

Your morning coffee routine gets derailed when you spot that ugly silver streak across your porcelain sink—or worse, deep gouges marring your stainless steel basin from last night’s dinner disaster. Before you budget for a $500 replacement, know this: 95% of kitchen sink scratches are surface-level damage you can fix yourself in under an hour. Most “scratches” on porcelain are actually metal deposits from pans, while stainless steel scratches follow predictable grain patterns that respond to targeted polishing. This guide delivers exact, material-specific techniques to erase those eyesores using affordable products already in your garage or local hardware store. You’ll learn to identify your sink type, choose the right repair method, and implement foolproof prevention so your sink stays showroom-perfect for years.
Pinpoint Your Sink Material Before Touching Any Cleaner
Using the wrong scratch remover can turn minor damage into permanent etching. Your first move? Determine your sink material within 30 seconds using these field tests:
- Porcelain (enamel-coated cast iron/steel): Tap the sink with a spoon—it produces a deep thunk sound. Look for perfectly smooth, glass-like surfaces in white or colors. “Scratches” appear as silvery streaks (metal transfer) or hairline cracks exposing black/gray base material.
- Ceramic (fireclay/vitreous china): Feels noticeably thicker and heavier. Has a matte or satin finish rather than high gloss. Scratches show as dull, cloudy streaks rather than shiny marks.
- Stainless steel: Metallic sheen with visible parallel grain lines running front-to-back. Scratches either follow these lines (brushed finish) or cut across them (swirl marks). Run your fingernail perpendicular to the scratch—if it catches, it’s deeper than 0.002 inches.
Critical mistake to avoid: Never use steel wool or chlorine-based cleaners (like Ajax) on stainless steel—they cause irreversible pitting.
Erase Porcelain Sink Scratches Without Damaging the Glaze
Why That “Scratch” Is Actually Metal Transfer (And How to Remove It)
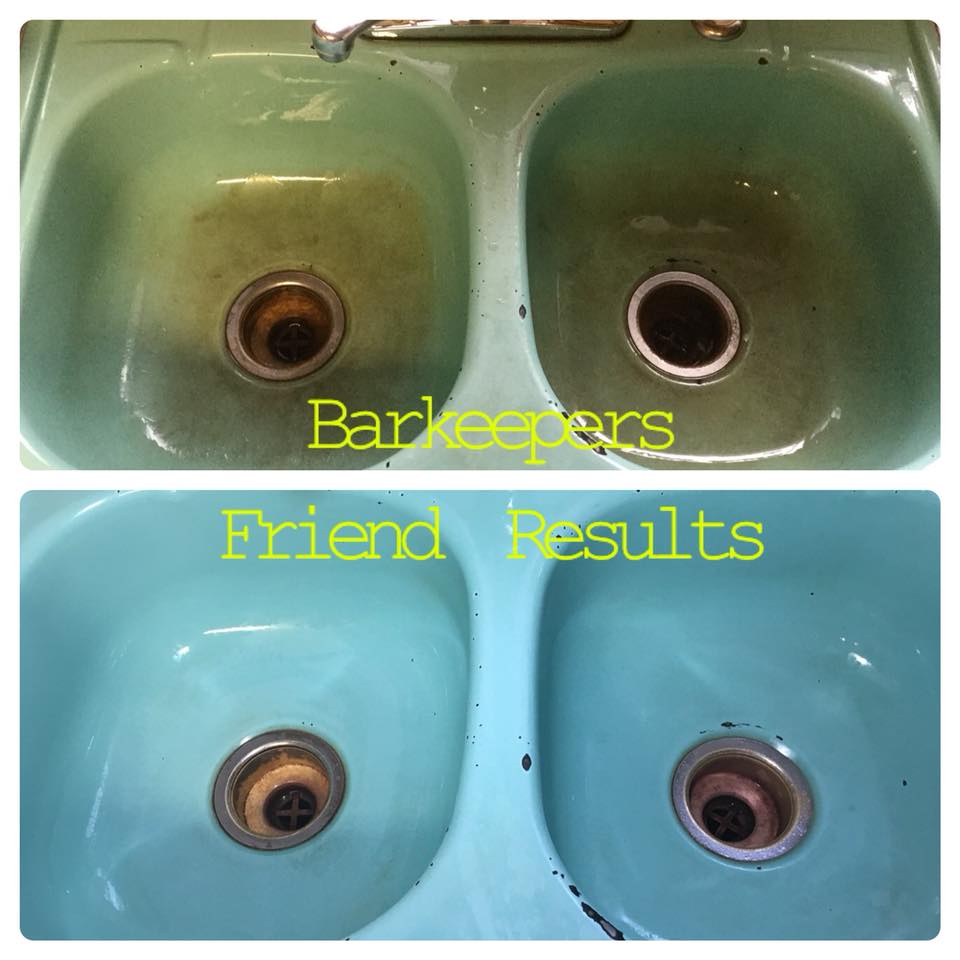
That silvery scar across your Kohler sink? It’s almost certainly metal from your pots and pans fused onto the enamel surface, not an actual scratch. True glaze damage exposes dark base material and feels rough to the touch. Metal transfer responds instantly to oxalic acid-based cleaners that dissolve the deposit without harming the finish.
Your 3-Product Porcelain Scratch Removal Kit
- Bar Keepers Friend Powder ($4): The non-negotiable hero—oxalic acid lifts metal while mild abrasives polish.
- Soft Scrub with Bleach ($3): Effective backup, but limit to 1-2 uses monthly (bleach dulls enamel over time).
- Baking Soda Paste (DIY): Mix 3 parts baking soda with 1 part water for gentle daily maintenance.
5-Minute Metal Transfer Removal Process
- Rinse sink thoroughly and dry the affected area
- Sprinkle BKF powder liberally over damp scratch
- Using a non-scratch sponge (blue Scotch-Brite), rub in small circles for 90 seconds—no heavy pressure needed
- Rinse immediately and inspect under angled light
- Repeat once if faint marks remain
Pro tip: For stubborn marks, leave BKF paste overnight before scrubbing. Never let it dry completely—it can micro-etch new porcelain sinks.
Fixing True Porcelain Scratches (Exposed Base Material)
For deep scratches revealing black/gray metal:
1. Lightly sand with 600-grit wet/dry paper (keep surface wet)
2. Apply epoxy filler from a Homax Porcelain Repair Kit ($15)
3. Cure 24 hours, then wet-sand flush with 1200-grit paper
4. Polish with carnauba wax for seamless blending
Stainless Steel Scratch Repair: From Gouges to Mirror Finish
Match Your Scratch Type to the Exact Repair Method
| Scratch Severity | Depth | Your Fix | Time Required |
|---|---|---|---|
| Superficial swirls | <0.001″ | Autosol polish + microfiber | 10 minutes |
| Brushed-grain scratches | Medium | 800→1200 grit sanding | 30 minutes |
| Deep gouges | >0.002″ | 400→2000 grit progression | 60 minutes |
Key insight: Always work with the grain direction (usually front-to-back). Sanding across the grain creates more damage.
Stainless Steel Scratch Removal in 6 Steps
Prep: Mask countertops with painter’s tape to catch polish splatter.
- Deep-clean with Pink Stuff degreaser ($5) to remove oils
- Wet-sand deep scratches: Start with 400-grit paper (keep surface wet), sanding along grain until scratch flattens
- Progress through grits: 600 → 800 → 1000 → 1200, feathering 1.5 inches beyond each previous pass
- Apply Autosol polish: Use foam pad on battery drill at 1000 RPM—work 1-foot sections until compound turns black
- Buff residue with clean microfiber cloth
- Seal with mineral oil: Wipe surface with oil-dampened cloth to restore brushed finish
Shortcut for light scratches: Skip sanding—apply Autosol directly with microfiber using firm pressure for 2 minutes.
Prevent Future Scratches With These Daily Habits
Porcelain/Ceramic Protection Protocol
- Wax religiously: Apply carnauba car wax ($10) every 3 weeks to the basin (monthly for apron fronts). Reapply when water stops beading.
- Immediate acid rinse: Flush tomato sauce, coffee, or vinegar spills within 2 minutes—they etch enamel over time.
- Never use: Steel wool, bleach, or abrasive powders—they strip protective layers.
Stainless Steel Defense System
- Sink grids are non-negotiable: Rubber-coated grids ($8) prevent 90% of new scratches from pots and pans.
- Wipe with the grain: Always use microfiber cloths moving front-to-back—never circular motions.
- Monthly polish: Spray Therapy Stainless Steel Cleaner ($12), then buff with dry microfiber for invisible protection.
Troubleshooting: When DIY Fixes Fail
Fingernail catches deeply? If your nail snags and exposes grey metal, the scratch exceeds 0.002 inches—call a pro ($150-$250 for stainless refinishing).
Rust spots after repair? Indicates low-grade steel. Apply Bar Keepers Friend paste, wait 5 minutes, then rinse thoroughly.
Shiny patch on brushed finish? You over-polished. Blend the area outward using 1200-grit paper along the grain, then re-polish.
Scratch Removal Cost Breakdown (2024 Prices)
You’ll spend $55 max for a permanent scratch-removal kit that handles all sink types:
– Bar Keepers Friend ($4)
– Autosol metal polish ($9)
– 8-piece sandpaper assortment ($12)
– 3 polishing pads ($15)
– Therapy Stainless Cleaner ($14)
– Carnauba wax ($10)
Skip expensive “sink repair kits”—this universal toolkit handles porcelain, ceramic, and stainless steel.
When to Call Professionals (And When to DIY)
DIY confidently for:
– All porcelain metal transfer
– Stainless scratches under 0.002″ deep
– Chips smaller than a dime
Call a pro ($150-$500) when:
– Porcelain exposes black base material over 1/4 inch wide
– Stainless steel scratches catch your fingernail deeply
– Your sink has a warranty (like Ruvati’s) that voids with sanding
Final reality check: Replacing a sink costs $300-$2,000 including installation. For less than $60 and one weekend hour, you can restore your sink to near-new condition using techniques trusted by kitchen remodelers. Start with the gentlest method for your material—most “scratches” vanish with the first Bar Keepers Friend application. Then implement the waxing and sink-grid habits that keep your sink looking flawless for years. That pristine finish you thought was gone forever? It’s just one polish away.

