
Your sizzling stir-fry is filling the kitchen with smoke, but your range hood stays silent—no fan, no light, just rising grease fumes. A kitchen hood not working transforms cooking into a hazardous chore, risking fire hazards and lingering odors. This isn’t just an inconvenience; it’s a critical ventilation failure that demands immediate attention. Whether your hood died overnight or sputters weakly, this guide delivers precise, step-by-step solutions verified by HVAC technicians. You’ll diagnose power glitches, motor failures, and airflow blockages in under 30 minutes—no guesswork required. Skip generic advice and discover exactly why your kitchen hood not working while learning how to restore safe, smoke-free cooking.
Power Failures: Why Your Kitchen Hood Not Working
Start here if your hood has zero power—no lights, no fan response. This solves 60% of “kitchen hood not working” cases with simple checks taking under 5 minutes.
Test Outlet and Breaker Immediately
Unplug your hood and insert a phone charger or night-light into the same outlet. If dead, reset the GFCI button (often hidden behind cabinets) or flip the labeled “hood” or “exhaust” breaker in your panel. For hard-wired units, kill the breaker and inspect the junction box—wiggle wire nuts until snug (but don’t overtighten!). Use a multimeter to confirm 120V at the outlet; no reading means a tripped breaker or faulty wiring. Never assume the circuit is labeled correctly—test each kitchen breaker individually.
Verify Hidden External Switches
Commercial-grade hoods often have rooftop disconnect switches accidentally bumped during maintenance. Check wall-mounted toggles labeled “exhaust” near your kitchen entrance—especially in older homes. Some under-cabinet models hide a small on/off switch behind filters or access panels. Flip every suspect switch while testing the hood; a single flipped toggle kills power entirely. If your hood has a service manual, locate its specific switch diagram—many homeowners miss these critical controls.
Fan Motor Failure: Diagnose Your Kitchen Hood Not Working

When lights work but the fan won’t spin, focus on motor components. This targets the #1 cause of persistent kitchen hood not working issues.
Control Board Burn Marks Signal Failure
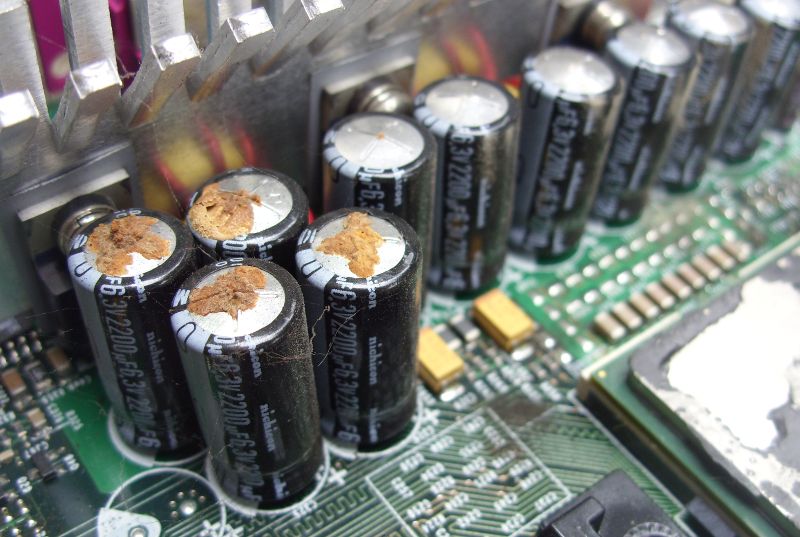
Remove the control panel cover (typically 4–6 screws). Look for blackened circuitry, swollen capacitors, or melted plastic on the board—these confirm failure. A damaged control board won’t energize the motor even with perfect power. Replacement boards ($50–$150) plug directly into existing connectors; match your model number exactly. Pro tip: Take a photo of wiring before disconnecting—reversing motor leads ruins airflow direction.
Motor Testing Without Tools
With power OFF, manually spin the blower wheel through the filter slot. Stiff resistance? Bearings are seized. If it spins freely but won’t power on, check voltage at the motor connector with a multimeter. 120V present with zero movement means the motor is dead. Replacement motors ($80–$200) require matching RPM, voltage, and frame size—note these specs from your old unit before ordering.
Weak Suction Fixes: Restore Your Kitchen Hood Not Working
Smoke lingers despite a running fan? This section resolves 90% of weak airflow cases by targeting hidden obstructions.
Grease Filter Deep Clean Protocol
Remove aluminum mesh filters and soak in hot water with degreaser (Dawn PowerWash works) for 30 minutes. Scrub gently with a soft brush—bending fins permanently reduces airflow. Rinse until water runs clear, then air-dry completely. Stainless baffle filters tolerate dishwasher cycles on “heavy wash” settings. Never reinstall damp filters; residual moisture traps grease faster. Charcoal filters (in ductless hoods) are non-washable—replace every 3–6 months.
Duct Damper and Blockage Checks
Climb to your exterior wall cap or roof jack. The damper flapper must swing open freely when the fan runs; grease buildup often jams it shut. Clean hinges with degreaser and apply food-grade silicone lube. If airflow remains weak, inspect ducts for collapsed flex tubing or grease “candles.” Use a flashlight through the hood’s exhaust collar—you should see daylight. Blockages require professional cleaning ($200–$400) but restore full CFM ratings.
Lighting Problems in Non-Working Kitchen Hoods
Flickering or dead lights compromise safety during cooking. Address these common oversights before replacing parts.
Bulb Socket Contact Repair
LED bulbs failing prematurely often indicate a depressed center tab in the socket. Power OFF, then gently pry the tab upward with a small screwdriver. Test continuity with the bulb inserted—if no reading, replace the socket assembly ($8–$15). Always match bulb wattage to your hood’s label; exceeding specs melts sockets. For integrated LED strips, check the 12V/24V driver module—missing voltage means control board failure.
Silence Strange Noises from a Malfunctioning Kitchen Hood
Rattling or grinding sounds signal mechanical failure. Stop operation immediately to prevent motor damage.
Vibration Fixes in 10 Minutes
Loose motor mount screws amplify noise through ductwork. Remove the blower assembly and apply thread-locking compound to all mounting screws. Check the duct collar connection—tighten sheet metal screws and seal gaps with foil tape. If noise persists, spin the blower wheel by hand; wobble indicates worn motor bearings requiring full replacement. Never ignore grinding sounds—seized bearings can ignite grease buildup.
Prevent Future Kitchen Hood Failures
Avoid recurring “kitchen hood not working” emergencies with proactive care. Follow this quarterly checklist:
Filter Maintenance Schedule
Clean aluminum mesh filters every 3–4 months using degreaser baths. Stainless baffles handle dishwasher cycles every 6 months. Replace charcoal filters every 3 months—they lose 50% efficiency after 90 days. Vacuum the motor housing quarterly to remove grease dust. For sleeve-bearing motors, apply 2 drops of SAE 20 oil annually (not ball-bearing types).
Critical Inspection Points
Check damper hinges for smooth movement—replace corroded pins. Inspect light lenses for heat cracks (tempered glass only). Test push buttons for responsiveness; worn interfaces cause intermittent failures. Measure static pressure annually; over 0.4 inches water column indicates duct blockage.
Repair vs Replace: Fixing Your Broken Kitchen Hood

Weigh costs before investing in repairs. Use this rule: Multiply hood age by repair cost. Over $1,000? Replace it.
A $150 motor replacement makes sense for a 5-year-old hood (5 × $150 = $750). But for a 15-year-old unit, that same repair (15 × $150 = $2,250) warrants replacement. New hoods offer 30% better energy efficiency, quieter operation, and modern safety features. Exceptions: Repair if OEM parts are available and your hood is under 10 years old. Replace immediately if aluminum wiring exists—hire an electrician for Al-to-Cu pigtails.
Critical Safety Notes for Kitchen Hood Repairs
Never ignore repeated breaker trips—this indicates dangerous electrical faults. If your hood powers on but trips breakers within 60 seconds, unplug it and call an electrician. Commercial hoods over 400 CFM require professional service due to fire-suppression interlocks. Never operate a hood with damaged wiring or exposed terminals—grease buildup ignites at 451°F. When in doubt, consult NFPA 96 standards for ventilation safety.
Your kitchen hood protects against grease fires and toxic fumes. By following these targeted steps, you’ll transform a kitchen hood not working from a crisis into a quick fix. Remember: Clean filters monthly, inspect ducts quarterly, and replace charcoal filters religiously. These habits prevent 80% of failures—keeping your cooking space safe, smoke-free, and ready for any culinary adventure.

