
Your kitchen deserves consistently perfect rice without the guesswork—and mastering how to use Bella rice cooker correctly makes that possible. Too many home cooks battle mushy grains or burnt bottoms because they skip critical setup steps or misjudge water ratios. Whether you just unpacked your first Bella or have been wrestling with inconsistent results for months, this guide eliminates the frustration. You’ll discover why your rice sticks, the exact water measurements for every grain type, and the resting technique professional chefs rely on. Let’s transform your appliance from confusing countertop clutter into your most reliable kitchen workhorse.
The secret isn’t luck—it’s understanding your Bella’s unique design. Unlike stovetop methods, these cookers use thermostatic sensors that detect moisture levels to switch automatically to warm mode. But they demand precise rice-to-water ratios and proper maintenance. Get these right, and you’ll serve restaurant-quality jasmine rice in 20 minutes or hearty quinoa bowls with zero monitoring. Skip a step? You’ll face overflow disasters or cement-like grains. This guide covers every detail from unboxing to troubleshooting, so you never waste another cup of rice.
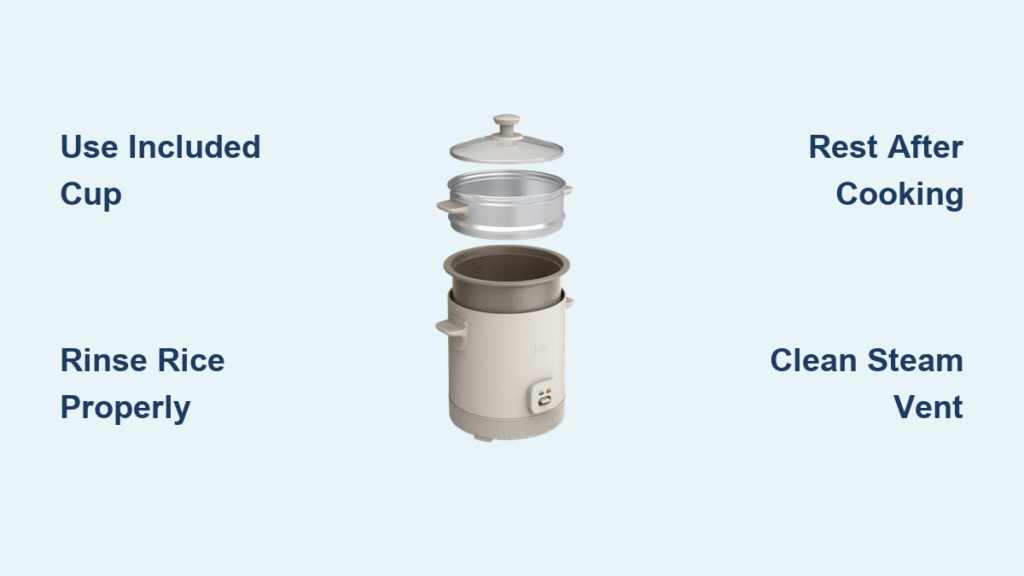
First-Time Bella Setup Guide
Unbox Your Cooker Correctly
Start by removing every trace of factory packaging. Peel protective films from the non-stick inner pot, discard steam vent covers, and extract cardboard inserts—leaving these in place risks melting or burning during operation. Never skip this step, as residue can permanently damage surfaces. Next, wash all removable components: the inner pot (using only soft sponges to avoid scratches), steam vent cap, condensation collector cup, rice paddle, and the included measuring cup. Crucially, wipe the heating plate with a damp cloth only—never submerge the base unit. This prevents electrical hazards while eliminating manufacturing oils.
Run Your First Water Cycle
Fill the inner pot to the 3-cup water line with plain cold water. Place it firmly on the heating plate, close the lid until it clicks, plug in the unit, and press COOK. Let it complete the full cycle (including the automatic switch to WARM mode), then discard the water. This critical step burns off residual manufacturing compounds that could taint your first rice batch. It also conditions the non-stick coating for optimal performance. Skipping this risks metallic-tasting rice and uneven heating—don’t rush to cook actual grains until you’ve completed this test run.
Measure Rice Like a Pro

Use the Bella Measuring Cup
Your Bella’s included cup holds exactly 6 ounces (180ml), nearly 20% smaller than standard US cups. This isn’t an error—it’s precision engineering. Using a regular measuring cup throws off water ratios immediately, guaranteeing mushy or undercooked rice. Always level rice with a knife’s edge; never pack or compress grains. For meal preppers: pre-portion dry rice in labeled containers using this cup for instant access. One cup of uncooked rice yields roughly two cups cooked, so adjust portions based on your model’s capacity markings (3-cup models max at 1.5 cups dry rice).
Perfect Rice-to-Water Ratios
White Rice (Jasmine/Basmati)
Use 1.5 cups water per 1 cup dry rice. Fill precisely to the “1” line inside your pot—no eyeballing. Level rice first, then add water slowly to avoid disturbing the surface. For sushi rice, reduce to 1.25 cups water and rinse until water runs crystal clear to remove excess starch. Brown rice demands 2 cups water per cup dry grain due to its fibrous bran layer, requiring 35-45 minutes total. Wild rice blends need 2.5 cups water. Always measure after rinsing and draining—excess surface water alters ratios.
Step-by-Step Cooking Process
Prepare Your Rice Properly
Place measured rice directly in the inner pot. Cover with cold water, swirl gently with clean fingers for 10 seconds, then drain the cloudy liquid through the steam vent. Repeat 2-3 times until water is mostly clear—this prevents gummy texture. Skip rinsing for risotto rice only. For fluffier results, soak white rice 20-30 minutes (brown rice 30-45 minutes) to reduce cooking time and improve texture. Never use hot water during rinsing—it starts starch gelation prematurely.
Start Cooking Sequence
After adding water to the correct line, place the inner pot squarely on the heating plate—it must sit flat to distribute heat evenly. Close the lid until it audibly clicks. Plug in the unit (the power light should glow), then press COOK. Never open the lid during cooking—releasing steam adds 5-10 minutes to cook time and creates uneven results. Watch for the automatic switch to WARM mode (marked by a distinct click); this signals completion.
Complete and Rest Properly
Let rice rest 10-15 minutes after the WARM light activates—this redistributes moisture, preventing soggy bottoms and dry tops. Skipping this causes 90% of “failed” batches. Fluff gently with the rice paddle using downward cutting motions (not stirring), which separates grains without crushing them. Serve immediately or leave on WARM for up to 12 hours. For meal prep, spread cooled rice in a thin layer before refrigerating to maintain texture.
Fix Common Rice Problems

Why Your Rice Is Mushy
Mushy rice means too much water or inadequate draining after rinsing. Next time, reduce water by 2-3 tablespoons and drain rice thoroughly in a fine-mesh strainer for 30 seconds post-rinsing. Older rice (over 1 year) absorbs less water—use fresher grains if adjustments fail. For immediate salvage, spread rice on a baking sheet and bake at 300°F for 10 minutes to evaporate excess moisture.
Solve Dry, Undercooked Rice
Hard centers signal insufficient water or old rice. Next batch, add 2-3 extra tablespoons of water. If using aged grains, increase water by ¼ cup per cup of rice. Critical: Always measure water after rice is leveled in the pot—adding water before measuring rice throws off ratios. For brown rice that’s still crunchy, restart the COOK cycle after adding 2 tablespoons water (do not open frequently).
Cook Beyond Rice
Transform Into Multi-Grain Cooker
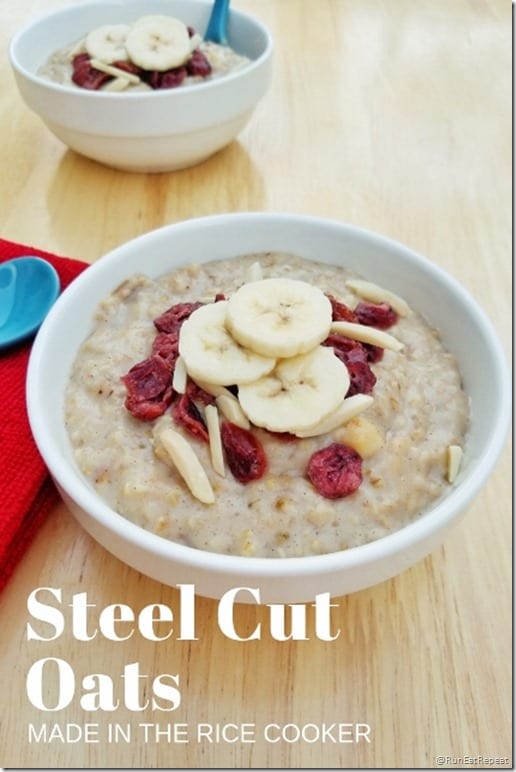
Your Bella handles grains beyond rice with simple ratio swaps: Quinoa (1:2 ratio, 15 minutes), steel-cut oats (1:3 ratio, stir once at 15-minute mark), and pearled barley (1:2.5 ratio, 40-45 minutes). For mixed grains like rice-quinoa blends, use the water ratio for the longest-cooking component. Always rinse quinoa thoroughly to remove bitter saponins. Avoid red lentils—they disintegrate quickly; use green lentils instead at 1:2 ratio.
Master One-Pot Meals
Layer ingredients strategically: Add rice and water first, then place pre-cooked proteins like chicken or tofu on the steam tray. Add quick-cooking veggies (broccoli, zucchini) during the last 10 minutes by briefly lifting the lid—this prevents overcooking. For soups, use 1 extra cup water and add broth instead of plain water. Never exceed the MAX line, or overflow will damage the heating element.
Clean Your Bella Properly
Daily Cleanup Routine
Unplug and cool completely before cleaning—never handle a warm unit. Remove the inner pot and wash with mild soap and a soft sponge (no steel wool!). Wipe the heating plate with a damp cloth only; submerging it causes electrical failure. Soak the steam vent cap in warm water for 5 minutes to dissolve clogs, then rinse. Empty the condensation collector daily to prevent mold. Never immerse the base unit in water—this voids warranties and creates shock hazards.
Deep Clean Monthly
Run a descaling cycle every 2-3 months: Fill the pot with equal parts water and white vinegar to the 3-cup line, run a full COOK cycle, then discard and rinse. For stubborn stains, soak the inner pot in warm water with 2 tablespoons baking soda for 30 minutes before washing. Check the steam vent weekly—if steam output weakens, clean the cap with a toothpick to remove starch buildup.
Safety Rules That Matter
Never operate your Bella empty—this permanently damages the heating element. Always place it on a dry, heat-resistant surface away from sinks. The exterior gets dangerously hot during operation—use oven mitts when handling the inner pot. Supervise children closely; the steam vent releases scalding vapor. Never wrap the power cord tightly—this frays wires over time. Store with the lid slightly ajar to prevent musty odors from trapped moisture.
Choose Correct Capacity
3-cup models (yields 6 cups cooked) suit singles or couples. 6-cup units (12 cups cooked) feed small families. 10-cup versions (20 cups cooked) handle dinner parties. Exceeding MAX capacity causes overflow disasters—rice expands 2-3x during cooking. Always leave 1 inch of space below the pot’s rim. For large batches, cook in stages rather than overfilling; quality trumps quantity.
Time-Saving Secrets
Pre-portion dry ingredients in freezer bags using your Bella cup for instant access. Substitute broth for water to add gourmet flavor with zero extra effort. Cook double batches—reheat leftovers in the microwave with 1 tablespoon water per cup of rice. Batch-cook mixed grains (rice + quinoa) for varied textures without extra work. Pro tip: Freeze rice in 1-cup portions for lightning-fast fried rice.
Mastering how to use Bella rice cooker transforms tedious kitchen chores into effortless wins. Start with perfect white rice using the exact 1:1.5 ratio, then experiment with grains and one-pot meals. Remember: consistent results come from precise measurements, proper rinsing, and that non-negotiable 15-minute rest. Clean the steam vent monthly, never skip the initial water cycle, and always use the included cup. Within weeks, you’ll wonder how you ever cooked rice any other way—your appliance is now a true kitchen ally, ready to deliver flawless results at the push of a button.

