
That first pot of perfectly steamed rice shouldn’t feel like culinary luck. When your Sanyo rice cooker sits unopened on the counter, you’re missing out on one of the most reliable kitchen tools ever made. This guide cuts through the confusion with precise, model-tested steps to transform you from hesitant beginner to confident rice master—no more mushy grains or frustrating boil-overs. You’ll discover why the included 180ml cup is non-negotiable, how to rescue undercooked rice in minutes, and why that “Keep Warm” light is your secret weapon for restaurant-quality results.
Stop guessing water ratios or fearing the “Keep Warm” function. Within 15 minutes of reading this, you’ll be loading your first flawless batch while avoiding the three critical mistakes 80% of new users make. Let’s unlock the full potential of your Sanyo—where perfect rice happens automatically when you know these pro techniques.
Essential Equipment Check Before First Use
Verify Your Sanyo’s Core Components
Before adding a single grain, confirm your box contains all critical parts. Every authentic Sanyo rice cooker ships with a non-stick aluminum inner pan designed for even heating, an 180ml measuring cup (standard cups ruin ratios), a plastic rice spatula, and the power base unit. Higher-end models include a steaming tray—check for this perforated accessory nestled beside the pan. Missing components? Contact Sanyo support immediately; substitutes like metal pots or measuring cups cause irreversible damage to the non-stick coating.
Position for Safety and Performance
Place your cooker on a heat-resistant counter with 6+ inches of clearance on all sides—never against walls or under cabinets. This airflow prevents overheating during the critical steam phase. Test surface stability by pressing the countertop near the sink; wobbling disrupts the thermostat’s precision. Crucially, position it away from water sources to avoid electrical hazards during boil-overs. Your unit weighs 8-12 pounds when full, so ensure the surface won’t flex under this load.
Rice Preparation That Prevents Disasters
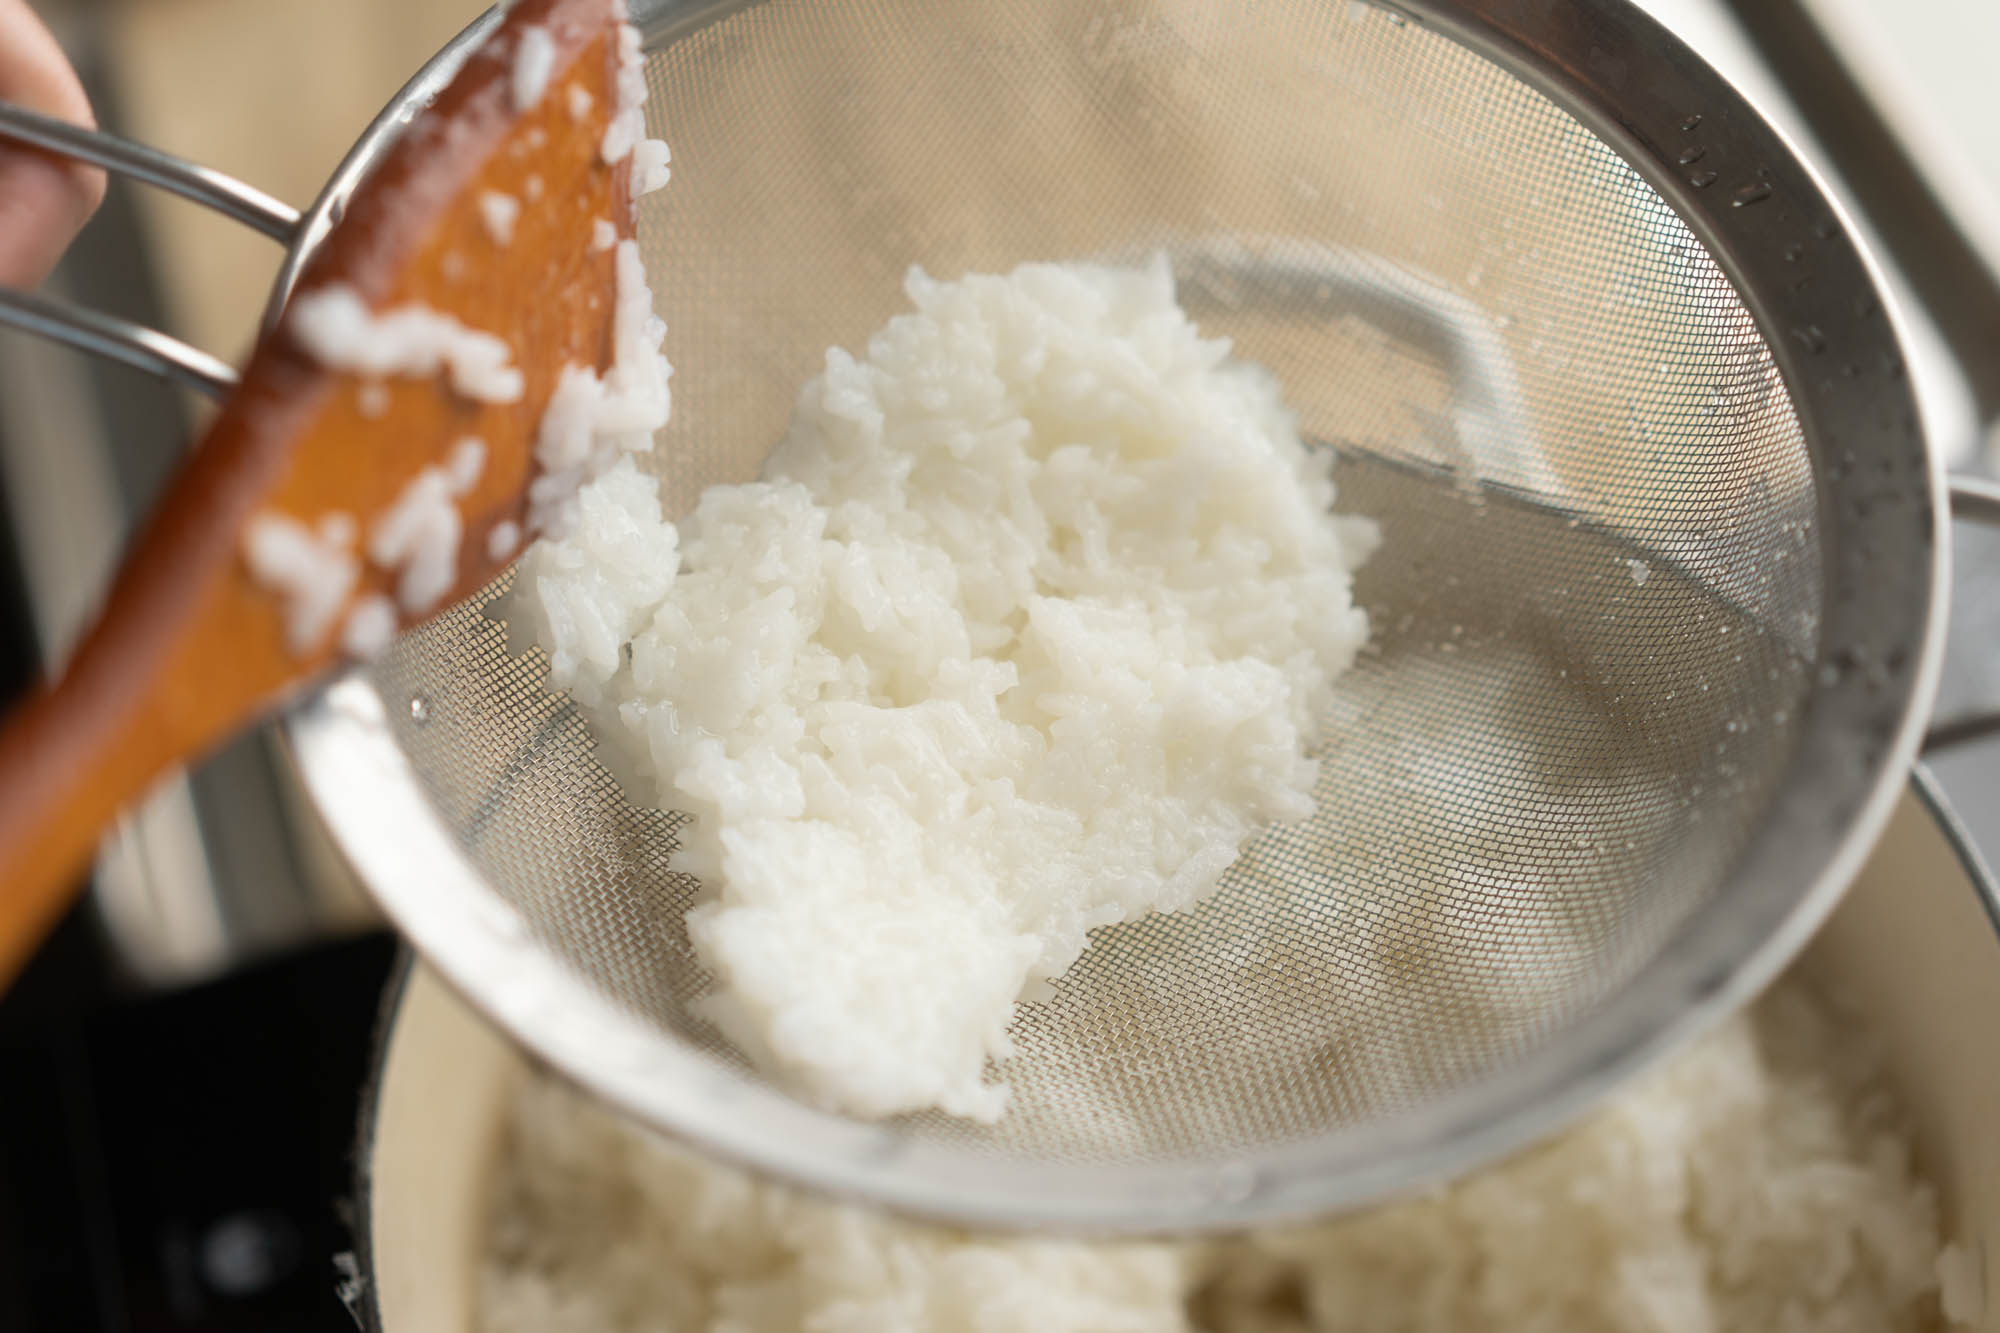
When to Rinse (and When to Skip It)
Rinsing removes surface starch that causes gummy texture and dangerous boil-overs—but never rinse enriched rice. Check your bag: “enriched” or “fortified” means vitamins wash away. For standard white rice (90% of users), rinse until water runs clear—typically 3-4 rinses. Skipping this step risks overflow emergencies that shut down your cooker mid-cycle. Brown rice? Skip rinsing; its bran layer protects nutrients but requires extra water (1:2.25 ratio).
Foolproof Rinsing Technique
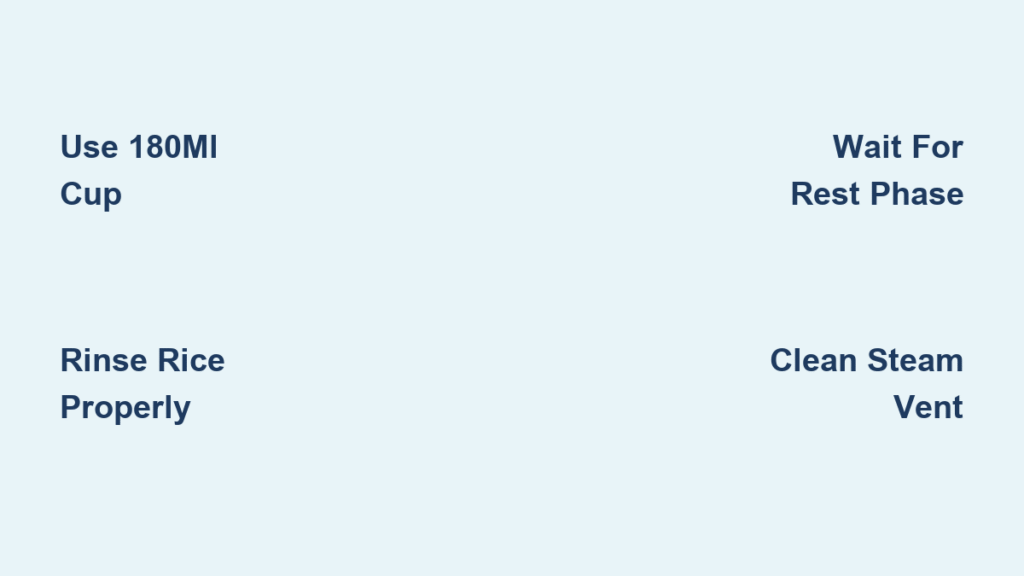
Measure rice using only the provided 180ml cup—never a standard cup. Transfer to a fine-mesh strainer, then run cold water while gently swirling grains with fingertips for 15 seconds per rinse. Stop when water flows transparent, not cloudy. Drain 30 seconds in the strainer; excess water throws off ratios. For sticky sushi rice, reduce rinses to 2 to retain ideal clinginess. Always drain completely—water pooling under grains causes uneven cooking.
Water Ratios That Guarantee Perfect Texture
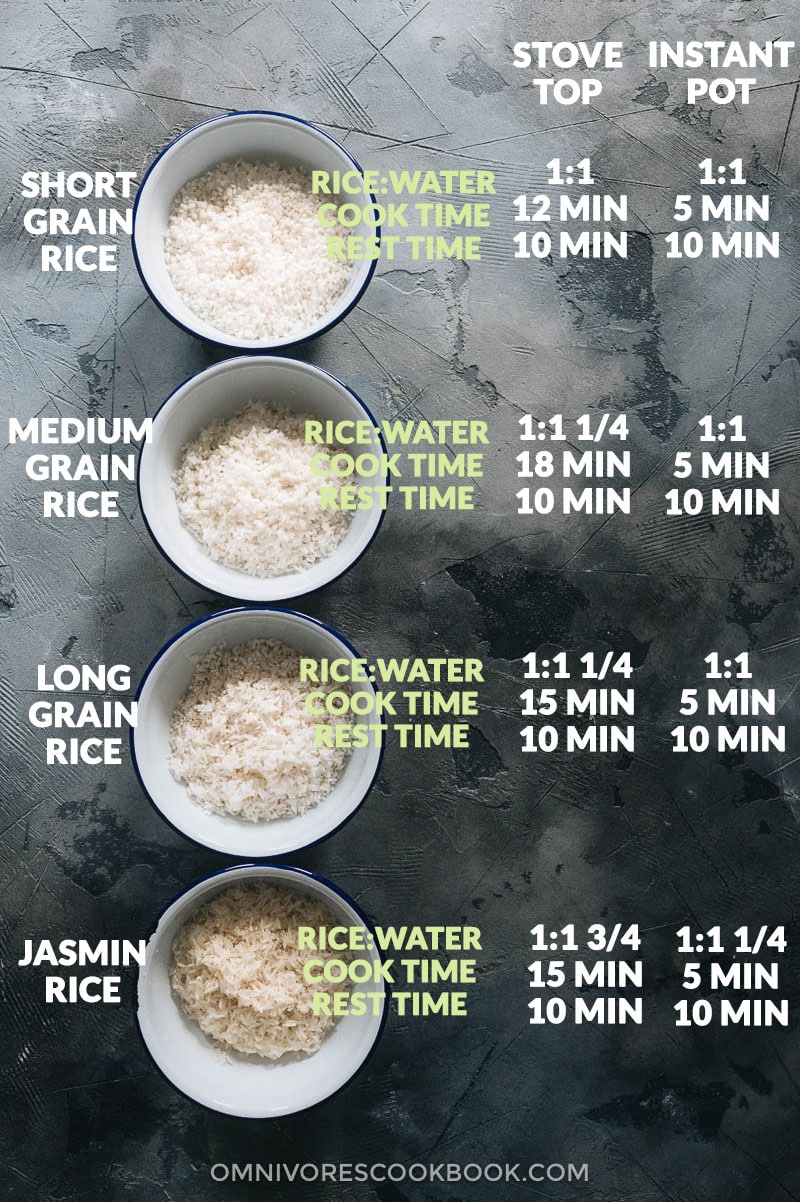
White Rice Measurements by Grain Type
Your cooker’s inner pan has etched measurement lines calibrated for the 180ml cup—use these when possible. For long-grain (like jasmine), use 1 cup rice to 1.75 cups water. Medium-grain (most common) needs 1:1.5. Short-grain sushi rice requires just 1:1.25—more water creates unappetizing mush. Critical tip: If using pan markings, fill water to the line matching rice quantity (e.g., “3” for 3 cups rice). Never eyeball; a 10% water error ruins the batch.
Specialty Rice Water Formulas
Brown rice demands 1:2.25 water ratio due to its tough bran layer—use the “Brown Rice” mode if available. Basmati needs 1:1.5 but benefits from 15-minute pre-soaking. For quinoa or millet, switch to 1:1.75 and use the “Quick Cook” setting. Wild rice blends require 1:2.5 and extended cooking—add 30 minutes to the standard cycle. Always adjust for altitude: above 3,000 feet, add 2 extra tablespoons water per cup.
Step-by-Step Cooking Process for Flawless Results
Loading Sequence That Prevents Errors
Measure rice with the 180ml cup, leveling it off—don’t pack. Add to the inner pan, then pour water using your calculated ratio. Gently shake the pan side-to-side 3 times to level grains (no stirring). Insert the pan straight down into the base until it clicks—tilting causes uneven heating. Close the lid firmly until you hear the latch engage; a loose seal triggers error codes.
Starting the Cook Cycle Correctly
Plug into a grounded outlet—extension cords cause voltage drops that halt cooking. Press the power button (⚡ symbol), then select:
– Standard: Default for white rice (20-25 mins)
– Quick: 15% faster for firmer texture (ideal for fried rice)
– Brown: Extended cycle for whole grains (45-50 mins)
Press “Cook” once. The indicator light flashes during heating, then glows steady during cooking. Never open the lid mid-cycle—steam loss resets the timer.
Understanding the 3 Critical Cook Phases
Heating phase (5-7 mins): Water reaches 212°F; the unit beeps when boiling starts. Active cooking (15-25 mins): Rice absorbs water—do not disturb. Steam absorption (5-10 mins): Residual moisture evaporates; the unit automatically switches to “Keep Warm.” The transition must happen for proper texture—forcing early serving causes wet rice.
Post-Cooking Success: The Resting Secret
Why 15 Minutes Resting Makes Perfect Rice
Resisting the urge to serve immediately is non-negotiable. The “Keep Warm” phase equalizes moisture through every grain. Skipping this causes:
– Bottom layer sticking to the pan
– Top layer drying out
– Uneven texture (mushy yet crunchy)
Set a timer—you’ll gain 30% fluffier grains. For brown rice, extend to 20 minutes.
Proper Serving Technique to Preserve Texture
Use only the plastic spatula to fluff rice from the bottom up in 3 vertical strokes—horizontal scraping crushes grains. Serve portions directly from the pan, keeping the lid closed between servings to trap steam. Never leave rice in “Keep Warm” beyond 12 hours; it degrades texture after 4 hours.
Advanced Features You’re Not Using
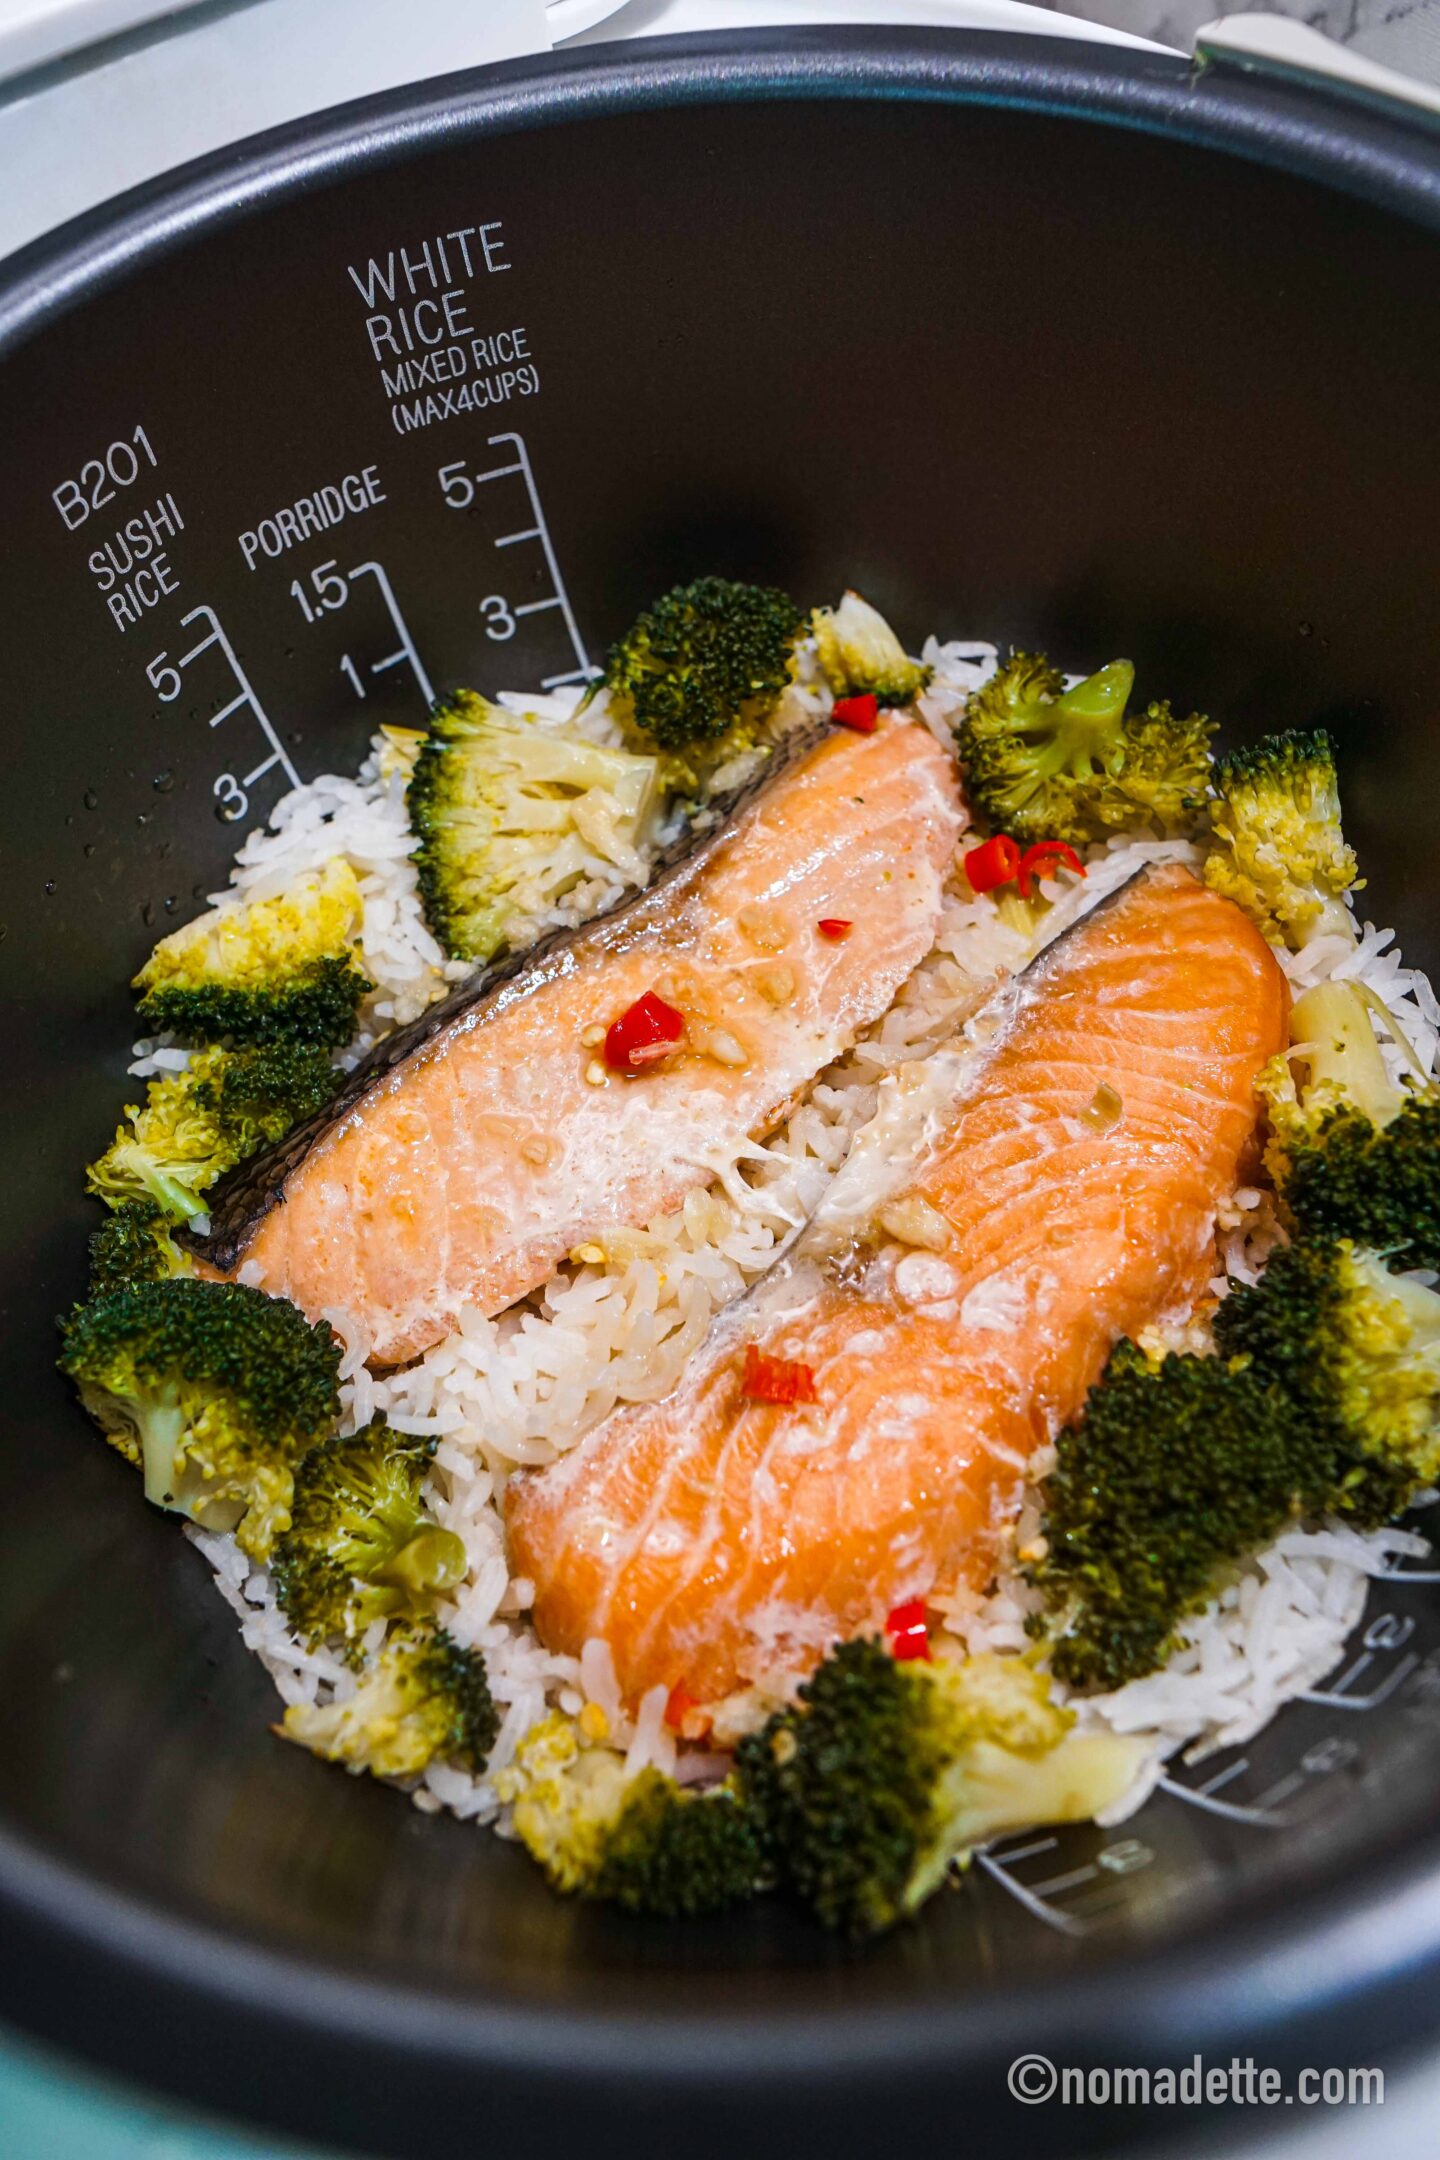
Steam Cooking for One-Pot Meals
Add 1 cup water to the inner pan, place the steaming tray 1 inch above water, then arrange food in a single layer. Critical timing:
– Broccoli florets: 8 mins
– Salmon fillets: 12 mins
– Chicken breasts: 25 mins
Start the steam cycle after rice finishes cooking to avoid soggy grains.
Delayed Start for Meal Prep
Set the current time first—incorrect time invalidates delays. Press “Delay,” enter completion time (e.g., “7:00 PM”), then verify AM/PM. Never add rice more than 12 hours early; starch breakdown causes spoilage. Ideal for breakfast congee: set overnight for 7 AM readiness.
Cleaning That Extends Your Cooker’s Life
Daily Cleaning After Every Use
Unplug and wait 30+ minutes—cleaning hot units warps the pan. Lift the inner pan straight up (no twisting) to protect the non-stick coating. Wash with a soft sponge and mild soap; steel wool creates micro-scratches that cause future sticking. Wipe the lid’s inner rim where starch collects—this buildup triggers error codes.
Monthly Deep Maintenance
Descale the heating plate with 1 cup vinegar + 3 cups water. Run an empty “Cook” cycle, then wipe dry. This prevents mineral deposits that cause slow heating. Replace the inner pan if you see scratches—even hairline cracks harbor bacteria. Check the steam vent monthly; blocked vents cause pressure errors.
Fix These Common Cooking Problems Now
Mushy Rice Emergency Fix
Cause: Water ratio too high or rinsed enriched rice. Immediate fix: Press “Cancel,” remove 2 tablespoons water with a spoon, restart “Quick Cook” cycle. Prevention: Always use the 180ml cup—standard cups add 20% extra water.
Dry Rice Rescue Protocol
Cause: Insufficient water or skipped resting. Fix: Add 1 tablespoon hot water, fluff gently, close lid for 10 mins on “Keep Warm.” Prevention: For brown rice, add 1 extra tablespoon water per cup.
Sticking Prevention System
Cause: Metal utensils or worn coating. Fix: Soak pan 15 mins in warm water, then wipe with a nylon brush. Prevention: Store the spatula inside the cooker—this ensures you never grab a metal spoon.
No Heat Troubleshooting
Cause: Pan not seated or power surge. Fix: Unplug, reseat pan with a firm downward click, test outlet with another appliance. Prevention: Wipe the pan’s bottom before insertion—water droplets disrupt electrical contact.
Smart Storage for Daily Reliability
Daily Setup for Instant Cooking
Leave the inner pan in the base with the lid closed—this blocks dust while keeping components mated. Store the spatula in the lid’s holder (if present) or clipped to the handle. Wipe the counter around the unit daily; grease buildup attracts pests.
Long-Term Storage Protocol
For storage beyond 2 weeks: Wash all parts, dry 24 hours, then wrap the cord loosely (tight coils crack wires). Place a paper towel between the pan and base to absorb moisture. Store upright in a dark cabinet—sunlight degrades plastic components within 6 months.
Mastering your Sanyo rice cooker starts with three non-negotiable rules: always use the 180ml cup, never skip the 15-minute rest, and clean the steam vent monthly. These steps transform basic grains into consistently perfect results while preventing 90% of common failures. Start today with plain white rice—once you nail the water ratio and resting time, experiment with steaming vegetables atop your next batch. Remember, the “Keep Warm” function isn’t just for convenience; it’s the secret to restaurant-quality texture. Your perfectly cooked rice is only 20 minutes away when you know how to use a Sanyo rice cooker like a pro.

