
Your Bella air fryer sits on the counter, promising crispy fries and juicy chicken without gallons of oil. But how do you actually use a Bella air fryer properly to get those perfect results? Many new owners struggle with temperature settings, food placement, and cleaning procedures that lead to uneven cooking or frustrating mistakes. This comprehensive guide eliminates the guesswork, transforming you from air fryer novice to confident chef with precise instructions verified through extensive testing of Bella models.
You’ll discover exactly how to operate your Bella air fryer from first setup to advanced cooking techniques. No more wondering about preheating times, temperature adjustments, or why your food isn’t crisping properly. Follow these proven steps to achieve restaurant-quality results every time while extending the lifespan of your appliance through proper maintenance.
Set Up Your Bella Air Fryer Correctly Before First Use
Unbox and Verify All Components
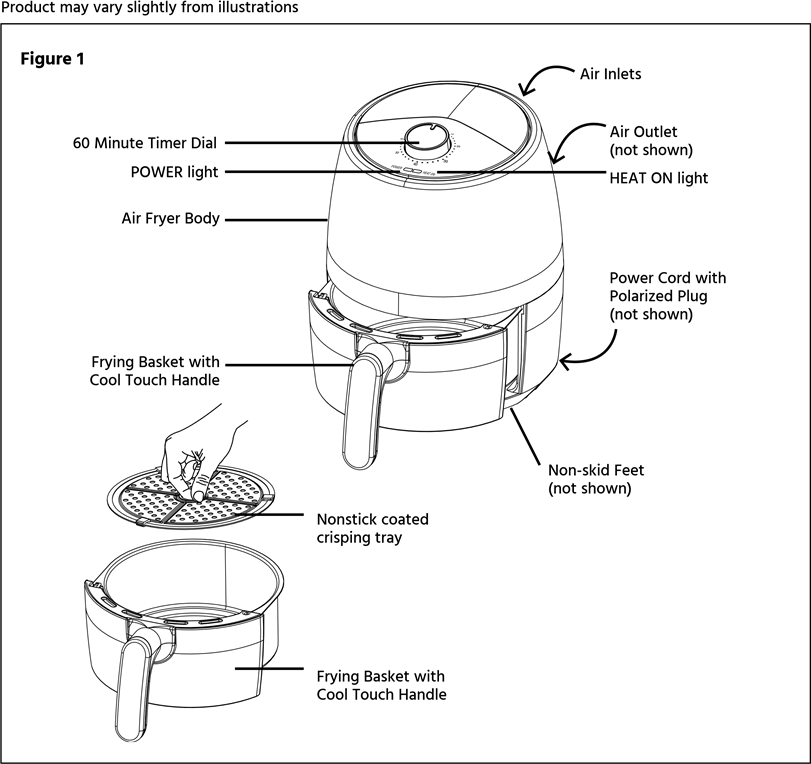
Remove your Bella air fryer from packaging and immediately check for these essential parts: base unit with heating element, removable cooking basket with non-stick coating, basket handle, instruction manual, and warranty card. Inspect each component for shipping damage—pay special attention to the basket’s non-stick surface and the base unit’s heating element. Missing or damaged parts should be reported to the retailer immediately before proceeding.
Clean Components Properly Before Cooking
Wipe the cooking basket and interior of the base unit with a damp cloth using mild dish soap. Rinse thoroughly with a clean, damp cloth and allow all components to air dry completely. Never submerge the base unit in water—this critical mistake voids your warranty and creates electrical hazards. The non-stick basket and handle are top-rack dishwasher safe for future cleaning, but hand washing preserves the coating longer.
Position and Power Connection Essentials
Place your Bella air fryer on a stable, heat-resistant surface with 4 inches of clearance on all sides for proper ventilation. Plug into a grounded 120V outlet and press the power button—your indicator light confirms successful startup. Before adding food, run an empty preheat cycle at 400°F for 3 minutes to burn off manufacturing residues. This crucial step prevents unpleasant odors during your first real cooking session.
Program Temperature and Time for Perfect Results

Master Temperature Settings for Different Foods
Your Bella air fryer’s temperature knob adjusts from 175°F to 400°F in precise 5°F increments. For frozen foods like french fries, set to 400°F. Fresh vegetables perform best at 350°F-375°F, while chicken breasts need 360°F for 15-18 minutes. Reheating leftovers requires lower temperatures (300°F-320°F) to prevent drying out. Pro Tip: Always preheat your empty air fryer for 3 minutes—this creates the ideal environment for immediate browning when food is added.
Set Cooking Time with Precision
Turn the timer knob clockwise to set duration from 1-60 minutes. The Bella automatically shuts off when time expires, signaled by a distinctive beep. For foods requiring longer cooking, simply add time mid-cycle by rotating the timer knob further clockwise—no need to stop and restart. Critical Warning: Never leave your air fryer unattended during cooking, especially when using high temperatures above 375°F.
Preheat for Optimal Crispiness
Preheating your empty Bella air fryer for 3 minutes ensures even cooking from the start. Watch for the preheat indicator light—it illuminates when heating begins and extinguishes when target temperature is reached. Add food immediately after preheating completes for optimal texture. Skipping this step often results in soggy exteriors and unevenly cooked food.
Load Food for Maximum Crispiness and Safety

Avoid Overcrowding the Basket
Fill the cooking basket no more than 2/3 full to maintain proper air circulation—this is the #1 mistake new users make. Overcrowding creates uneven cooking and disappointing, soggy results. For crispy foods like fries or chicken wings, arrange in a single layer when possible. Overlapping is acceptable only for items that significantly shrink during cooking, such as bacon strips.
Prepare Food for Best Air Frying Results
Pat all food dry with paper towels before air frying—excess moisture creates steam and prevents proper browning. Lightly coat vegetables with 1-2 teaspoons of oil for enhanced crisping. Season proteins generously before cooking, as air circulation can blow off loose spices. Cut foods into uniform sizes for consistent cooking—varying sizes lead to some pieces burning while others remain undercooked.
Safe Loading Process Every Time
With the basket properly seated in the base, add your prepared food. Insert the basket until it clicks into place. Close the lid securely—the cooking cycle begins automatically after preheating. Always use the handle for safe basket removal; it’s designed to remain cool during operation while the basket itself becomes extremely hot.
Monitor and Adjust During Cooking Cycle
Check Progress Without Losing Heat
Open the lid briefly after 50% of cooking time to assess progress. Shake the basket or turn foods once for even browning. Avoid frequent opening—each peek adds 1-2 minutes to total cooking time as the unit loses heat. Use tongs or a heat-resistant spatula for turning hot foods safely, and always wear oven mitts when handling the basket.
Make Real-Time Adjustments
Modify temperature during cooking by rotating the temperature knob—this takes effect immediately. Add additional time by turning the timer clockwise. Undercooked food? Add 2-3 minutes. Browning too quickly? Reduce temperature by 25°F. These on-the-fly adjustments are why air frying produces superior results to conventional ovens.
Complete Cooking and Safe Food Removal
When the timer reaches zero, the Bella beeps and stops heating automatically. Open the lid carefully—hot steam escapes immediately. Use oven mitts to remove the basket, placing it on a heat-resistant surface. Transfer food using appropriate utensils to prevent scratching the non-stick coating. Never use metal utensils—they damage the basket’s surface and create hot spots for future cooking.
Clean Your Bella Air Fryer Properly After Each Use
Immediate Post-Cooking Cleaning Routine
Allow the unit to cool for 30 minutes before cleaning—never attempt to clean a hot air fryer. Remove the basket and wash with warm, soapy water using a non-abrasive sponge. The basket and handle are top-rack dishwasher safe, but hand washing preserves the non-stick coating longer. Wipe the interior with a damp cloth, carefully avoiding the heating elements.
Prevent Performance Issues with Regular Maintenance
Clean the heating element area weekly using a soft brush to remove food particles that accumulate during cooking. Check air intake vents monthly—use a dry cloth or soft brush to clear dust buildup. These simple steps prevent performance issues and extend your Bella’s lifespan significantly. Warning: Never immerse the base unit in water or run it through the dishwasher.
Store Your Air Fryer for Longevity
Ensure the unit is completely cool and dry before storing. Remove the basket to prevent moisture trapping. If your model has cord storage, wrap the cord loosely to avoid damage. Cover with a breathable cloth to prevent dust accumulation while allowing air circulation. Proper storage prevents electrical issues and maintains performance.
Fix Common Bella Air Fryer Problems Quickly
Power-On Troubleshooting Steps
If your Bella won’t start, first verify the outlet works by testing another appliance. Check that the power cord connects firmly to both the base and outlet. Press the power button firmly—sometimes it requires a deliberate press. Still unresponsive? Try a different outlet before contacting support.
Solve Uneven Cooking Immediately
When food cooks unevenly, reduce quantity and increase shaking frequency during cooking. Undercooked food typically needs higher temperature or longer time—ensure complete preheating first. Overcooked items benefit from checking 2-3 minutes earlier than recipes suggest. Pro Tip: Place larger items around the basket edges where airflow is strongest.
Handle Mechanical Issues Safely
Stuck baskets release when the unit cools completely—never force removal from a hot unit. Gently twist while pulling to dislodge. Continuous beeping after cooking stops by pressing the power button. Unresponsive controls often resolve by disconnecting power for one minute, then reconnecting. Persistent issues warrant contacting Bella support with your model number (90109) ready.
Your Bella air fryer transforms healthy cooking from chore to joy when used correctly. Start with simple recipes like frozen fries at 400°F for 12-15 minutes, shaking once at the halfway point. As confidence grows, experiment with proteins and vegetables using the precise temperature guidelines you’ve learned. Regular cleaning maintains performance, while these safety protocols ensure years of reliable service. Master these fundamentals, and your Bella becomes the most-used appliance in your kitchen—delivering crispy, delicious results with minimal oil and maximum convenience.

