
That persistent creak under your coffee mug or the widening gap near the dishwasher isn’t just annoying—it’s your kitchen floor screaming for attention. Left unchecked, a single loose board can warp into a structural hazard, while a hairline tile crack invites moisture that rots subfloors from below. The good news? 95% of kitchen floor repairs can be tackled in a weekend with basic tools and the right diagnosis. Whether you’re wrestling with tenting ceramic tiles, buckling vinyl planks, or hardwood that groans with every step, this guide delivers exact fixes verified by flooring contractors. You’ll learn how to pinpoint the culprit, execute model-specific repairs, and prevent future damage—all without tearing out your entire floor.
Diagnose Your Floor’s Distress Signals
Why Your Hardwood Floor Squeaks Underfoot
Squeaks occur when nails loosen between boards and joists or subflooring pulls away. Walk slowly across problem zones wearing socks—if a board talks back within 6 inches of a wall, it’s likely a loose nail. If the noise happens mid-room, probe with a flashlight from the basement; visible gaps between subfloor and joists require shimming. Never ignore this: unaddressed squeaks accelerate wear and invite moisture infiltration.
How to Spot Dangerous Tile Buckling
Tenting tiles (edges lifting like a pyramid) mean expansion space was omitted around walls. Press down firmly—if the tile snaps back up, moisture is trapped underneath. For long cracks spanning multiple tiles, check appliances: a dripping dishwasher line often causes subfloor swelling directly beneath. Sniff near baseboards; musty odors confirm hidden water damage requiring immediate subfloor repair.
Vinyl Plank Swelling: The 24-Hour Emergency
Luxury vinyl planks that peak at seams indicate water seepage through click-lock joints. Measure the swell—if it’s over 1/8 inch high, shut off water to the fridge/dishwasher immediately. Peel-back tests reveal the culprit: lift a corner with a putty knife. Sticky residue points to sugary spills; damp subfloor means a plumbing leak. Delaying repair risks permanent delamination.
Execute Type-Specific Repairs
Ceramic Tile Crack Fixes That Last
Patch Hairline Cracks in 20 Minutes
Inject clear epoxy using a syringe until slightly overfilled. Wipe excess with acetone-dampened cloth. Critical step: place masking tape along both sides of the crack to prevent epoxy spread. After 24 hours, shave flush with a single-edge razor blade held at 45 degrees. For colored tiles, tint epoxy with artist’s oil paint (1 drop per 5ml).
Replace Cracked Tiles Without Demolishing the Floor
Score grout lines with an oscillating tool set to 3mm depth. Position cold chisel vertically in the crack and tap gently with a rubber mallet—never strike horizontally to avoid shattering adjacent tiles. Remove debris with a shop vac, then apply rapid-set thinset mortar. Press replacement tile into place, twisting slightly to ensure full adhesion. Weight with stacked books for 4 hours before regrouting.
Hardwood Floor Squeak Elimination

Silence Squeaks From Above (No Basement Access)
Drill two 1/16-inch pilot holes at opposing 45-degree angles through the board into the joist below. Drive 2-½-inch spiral flooring nails—stop 1/8 inch short of the surface to avoid splintering. Fill holes with color-matched putty stick melted with a heat gun. Pro tip: Sprinkle talcum powder over the squeak zone first; it highlights exact nail locations by settling into gaps.
Fix Gaps Wider Than a Nickel
For gaps exceeding 2mm, cut a spline (thin wood strip) to match your floor’s groove depth. Apply waterproof wood glue to the spline and slot it into the groove side of adjacent boards. Clamp lightly for 2 hours—excessive pressure cracks boards. Sand flush with 120-grit paper once dry. For seasonal gaps, use latex wood filler tinted with stain; it flexes with humidity changes.
Vinyl Plank Water Damage Control
Swap Swollen Planks in Under an Hour
Remove baseboards with a pry bar. Starting at the damaged zone, unclick planks by lifting at 30-degree angles—never pull straight up. Replace saturated underlayment with 2mm foam padding. When reinstalling, leave 3/8-inch expansion gaps at walls (not 1/4 inch) for kitchens’ extreme humidity swings. Reattach baseboards with finish nails every 16 inches.
Repair Peeling Sheet Vinyl Corners
Lift the loose edge no higher than 45 degrees to avoid tearing. Scrape old adhesive with a floor scraper until subfloor is bare. Apply vinyl seam sealer with a notched trowel, then roll with a 75-pound floor roller from center outward. Weight overnight with concrete blocks wrapped in towels to prevent indentations.
Subfloor Repair: The Non-Negotiable Foundation
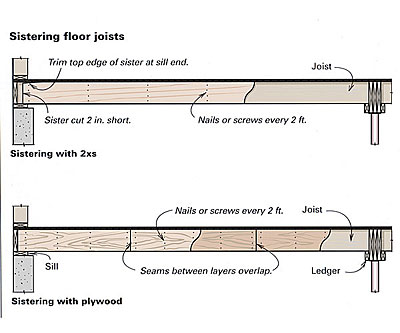
Sister Joists for Sagging Floors
If a joist sags more than 1 inch over 8 feet, cut a new 2×8 to match its length. Apply construction adhesive to the old joist’s side, then screw the new piece alongside with 3-inch structural screws every 12 inches. Critical detail: stagger screw patterns so no two screws align vertically—this prevents new stress points. Allow 24 hours for adhesive cure before reinstalling flooring.
Dry Rot Remediation Protocol
Cut out rotted plywood sections using a jigsaw with carbide-tipped blade. Extend cuts 6 inches beyond visible damage—rot often spreads invisibly. Treat exposed joists with borate solution to kill fungi. Install new 5/8-inch exterior-grade plywood, screwing every 6 inches into joists. Leave 1/8-inch gaps at all edges for expansion; never butt-cut panels flush against walls.
Step-by-Step Repair Timeline
- Hour 0-1: Shut off water supply, clear appliances, and diagnose using symptom checklist.
- Hour 1-3: Remove damaged flooring—save every intact tile/plank for future repairs.
- Hour 3-27: Dry subfloor with dehumidifier + fans until moisture meter reads ≤12%. Never skip this—trapped moisture causes repeat failures.
- Hour 27-30: Fix structural issues (sister joists, replace plywood).
- Hour 30-36: Install new flooring per material-specific methods.
- Hour 36-72: Cure time—weight repairs, avoid foot traffic.
- Hour 72+: Finish with grout sealer (tile) or water-based polyurethane (hardwood).
Prevent Future Disasters
Seal grout annually with penetrating sealer—test absorbency first by dripping water; if it darkens the tile, reseal immediately. Inspect dishwasher hoses every spring for bulges or cracks; replace every 5 years. Keep indoor humidity between 30-50% using a $15 hygrometer; levels above 55% cause hardwood cupping within weeks. Always place rubber-free mats at sink/stove zones and launder weekly to prevent mold under mats.
Must-Have Repair Toolkit
- Oscillating tool with carbide grout blade ($35)
- Moisture meter with pin probes ($28)
- Rapid-set thinset mortar (for tile) or waterproof wood glue (for hardwood)
- 3-inch structural screws (joist repair)
- Replacement materials: keep 5% extra tiles/planks from original batch
- Grout sealer applicator bottle (avoids messy sponge streaks)
Ignoring kitchen floor damage guarantees costlier repairs down the line. But armed with these exact techniques—verified by decades of flooring contractor experience—you can transform that squeaky, sagging disaster into a rock-solid foundation. The secret? Match the fix to your floor’s specific distress signals, never skip subfloor drying, and invest in annual maintenance. Your silent, seamless kitchen floor is just one weekend project away.

