
That steady drip-drip-drip from your Delta kitchen faucet isn’t just driving you crazy—it’s wasting 3,000+ gallons of water yearly. Before you panic-call a plumber charging $200 for a simple fix, take heart: 90% of Delta single-handle faucet issues stem from worn internal parts easily replaced with a $15 kit. You’ll stop leaks, restore smooth handle operation, and fix inconsistent water flow using the exact methods professionals use. This guide walks you through every critical step for Delta ball-type faucets (models 1692, 1693, 1694, and similar), turning you into your home’s go-to faucet fixer.
Delta Repair Kit Must-Haves: No Plumbing Degree Required
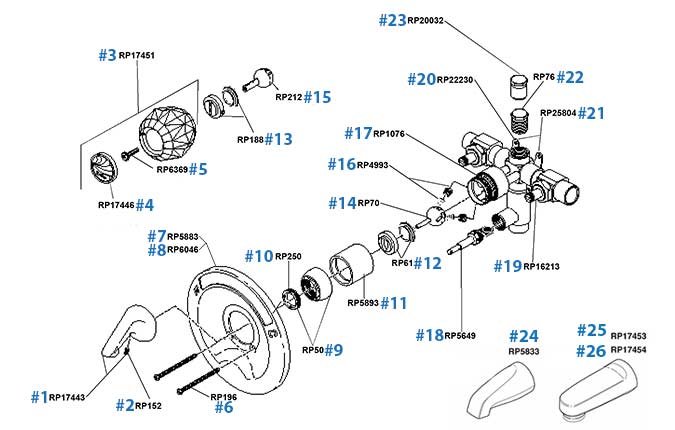
Don’t waste time hunting for mismatched parts. Delta-specific repair kits (model RP20126 or RP46255) contain everything for a complete overhaul:
- Complete washer/gasket set (prevents leaks at critical pressure points)
- Two replacement springs (restores proper tension for sealing)
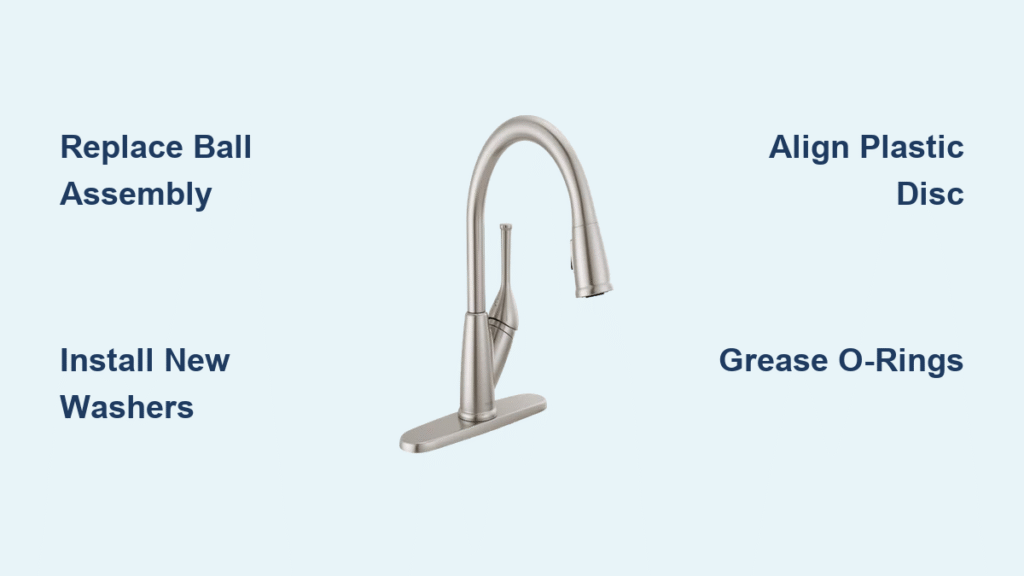
- New ball assembly (with slot alignment guide for foolproof reassembly)
- Plastic alignment disc (keyed to prevent handle binding)
- Food-grade silicone grease (non-toxic lubrication that lasts 2x longer)
- Allen wrench (included—fits set screw perfectly)
Critical Tools You Already Own
- Flat-tipped screwdriver (wrap jaws in electrical tape to avoid chrome scratches)
- Channel-Lock pliers (for stubborn chrome dome removal)
- Needle-nosed pliers (essential for pressing plastic disc during reassembly)
- Small hammer (for gentle taps—not force—to break corrosion)
- Headlamp (hands-free lighting to spot hidden leaks)
Pro Tip: Place a microfiber towel in the sink. One dropped screw could scratch your finish or vanish down the drain.
Why Your Delta Faucet Leaks (And How to Stop It)
Shut-Off Valve Survival Guide
Those brass valves under your sink haven’t moved in years—they’re corroded and fragile. Turn clockwise gently until resistance stops movement. If stuck, spray with penetrating oil (like PB Blaster), wait 10 minutes, then try again. Never force it—brass valves crack easily, causing flooding.
Water Verification Test
Turn faucet handles to both hot/cold positions. Water should sputter then stop completely within 10 seconds. If it drips:
✅ Success: Proceed immediately
⚠️ Failure: Shut valves tighter or replace valves first (don’t risk flood damage)
Warning: If valves leak while turning, stop. Replace valves with quarter-turn ball valves before continuing—this repair won’t work with faulty shut-offs.
Handle and Chrome Dome Removal Without Damage

Handle Removal in 60 Seconds
Insert the kit’s Allen wrench into the set screw beneath the handle base. Turn counterclockwise 2-3 full turns—you’ll feel it loosen. Lift handle straight up (no wiggling!). Note its position: the spout should face forward when reassembled.
Chrome Dome Extraction Tricks
The plastic ring has four notches—insert screwdriver into one notch. Tap screwdriver handle lightly with hammer to break initial resistance. Unscrew ring counterclockwise by hand (Channel-Locks only if absolutely stuck). If using pliers, wrap jaws in masking tape to prevent chrome scratches.
Critical Mistake to Avoid: Forcing the dome with metal tools. This cracks the plastic ring, requiring full faucet replacement.
Replace Worn Parts: Where Leaks Actually Start
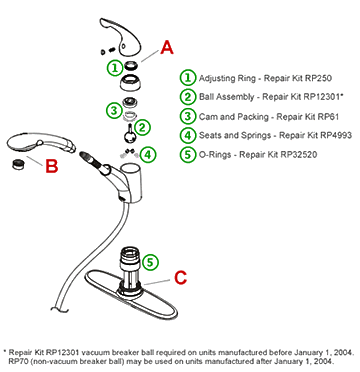
Ball Assembly Removal and Orientation
Lift out the plastic disc—it should come with a black rubber gasket attached. Now remove the ball. Pay attention: The ball has a slot that must align with the internal stud (like a key in a lock). This orientation is why most DIY repairs fail—get it wrong, and leaks return in days.
Spring and Washer Replacement (The Leak-Stoppers)
At the socket bottom, you’ll see two black rubber washers with springs underneath. Use a small screwdriver to pry out old parts. Install new springs large-end first, then press new seats over each spring until flush. Crucial step: Apply silicone grease to both sides of each washer—this creates a watertight seal and prevents premature wear.
Faucet Arm O-Ring Service
Pull the faucet arm straight up while rotating slightly. Replace the two large O-rings around the vertical shaft. Grease liberally—they must slide smoothly during reassembly. Reinstall by pressing down while rotating to distribute grease evenly (prevents binding).
Precision Reassembly: Avoiding Costly Re-Do’s
Ball and Disc Alignment Secrets
Drop the new ball into the socket, slot facing LEFT (like 9 o’clock position). The plastic disc with new gasket seats next—its keyed slot must face LEFT to match the upright cylinder. Misalignment here causes handle stiffness and leaks.
Chrome Dome Installation Hacks
Loosen the plastic ring inside the dome first. Thread dome clockwise—it will resist due to new parts. Use needle-nosed pliers to press the plastic disc down while turning. Tighten until snug, then back off 1/8 turn. Over-tightening cracks the ring and accelerates wear.
Handle Calibration Test
Slide handle onto shaft. Tighten set screw firmly but stop when resistance increases—over-torquing strips plastic parts. Move handle through full range: it should glide smoothly. If stiff, slightly loosen the plastic ring inside the dome.
Leak Testing: Why 90% of Repairs Fail Here
Gradual Water Restoration Protocol
Turn cold water valve halfway open. Watch for leaks around chrome dome and handle base for 60 seconds. No leaks? Open valve fully. Repeat for hot water. Run both for 2 minutes to flush debris from new parts.
Handle Performance Red Flags
- Stiff movement: Plastic ring is over-tightened (loosen 1/8 turn)
- Drips from spout: Washers misaligned or insufficient grease
- Leaks at handle base: O-rings not seated or damaged during reassembly
Pro Insight: If leaks persist after testing, disassemble immediately. Forcing it worsens damage—recheck washer seating and ball orientation.
Prevent Next Month’s Emergency Repair
60-Second Monthly Maintenance
- Wipe faucet dry after use (prevents mineral buildup on seals)
- Soak aerator in vinegar weekly (stops flow-restricting deposits)
- Test handle smoothness—catch stiffness early before leaks start
Early Warning Signs to Act On
| Symptom | Urgency | Quick Fix |
|---|---|---|
| Handle stiffness | High | Lubricate with silicone grease |
| Intermittent drips | Critical | Replace washers immediately |
| Water around base | Emergency | Shut off valves, disassemble |
Critical Tip: Never use abrasive cleaners—they degrade rubber components. A vinegar-water mix removes buildup safely.
Warranty Protection and When to Call Pros
Using genuine Delta parts (RP20126 kit) maintains your faucet’s warranty. Register your model online for access to Delta’s exploded diagrams and model-specific videos. For these issues, call a pro:
– Cracked faucet housing
– Stripped mounting threads
– Leaking supply lines (indicates valve failure)
Bottom Line: You’ve just completed a $200+ plumber job in 45 minutes with $15 parts. Your Delta faucet now operates like new, and you’ve gained the skills to fix any future leak. Remember: 80% of faucet failures stem from mineral deposits—adding that monthly vinegar soak will double your repair’s lifespan. Next time you hear that drip, you’ll know exactly how to silence it for good.

