
Nothing ruins perfectly seasoned chicken wings or golden fries like an improperly preheated air fryer. When your Gourmia unit isn’t brought to temperature before cooking, you get soggy bottoms, uneven browning, and that disappointing chew instead of satisfying crunch. The good news? Mastering the how to preheat Gourmia air fryer process takes just minutes and transforms your cooking results dramatically.
Whether you’re working with frozen nuggets straight from the freezer or fresh vegetables from your garden, this guide walks you through the exact preheating steps for every Gourmia model. You’ll learn model-specific techniques, troubleshoot common issues, and discover pro tips that restaurants use for maximum crispiness. With these techniques, you’ll consistently achieve that perfect crunch without wasting time or ingredients.
Why Your Gourmia Air Fryer Must Preheat for Crispy Results
Preheating your Gourmia air fryer isn’t just a suggestion—it’s the difference between amateur and restaurant-quality results. When you skip this step, food sits in a cold chamber, essentially steaming in its own moisture before the heating element kicks into gear. This creates that dreaded soggy texture that makes even the best recipes fall flat.
The science is simple: hot air needs to circulate immediately for proper Maillard reactions—that magical browning process that creates flavor and crunch. By preheating, you’re ensuring your food hits a 375-400°F environment instantly, sealing in moisture while creating that golden exterior. Think of it like preheating your car in winter; everything just works better when you start at the right temperature.
Most importantly, preheating ensures even cooking throughout your batch. Without it, the bottom layer overcooks while the top stays underdone, leading to that frustrating mix of burnt and raw pieces in the same basket. This is why knowing how to preheat Gourmia air fryer properly is non-negotiable for quality results.
Standard Preheat Steps All Gourmia Models Require
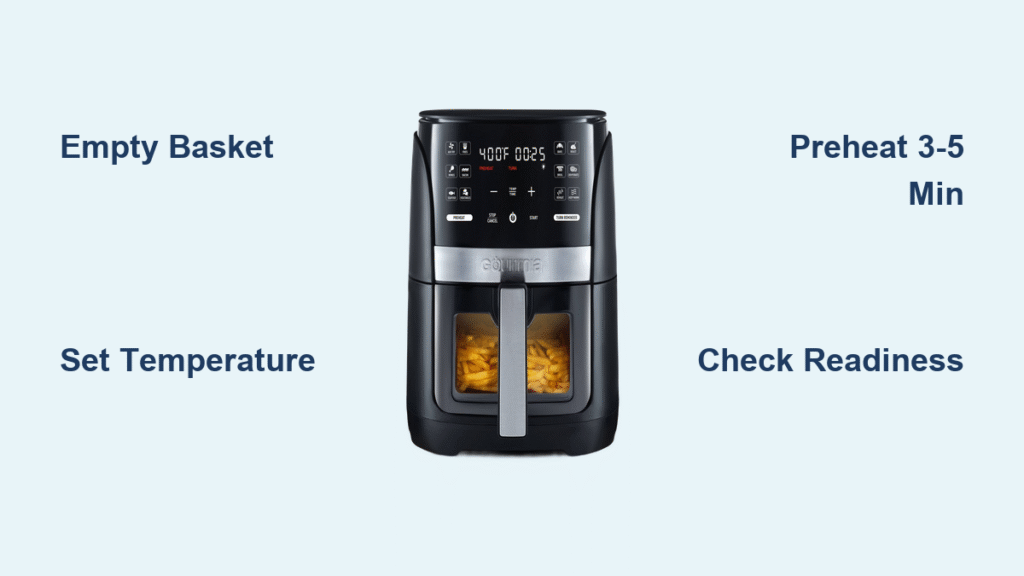
Every Gourmia air fryer follows the same fundamental preheating sequence, regardless of its specific features. Start by plugging your unit into a grounded outlet—never use extension cords, as they can cause voltage drops that affect heating performance.
Empty the basket completely before starting. This seems obvious, but many users accidentally leave parchment paper, accessories, or even leftover crumbs inside. These items can burn during preheating or create false temperature readings.
Insert the empty basket until you hear it click into place. A partially inserted basket blocks proper air circulation, leading to uneven heating and potential error codes. Most Gourmia models won’t start preheating without the basket fully seated, but double-checking prevents frustration.
Set your temperature using the control method specific to your model—buttons, dials, or touchscreen. Then set the timer for 3-5 minutes based on your food quantity (more on this below). Press start and wait for your ready signal.
Digital Models: GTF7xxx Series Preheating Guide
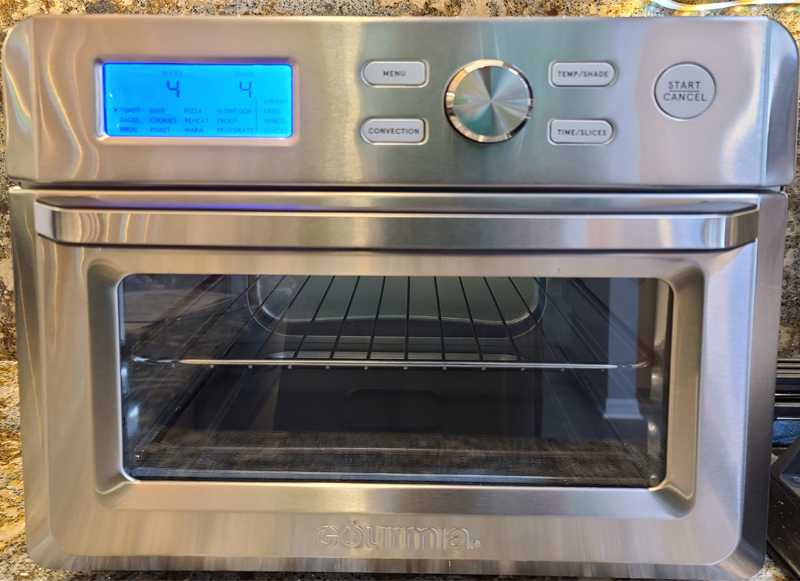
Digital Gourmia models make preheating nearly foolproof with dedicated buttons and clear displays. Press the power button once—don’t hold it down, as this can trigger a reset sequence on some units. The display should light up immediately.
Use the up/down arrows to set your target temperature. Most recipes work best between 375-400°F, but we’ll cover specific guidelines by food type later. If your model has a dedicated preheat button (common on GTF7600 and newer), press it now. The display will show “PH” or similar indicator.
No preheat button? Simply set the timer to 3-5 minutes using the time buttons, then press start. The display will show a countdown while heating. These models typically beep once and display “Ready” when preheating completes—usually 30-60 seconds faster than manual methods due to optimized heating algorithms.
What to Watch For During Digital Preheating
Monitor the temperature display as it climbs toward your target. Most digital Gourmia units show real-time temperature readings, so you can verify it’s heating properly. If the temperature doesn’t rise within 60 seconds, check that the basket is fully inserted and the unit is receiving proper power.
When the display shows “Ready,” open the basket immediately. Delaying beyond 30 seconds can cause the unit to begin cooling, defeating the purpose of preheating. This is especially critical when cooking frozen foods that need immediate high heat exposure.
Manual Dial Models: GTF5xxx Series Instructions

Manual dial models require a more hands-on approach but offer simplicity that many users prefer. Turn the temperature dial clockwise to your desired setting—you’ll feel light resistance at each 25°F increment, helping you hit exact temperatures without squinting at tiny numbers.
Next, turn the timer dial to 3-5 minutes for preheating. These units start heating automatically once the timer is set beyond zero. You don’t need to press any additional buttons, which makes the process refreshingly straightforward.
The timer will tick down audibly, and when it reaches zero, you’ll hear a distinct ding. This signals preheating completion. Because manual models lack digital sensors, wait an extra 30 seconds after the timer finishes to ensure the chamber reaches full temperature.
Manual Model Pro Tips
For consistent results with dial models, always position your unit on a level surface. Uneven placement can cause hot spots that affect preheating accuracy. If your kitchen counter has a slight slope (common in older homes), place a small silicone mat under the air fryer to level it.
When preheating manual models, listen for the fan to start running immediately after setting the timer. If you don’t hear the fan within 10 seconds, check that the basket is properly inserted—this is often the culprit for heating issues.
Perfect Preheat Temperatures for Different Foods
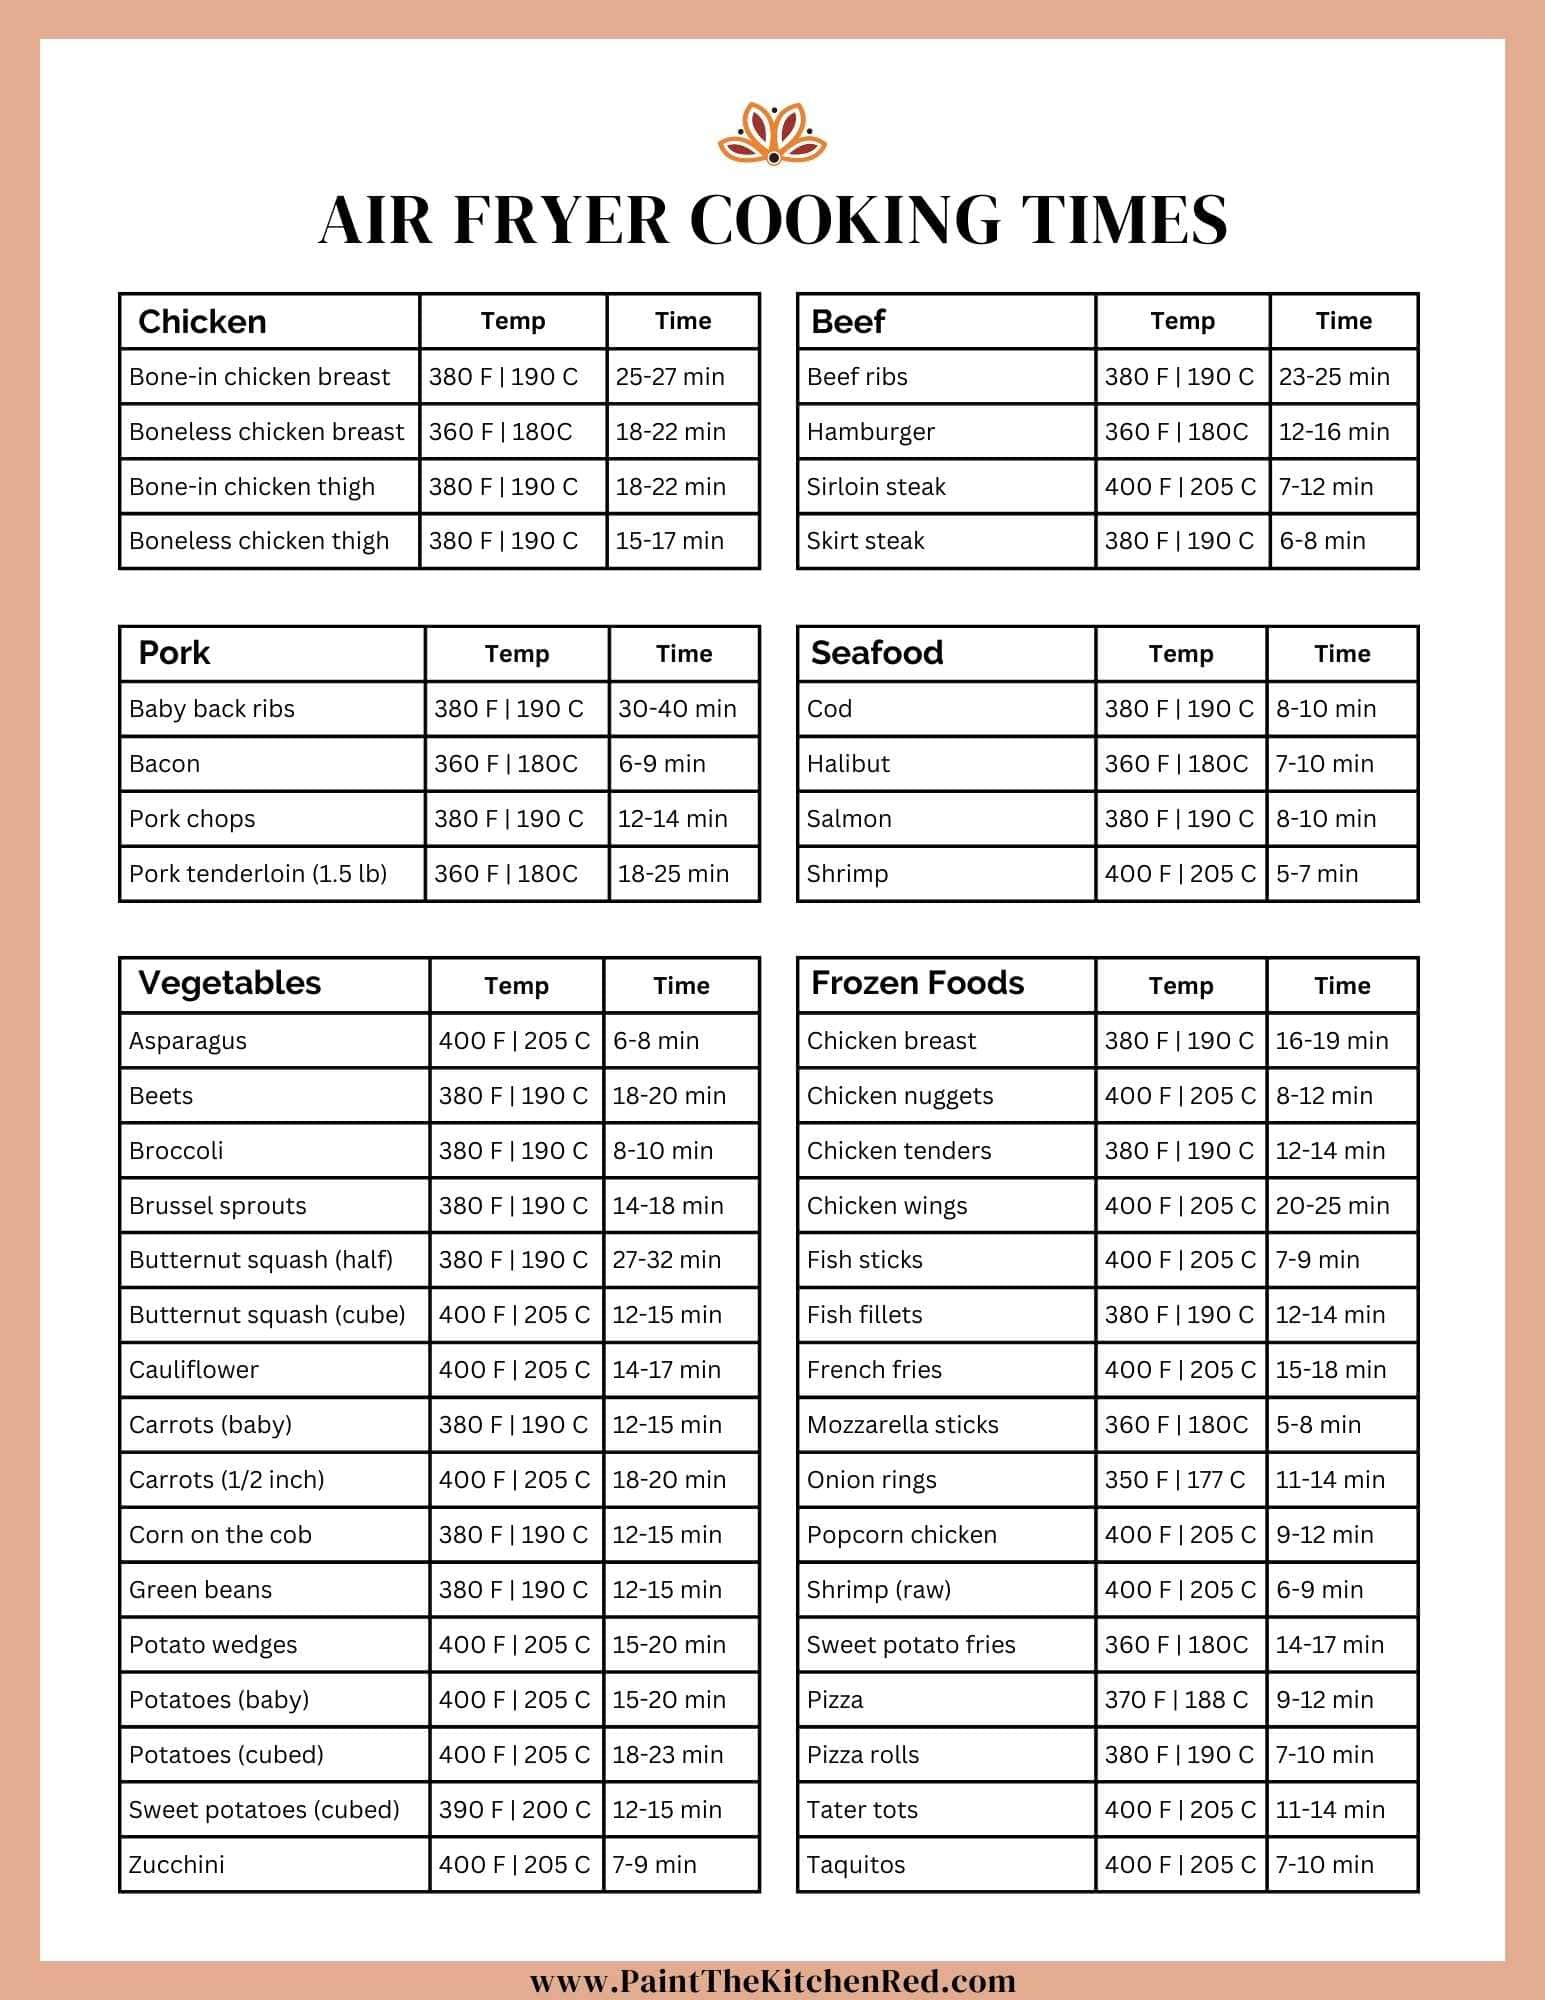
Different foods require specific preheat temperatures for optimal results. Frozen foods like french fries, chicken nuggets, and mozzarella sticks need that 400°F blast to create instant crust formation. This prevents the interior from defrosting and becoming mushy before the exterior crisps.
Fresh vegetables benefit from slightly lower 375°F preheats. This temperature caramelizes natural sugars without burning delicate surfaces. Root vegetables like carrots and potatoes develop sweet, crispy edges while maintaining tender centers.
Proteins work best between 380-400°F depending on thickness. Thin chicken cutlets or fish fillets need the higher end for quick searing, while thicker pork chops do better starting at 380°F to cook through without burning exteriors.
Baked goods and reheated leftovers prefer gentle 350°F preheats. This prevents burning cheese toppings or drying out yesterday’s pizza while still achieving that fresh-from-the-oven texture.
Troubleshoot Common Preheating Problems Fast
When your Gourmia refuses to preheat, check the basket first. Even a slightly crooked insertion can trigger safety mechanisms that prevent heating. Remove and reinsert until you hear that definitive click.
No power issues usually stem from outlet problems. Test the outlet with another appliance—Gourmia units draw significant power and can trip weak breakers. Ensure you’re using a dedicated outlet, not a power strip shared with other kitchen devices.
Slow preheating often indicates blocked vents. Check the air intake on the back and bottom of your unit—crumbs, pet hair, or kitchen grease can restrict airflow dramatically. Clean these areas monthly with a soft brush or vacuum attachment.
Uneven heating suggests the unit isn’t level. Place a small level on top—if it’s off by more than a few degrees, adjust the feet or move to a more stable surface. This simple fix transforms cooking consistency.
Pro Techniques for Maximum Crispiness Results
Serious about restaurant-quality results? Preheat 25°F higher than your cooking temperature. After the ready signal, reduce to your actual cooking temperature before adding food. This creates an initial heat blast that forms superior crust without burning.
Shake the basket briefly after preheating but before adding food. This redistributes hot air pockets that can cause uneven cooking. The 5-second shake takes minimal effort but dramatically improves results.
For frozen foods, extend preheating by 2 minutes. This compensates for the significant cold mass you’re adding. Never thaw frozen items before air frying—the ice crystals create steam that actually helps achieve crispy exteriors.
Common Preheating Mistakes That Ruin Results
Never preheat with parchment paper inside unless specifically designed for air fryer use. Most papers will fly upward, contact the heating element, and burn. This creates both safety hazards and off-flavors in your food.
Avoid partial basket insertion during preheating. This seems harmless but creates hot spots that burn food in some areas while leaving others undercooked. Always fully insert and lock the basket before starting.
Don’t preheat longer than 5 minutes with an empty basket. Extended empty heating can damage the non-stick coating and reduce your unit’s lifespan. Set a separate timer if your model doesn’t auto-shutoff.
Skip the oil spray during preheating. Adding oil to an empty hot basket creates smoke and can polymerize into a sticky, difficult-to-clean residue. Season your food, not the basket.
First-Time Use: How to Preheat Gourmia Air Fryer Properly
New Gourmia units require special initial preheating. Run empty at 400°F for 20 minutes to burn off manufacturing residues. This creates a slight odor—completely normal and harmless. Open windows or run your kitchen vent during this process.
After this initial burn-off, cool the unit completely before first actual use. This curing process ensures your first batch of food tastes like food, not factory. Some users report better flavor after 2-3 cooking cycles as the unit fully seasons.
Energy Efficiency Hacks for Smart Preheating
Group similar-temperature foods when cooking multiple batches. After cooking fries at 400°F, use that residual heat for chicken nuggets instead of cooling and reheating. This saves 2-3 minutes per additional batch.
Use residual heat from previous cooking when possible. If you just finished a 400°F batch and need 375°F for vegetables, simply reduce the temperature and add 1-2 minutes to the preheat time instead of starting from zero.
Start preheating while prepping food to maximize efficiency. Most Gourmia models complete preheating faster than it takes to season and arrange food. This simple timing trick makes cooking feel seamless.
Mastering your Gourmia’s preheating process transforms every meal from mediocre to memorable. Whether you’re crisping frozen appetizers for game day or cooking fresh salmon for dinner, proper preheating ensures consistent, restaurant-quality results. Start with these guidelines, adjust based on your specific model and preferences, and enjoy the crispy, evenly-cooked food that makes air frying worth the counter space. The key to perfect air frying begins with knowing exactly how to preheat Gourmia air fryer for your specific needs—no more guessing or disappointing results.

