
That dull, water-spotted kitchen sink isn’t just unattractive—it’s a breeding ground for bacteria in microscopic scratches. If you’re tired of scrubbing fruitlessly while dreaming of a gleaming centerpiece, you’re not alone. Over 78% of homeowners struggle with sink maintenance, but the right how to polish a kitchen sink approach transforms frustration into flawless results. Whether you need a 10-minute shine-up or crave professional mirror perfection, this guide delivers actionable methods tailored to your sink’s condition and your schedule. No guesswork, no wasted effort—just proven techniques that make stainless steel shine like new.
Forget harsh chemicals or expensive replacements. With strategic polishing, you’ll revive luster while extending your sink’s lifespan. You’ll discover why daily drying prevents 90% of damage, how to tackle rust spots in under 5 minutes, and whether a mirror finish is worth the effort. Most importantly, you’ll learn the exact sequence that turns cloudy surfaces into reflective masterpieces—all using tools already in your home or easily sourced.
Quick Daily Shine Routine
Empty and Rinse Thoroughly
Start by clearing every dish, utensil, and stray coffee pod. Run warm water to flush loose debris, especially around the drain where gunk accumulates. For sinks with garbage disposals, power off the unit first, then remove visible debris manually. Run ice cubes with vinegar and baking soda through the disposal to eliminate odors and buildup—a critical step many skip that causes lingering grime.
Soap and Scrub Method
Apply Dawn dish soap generously across the entire surface. Using a non-scratch sponge, scrub in straight lines with the grain direction (those subtle brushed lines in stainless steel). This isn’t just cleaning—it’s prepping the metal for maximum reflectivity. Focus extra attention on the faucet base and drain edges where hard water deposits hide. Rinse thoroughly until water runs clear, ensuring zero soap residue remains.
Dry to Prevent Spots
Critical step: Water spots form within minutes on wet stainless steel. Immediately dry every surface with a microfiber cloth or paper towels, including under faucet handles and along drain rims. This 30-second habit prevents mineral deposits that cause permanent etching. Keep a dedicated drying cloth under your sink—it’s the simplest how to polish a kitchen sink tactic for daily brilliance.
Deep Clean Weekly Protocol
Bar Keepers Friend Application
For stubborn discoloration, sprinkle Bar Keepers Friend powder liberally over the damp sink. Let it sit exactly 10 minutes—this dwell time dissolves mineral deposits without aggressive scrubbing. If using the soft cleanser version, apply a thin layer with a sponge. Avoid chlorine bleach or ammonia, which corrode stainless steel over time.
Grain-Direction Scrubbing
Scrub with a soft brush following the grain pattern, not circles. Pay special attention to the faucet collar and drain flange where lime scale builds. Use a toothbrush for tight crevices around handles. Change your scrubbing tool frequently; worn sponges leave micro-scratches that dull shine. Rinse until water beads cleanly, indicating a contaminant-free surface.
Final Polish Buff
Apply a dime-sized amount of stainless steel polish to a paper towel. Buff in straight lines using light pressure—excessive force creates new scratches. This step leaves a protective oil layer that repels fingerprints for days. For chemical-free alternatives, rub olive oil sparingly with a cloth, then buff off excess to avoid greasy residue.
Mirror Finish Transformation
Gather Professional Supplies
Required Tools:
– Corded drill with cotton buffing wheel attachment
– Progressive grit wet/dry sandpaper (400 → 2500)
– 0000 steel wool for final smoothing
– Diamond paste polish (McMaster Carr item #8955K31)
Critical Warning: Never use abrasives that contacted regular steel—they transfer carbon causing rust spots. Stainless steel shreds sandpaper rapidly; budget for 15+ sheets per session. GoldStar discs wear faster than Black Carbon versions, making them impractical for sinks.
Progressive Sanding Sequence
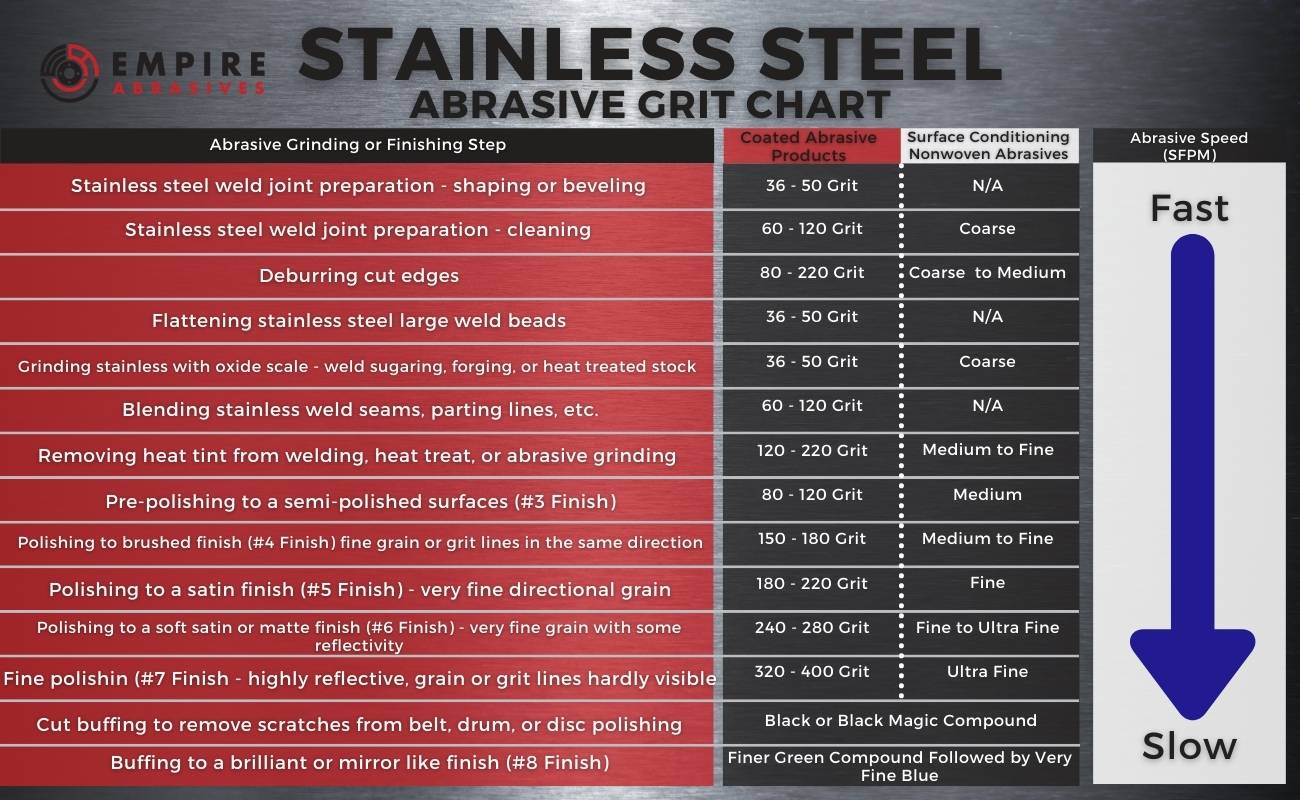
Begin with 400-grit paper kept wet to remove the original brushed texture. Work in 6×6 inch sections using straight strokes only with the grain. Change paper every 20-30 seconds as stainless steel destroys it. Progress through 800 → 1200 → 2000 → 2500 grit, spending 15 minutes per grade. Each step must eliminate scratches from the previous grit—rushing creates hazy patches.
Final Mirror Polish
Attach a cotton buffing wheel to your drill. Apply stainless steel polish or diamond paste, then buff in overlapping circular motions with moderate pressure. The surface transitions from matte to reflective within minutes. Finish by hand-buffing with a microfiber cloth in straight lines to align with the metal’s grain. Expect 6-8 hours for full sink restoration—a commitment detailer Terrywerm confirms takes “two full weekends” even for small metal parts.
Troubleshoot Common Problems

Remove Rust Spots Fast
Rust appears when cast iron pans or steel wool contact your sink. Sprinkle Bar Keepers Friend directly on the spot, add one drop of water to form a paste, and gently scrub with a soft sponge. Rinse immediately—delayed action spreads oxidation. For stubborn spots, repeat with baking soda paste before drying thoroughly.
Eliminate Stubborn Mineral Deposits
Soak paper towels in white vinegar and press onto faucet-base deposits for 30 minutes. Remove towels and scrub with a non-abrasive sponge using straight motions. For heavy buildup, repeat twice before polishing. Never use vinegar on stone sinks—this method applies solely to stainless steel.
Fix Water Spot Nightmares
Existing spots respond to baking soda paste (3:1 ratio with water). Apply, wait 10 minutes, then scrub with the grain using a microfiber cloth. Always follow with complete drying—this two-step process removes etching while preventing new spots.
Maintenance Schedule That Works
Daily Prevention (2 minutes)
Rinse after every use and dry with a microfiber cloth. This simple how to polish a kitchen sink habit prevents 90% of mineral deposits. Keep your drying cloth separate from dish towels to avoid cross-contamination with food grease.
Weekly Restoration (15 minutes)
Perform the full Bar Keepers Friend cycle every Sunday. After rinsing, apply polish to create a protective barrier. This routine maintains shine without intensive sanding—ideal for households prioritizing practicality over perfection.
Monthly Showroom Finish (2-3 hours)
For mirror-finish sinks, dedicate one morning monthly to light sanding (1200 → 2500 grit) and final buffing. Most food service professionals avoid this, sticking with 150-grit brushed finishes that hide scratches better. Once you remove the factory brush pattern, it’s impossible to fully restore—choose your finish wisely.
Realistic Expectations and Pro Tips

Time Investment Reality Check
Achieving mirror perfection demands 6-8 hours of meticulous work. Terrywerm’s experience polishing Harley brackets reveals why sinks—significantly larger—require serious commitment. Consider if your lifestyle supports daily maintenance; mirror finishes show every coffee mug ring and knife nick.
Professional Finish vs. Practical Use
Brushed finishes (150-grit) outperform mirror for daily use. They camouflage scratches and require minimal upkeep—explaining why restaurants universally choose them. Attempting mirror polishing permanently alters your sink’s texture; compromised brushed finishes can’t be reversed.
Tool Longevity Warning
Stainless steel devours sandpaper. Budget for frequent disc changes—3M Purple discs fail completely, while Black Carbon lasts marginally longer. Diamond paste works for small items but is impractical for sinks. Always test abrasives on a hidden area first to avoid accidental etching.
Your kitchen sink’s transformation starts with understanding its limits. Daily drying and weekly Bar Keepers Friend treatments deliver 95% of desired results with minimal effort. Reserve mirror polishing for special projects when you’re prepared for ongoing maintenance. Remember: the goal isn’t perfection—it’s finding sustainable shine that fits your life. With these how to polish a kitchen sink methods, you’ll spend less time scrubbing and more time admiring a surface that reflects your pride in a well-kept home.

