
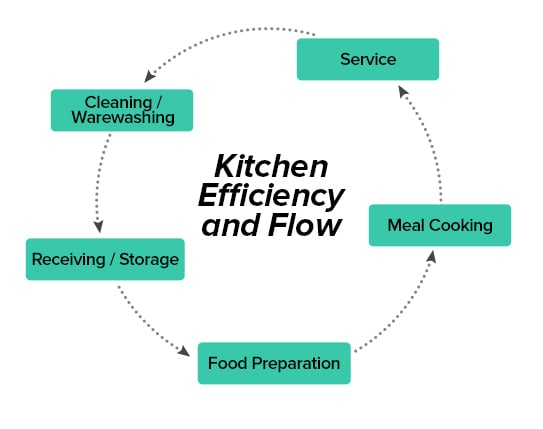
Your dream restaurant lives or dies in the kitchen—not by the quality of your recipes alone, but by a space engineered for speed, safety, and seamless compliance. Picture this: Opening day chaos because your fryer placement forces staff to cross the cold prep zone, contaminating ingredients. Or worse—failing a health inspection over missing mop sinks after investing $100,000. How to make a commercial kitchen that avoids these disasters starts with one non-negotiable truth: Your menu dictates every square foot. Forget Pinterest-worthy designs; a ramen shop needs pressure fryers and broth kettles, while a steakhouse demands high-temp broilers. Get this wrong, and bottlenecks cost you 30% in lost sales during peak hours. This guide reveals the exact sequence professionals follow to build kitchens that pass inspections on the first try and turn a profit from day one.
Lock Menu-Driven Equipment Before Signing Leases
Your menu isn’t a list of dishes—it’s your kitchen’s architectural blueprint. A 12-item fast-casual bowl concept thrives in 200 sq ft with induction warmers and rice cookers. But add seared proteins, and suddenly you need a 6-burner range, exhaust hoods, and fire suppression—tripling your space needs. Skip this step, and you’ll cram incompatible equipment into a leased space, triggering costly retrofits.
Calculate Exact Equipment Needs from Menu Items
Break down every dish into cooking methods:
– Ramen shop example:
– 6-burner range (40,000 BTU) for broth simmering
– Pressure fryer for karaage (requires dedicated 220V circuit)
– Induction units for egg poaching (prevents open-flame risks near cold prep)
– NSF-certified holding cabinets for chashu
Critical mistake: Assuming “versatile” combi-ovens replace specialized gear. They can’t replicate a dedicated charbroiler’s sear for steaks. Validate each appliance against your specific menu—not generic templates.
Align Price Points to Equipment Tier
$15 bowls demand countertop induction units ($1,200/unit). $45 filet mignon justifies an $8,000 broiler. Your target price point directly controls equipment quality and capacity. A ghost kitchen selling $10 tacos needs two compact fryers; a fine-dining venue requires separate stations for proteins, sauces, and plating. Underestimate this, and you’ll burn through margins replacing undersized gear during your first busy weekend.
Verify Zoning and Budget Before Breaking Ground
Never sign a lease without confirming two make-or-break factors: municipal zoning and utility capacity. A mixed-use zone might ban grease-producing kitchens, forcing you to abandon a $5,000 deposit. Or discover too late that the gas line is residential-grade—requiring a $15,000 upgrade before installing your range.
Get Written Zoning Confirmation in 24 Hours
Call your city planning department with your exact address and ask:
1. “Is food service permitted here, specifically grease-heavy cooking?”
2. “What permits trigger for a kitchen under 1,000 sq ft?”
Red flag: If they mention “conditional use permits,” expect 8-12 weeks of delays. Demand written confirmation—verbal approvals vanish when inspectors arrive.
Budget Breakdown for 800 Sq Ft Kitchens
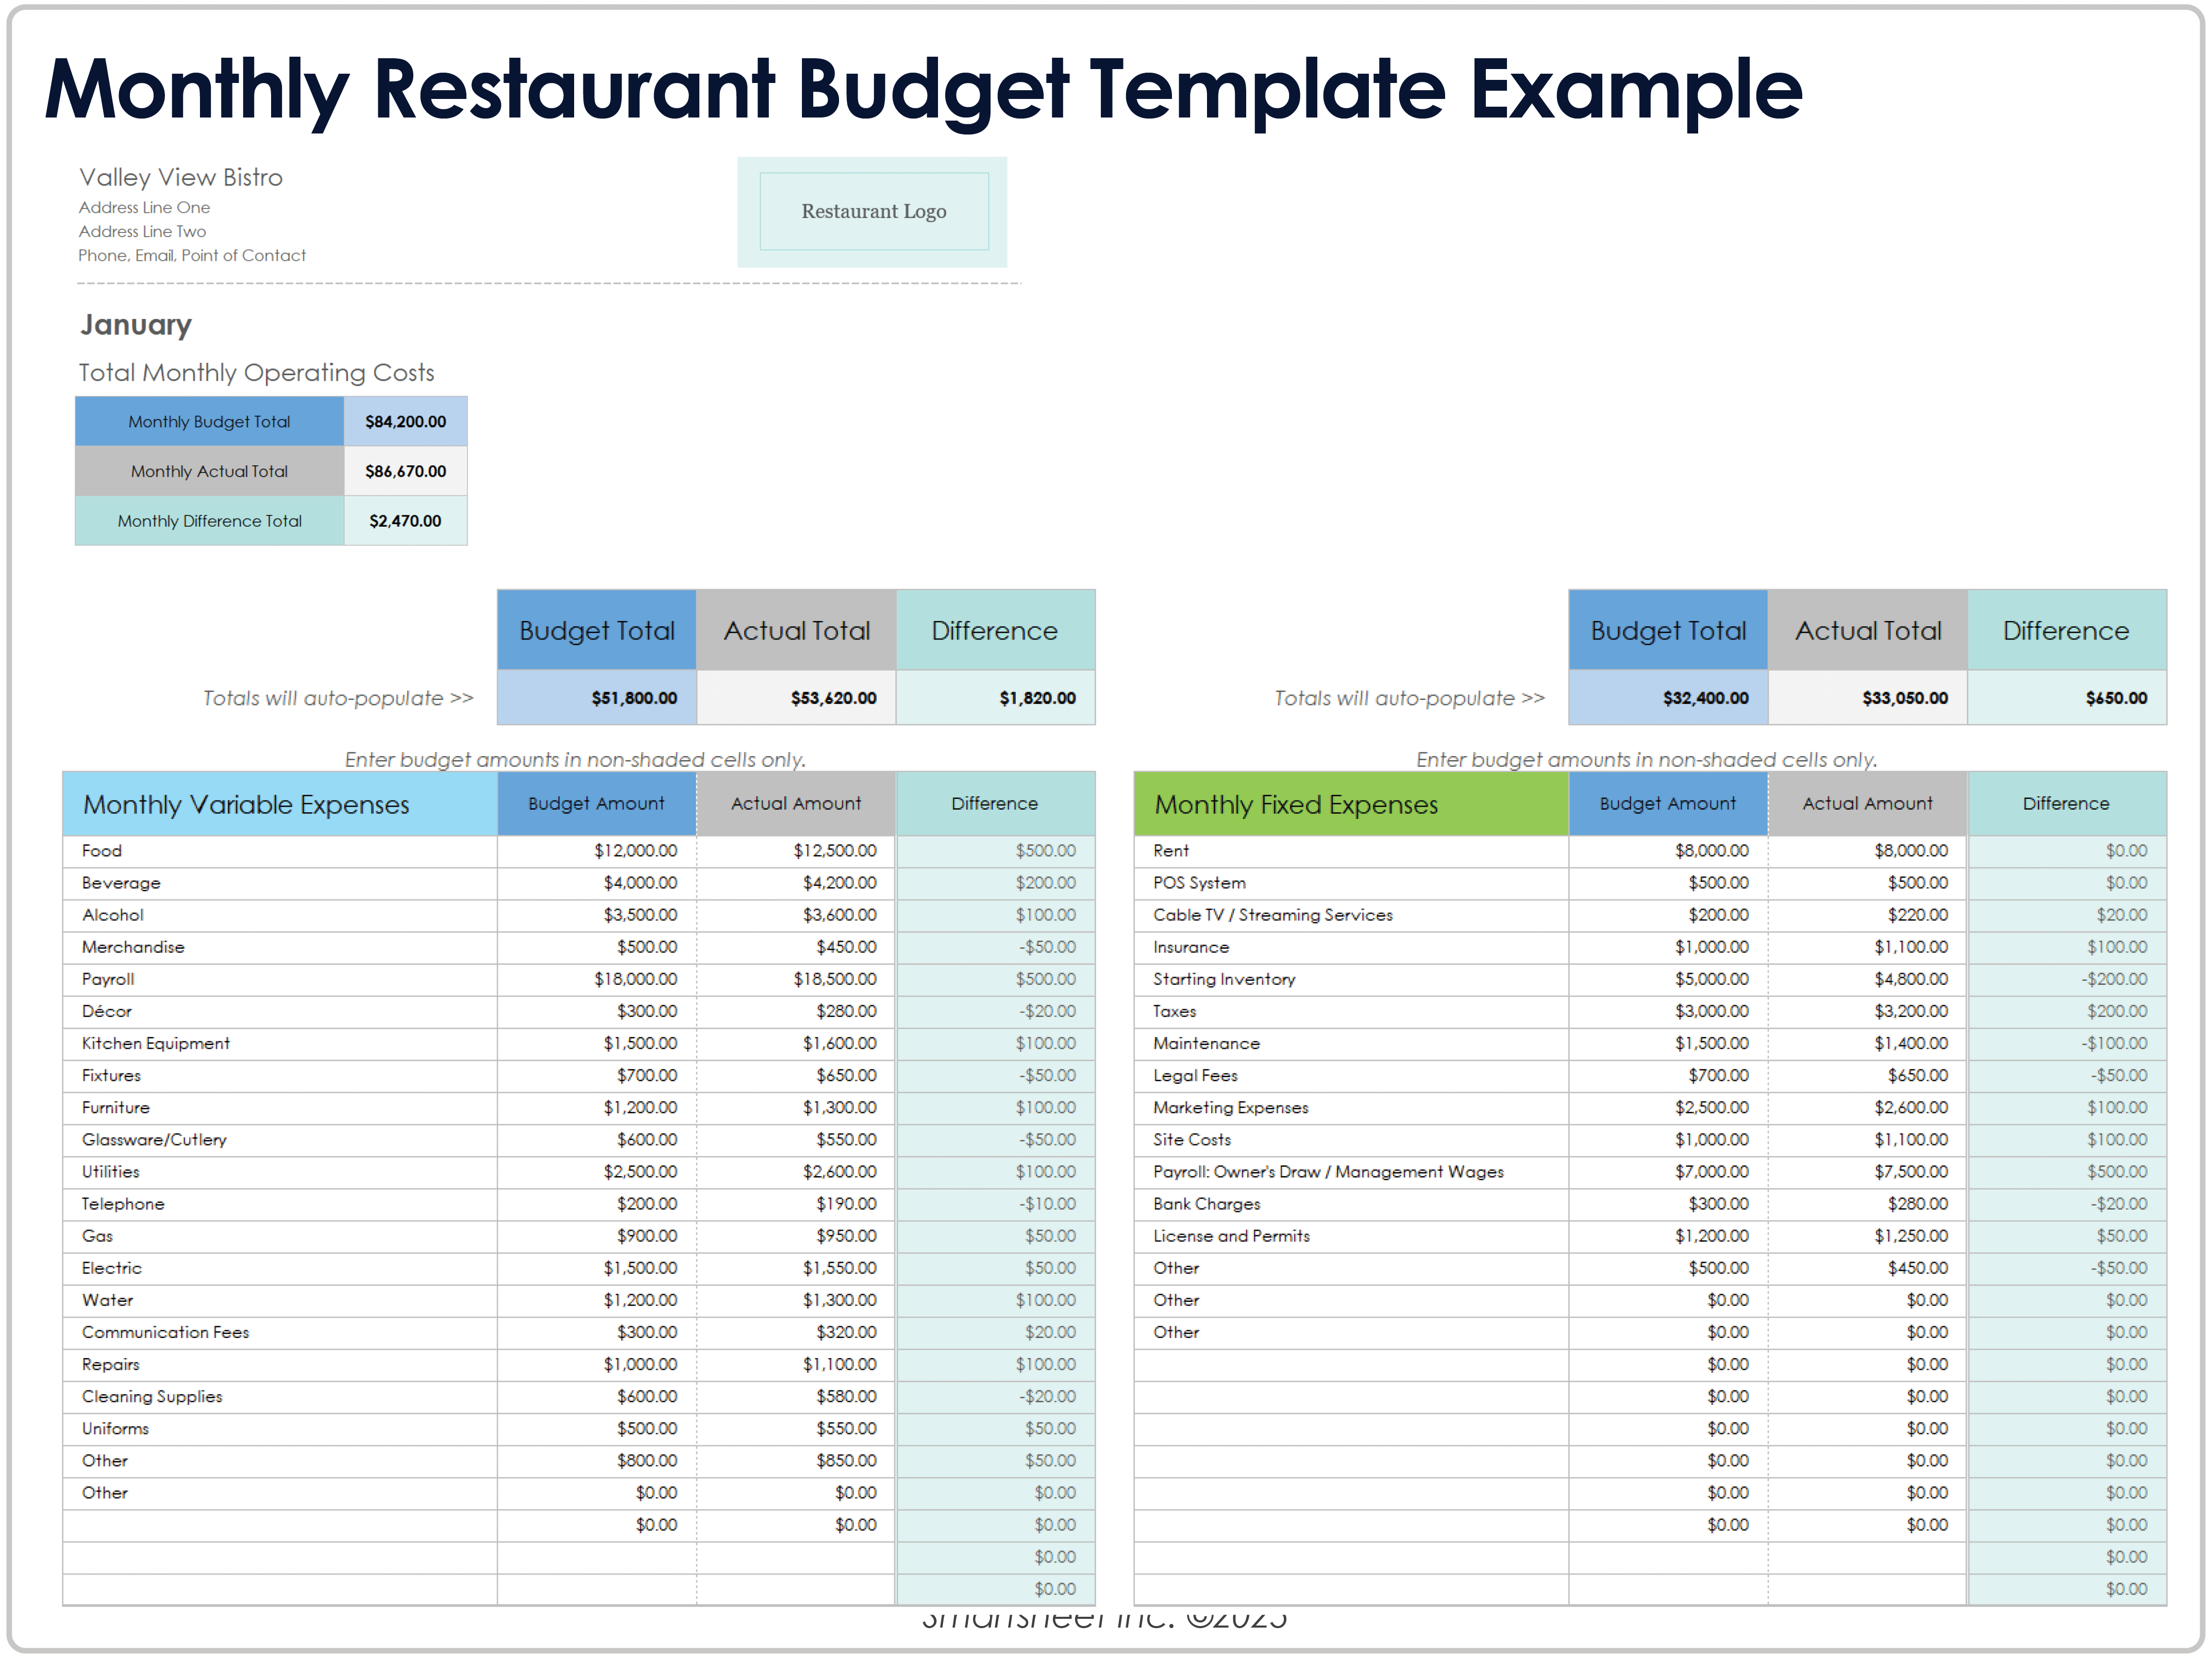
| Category | Low-End | High-End | Why the Spread |
|—————-|———|———-|—————-|
| Ventilation | $15,000 | $35,000 | Custom hood sizes vs. stock; NFPA 96 compliance adds 30% |
| Refrigeration | $8,000 | $20,000 | Walk-in freezer doubles costs; remote condensers avoid roof penetrations |
| Cooking Line | $20,000 | $50,000 | Gas vs. electric; combi-ovens add $12k+ |
| Total | $73,000 | $180,000 | Location and code stringency drive variance |
Non-negotiable: Add 20% contingency. Hidden costs like grease trap upgrades or electrical panel swaps sink 40% of first-time builds.
Design Layouts That Match Your Actual Footprint
Forget Instagram-perfect kitchens. Your space dimensions dictate which layout types even work. A 15-foot wall kills zone-style dreams immediately—it needs 20+ feet for proper station separation. Choose wrong, and you’ll pay $20,000 to reconfigure after equipment delivery.
Match Layout to Menu Volume and Type
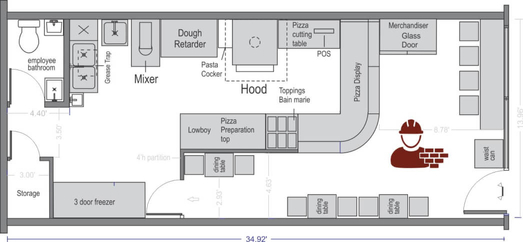
– Assembly Line (12×25 ft minimum):
Ideal for pizza/sandwich shops with ≤15 items. Staff move linearly from prep to packaging.
Warning: Adding a taco station later requires tearing out walls—budget 15% extra for future flexibility.
– Island Layout (200+ sq ft):
Required for diverse menus (e.g., brunch spots with omelets, pancakes, and coffee). Central workstation enables supervision but needs 5-ft aisles to prevent collisions.
– Zone-Style (400+ sq ft):
Only viable for high-volume operations like hotel kitchens. Demands separate cold, hot, and pastry zones—plus $50k+ in redundant ventilation.
Calculate Space Allocation in 60 Seconds
Back-of-house must cover 30-40% of total space. For a 2,000 sq ft restaurant, that’s 600-800 sq ft kitchen. Measure your longest wall:
– Under 15 ft? Forget island layouts—go assembly line.
– 15-20 ft? Hybrid approach: Cold prep along one wall, cooking line opposite.
– Over 20 ft? Zone-style possible if budget allows.
Pro tip: Sketch stations at 1:20 scale using graph paper. If the work triangle (prep-cook-serve) exceeds 21 ft, move stations closer.
Hire Professionals in This Exact Order
Most owners hire contractors first, triggering $15,000 in rework when health inspectors reject layouts. Professionals must engage sequentially—deviate, and permits stall for weeks.
Critical Hiring Sequence

1. Kitchen designer (creates equipment layouts compliant with FDA Food Code)
2. MEP engineer (solves gas line sizing, 400-amp electrical needs, grease trap specs)
3. Architect (submits permit drawings matching designer/engineer specs)
4. General contractor (builds only to approved plans)
Budget hack: Many equipment dealers (like Vulcan or Garland) offer free layout services when you purchase $20k+ in gear. Start shopping early to lock this perk.
Designer Red Flags That Cost You Weeks
- Portfolio lacks your menu type (e.g., only full-service experience for your ghost kitchen)
- Can’t name local health code amendments (e.g., “Our county requires 3 hand sinks, not 2”)
- Pushes specific brands without reviewing your menu (a red flag for kickbacks)
Order Long-Lead Items During Permitting
Walk-in refrigerators and custom hoods take 8-10 weeks to arrive—regardless of construction speed. Delay ordering, and your opening date slips by months while waiting on these anchors.
Priority Purchase Sequence
- Walk-in cooler/freezer (requires floor prep before epoxy curing)
- Custom ventilation hood (needs exact site measurements; stock hoods rarely fit)
- Specialty equipment (pizza ovens, combi-steamers—factor 6-week lead times)
- Fire suppression system (must match hood specs; Ansul R-102 is industry standard)
Pro move: Pay expedite fees only for walk-ins and hoods. Standard delivery works for fryers and refrigerators.
Construction Sequence That Prevents $10,000 Rework
Most contractors install floors after plumbing—trapping leaks under epoxy. Follow this phased approach to avoid demolition:
Phase 1: Infrastructure (Weeks 1-3)
- Grease trap first: Install before any plumbing to avoid re-digging.
- Electrical rough-in: Run 400-amp panels with dedicated 220V drops for ovens.
- Plumbing: 3-compartment sink (NSF-approved), hand sinks at prep/service zones, and floor-level mop sink.
Phase 2: Surfaces & Ventilation (Weeks 4-6)
– Epoxy floors with 2% slope: Pour before wall panels to seal seams.
– FRP wall panels to 6-foot height: Critical for washdown compliance.
– Hood installation: Tie fire suppression nozzles to each appliance before equipment sets.
Phase 3: Equipment & Final Details (Weeks 7-8)
- Equipment placement: Use laser levels to ensure fryers slope toward drains.
- Final connections: Verify gas lines have shut-offs within 6 ft of appliances.
Critical warning: Never set refrigeration on uncured epoxy. Moving 800-lb walk-ins across soft floors cracks surfaces, costing $5k in repairs.
Pass Health Inspections on First Try
Inspection failures stem from three oversights: missing sinks, improper lighting, and uncalibrated thermometers. Fix these before scheduling:
Pre-Inspection Checklist
- Hand sinks stocked with soap, paper towels, and no-touch faucets
- Thermometers calibrated within 6 months (use ice bath test)
- Chemical test strips at dish station (for sanitizer concentration)
- First-aid kit visible with OSHA-compliant burn supplies
- Fire extinguisher tags current (Class K within 30 ft of cooking line)
Top 3 Failure Fixes Under $200
- Missing mop sink: Install utility sink with floor-level grate ($150)
- Inadequate lighting: Add LED fixtures to hit 50 foot-candles minimum ($75/fixture)
- Wrong floor slope: Grind high spots and re-pour epoxy ($200)
Launch With Systems That Prevent Shutdowns
Your kitchen isn’t operational until staff execute HACCP plans flawlessly. Skip this, and your first health inspection fails over unlabeled cutting boards.
HACCP Implementation in 48 Hours
- Color-coded stations: Red boards (meat), green (produce), yellow (poultry)
- Time/temp logs: Digital probes with auto-alerts at critical limits
- Allergen protocols: Dedicated fryer for gluten-free items; separate storage
Pro tip: Run “disaster drills” during soft openings—e.g., simulate a power outage to test walk-in temp logs.
Soft Opening Strategy That Saves $5,000
- Friends & family night: 50% capacity to test workflow
- Limited menu test: Only top 3 sellers to avoid station overload
- Rush simulation: 2-hour lunch window with double orders
- Real-time tweaks: Adjust prep table heights if staff complain of back pain
Quarterly Maintenance That Avoids Costly Closures
NFPA 96 mandates quarterly hood cleaning—skip it, and fire marshals shutter you in minutes. Track these non-negotiables:
Critical Quarterly Tasks
- Hood cleaning (use certified vendor; keep receipts for inspections)
- Refrigeration coil maintenance (dust buildup raises energy costs 25%)
- Fire suppression system testing (fusible links at 165°F must activate)
- Thermometer recalibration (NSF requires 6-month cycles)
Pro tip: Photograph all equipment nameplates during installation. When warranties expire, these serial numbers speed up service calls by 70%.
Your commercial kitchen is a profit engine—not just a workspace. Every decision, from floor slope to fryer placement, either accelerates service or creates bottlenecks. Start with your menu, follow this sequence, and you’ll open with confidence instead of costly compromises. Remember: Most successful restaurants spend 18 months from concept to opening. Rushing permits or skipping professional consultations typically adds 6-8 weeks of delays and 15-25% cost overruns. How to make a commercial kitchen right means building once—correctly—so you pour energy into cooking, not crisis management.

