
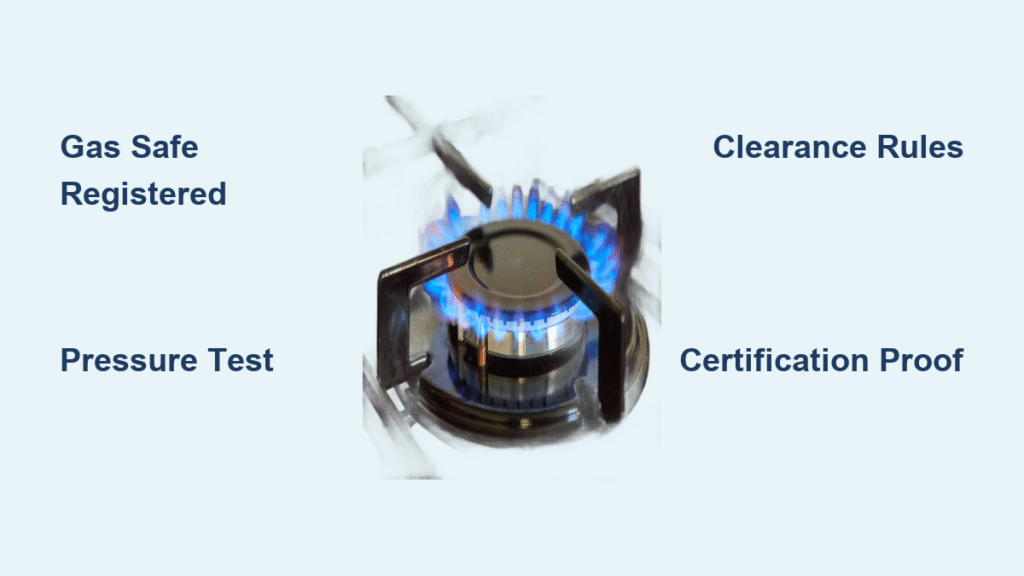
Your kitchen upgrade hits a critical roadblock when you realize your shiny new gas hob won’t magically connect itself. How to install gas hob in kitchen safely isn’t a DIY weekend project—it’s a legally mandated professional job in the UK. Every year, illegal gas installations cause preventable leaks, explosions, and invalidated home insurance policies. This guide demystifies the exact process a Gas Safe engineer follows so you know what to expect, how to verify compliance, and why cutting corners risks everything. You’ll learn clearance requirements that prevent cabinet fires, pressure tests that catch deadly leaks, and why your granite worktop needs special preparation. Most importantly, you’ll understand why hiring certified professionals isn’t optional—it’s your legal and safety lifeline.
Gas Safe Registration: Your Non-Negotiable Legal Requirement
Why DIY Gas Hob Installation Is Illegal and Dangerous
Never attempt gas connections yourself—this isn’t a recommendation but a legal requirement under UK law. Only Gas Safe registered engineers can legally install gas hobs because they’ve proven competency in:
– Detecting gas leaks invisible to untrained eyes
– Calculating precise pipe sizing to prevent pressure drops
– Executing emergency shut-off procedures during faults
Attempting DIY work risks carbon monoxide poisoning, fires, and invalidates your home insurance immediately. If discovered during property sales, it halts transactions until a certified engineer rectifies the work—a costly delay you can’t afford.
Building Regulations That Control Your Kitchen Layout
Your installation must comply with Part J (gas safety) and Part P (electrical safety) regulations. Critical requirements include:
– 30cm minimum clearance between hob and extractor fan to prevent grease fires
– 15cm side-wall spacing to avoid heat damage to cabinets
– 22mm gas pipe diameter at the connection point for adequate flow
– Gas Safety Certificate issued upon completion (legally required for property sales)
Ignoring these isn’t just risky—it triggers fines up to £5,000 and forces expensive reworks. A competent engineer self-certifies compliance through the Gas Safe Register scheme, eliminating local council paperwork delays.
Kitchen Layout Planning: Avoid Costly Mistakes Before Cutting Worktops
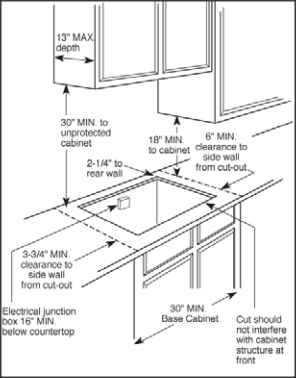
Critical Clearances Based on Your Hob Type
Your hob’s placement affects safety and functionality. Measure twice before installation:
– Electric extractor hoods: Require 65cm vertical clearance (vs. 30cm for ducted hoods)
– Combustible worktops (laminate, wood): Need 5cm rear-wall clearance plus aluminum heat shields
– Adjacent cabinets: Must feature heat-resistant panels within 15cm of hob edges
Mistakes here cause warped cabinets, melted handles, or fire hazards. Always dry-fit your hob using the manufacturer’s template before cutting—granite worktops can’t be “fixed” after an oversized cut-out.
Worktop Material Requirements That Prevent Disasters
Your worktop thickness determines structural support:
– Granite/composite: Minimum 40mm thickness (thinner slabs crack under heat stress)
– Solid wood: 30mm minimum with plywood underframe support
– Laminate: 38mm required plus heat-resistant sealant on cut edges
Engineers verify this during site surveys. Skipping support frames causes hob wobbling, gas line stress fractures, and seal failures—leading to leaks. Never install on particleboard; it swells when exposed to cooking moisture.
Gas Connection Process: Where Professionals Prevent Catastrophes
Pipe Preparation and Connection Protocol
Gas engineers follow military-precision steps you can’t replicate:
1. Deburr all pipe ends to prevent debris clogging burner jets
2. Apply PTFE tape clockwise (3-4 wraps) on male threads to seal micro-gaps
3. Install downward-facing ½” BSP elbow below worktop to trap condensation
4. Use BS 669 Type 2 flexible hose (max 1.5m length) for vibration resistance
One missed step—a loose fitting or backward tape wrap—creates slow leaks. Gas is odorless; the “rotten egg” smell is added mercaptan. If that fails, you won’t detect leaks until it’s too late.
Mandatory Pressure Testing That Saves Lives
This 10-minute test is non-negotiable:
– Pressurize system to 150 mbar (7x normal operating pressure)
– Apply leak detection fluid to every joint—bubbles reveal invisible faults
– Record results on your Gas Safety Certificate
Skipping this causes 40% of gas-related incidents. Never let an engineer “trust” connections without visible testing. Demand proof—your certificate must show test duration and pressure readings.
Electrical Connection Steps: Avoiding Ignition Failures

Wiring the Ignition System for Reliable Sparks
Gas hobs need power for electronic ignition. Engineers ensure:
– Brown wire → L terminal (live)
– Blue wire → N terminal (neutral)
– Green/yellow → Earth terminal
– 50mm minimum separation from gas pipes to prevent sparks near leaks
A common mistake? Routing cables under gas lines. Heat degrades insulation, causing shorts. Your engineer routes cables along the cabinet’s coolest side, securing them with heat-resistant clips every 30cm.
Circuit Protection That Prevents Electrical Fires
The ignition system requires dedicated electrical safeguards:
– 13A fused spur installed ≥150mm from hob edge (prevents heat damage)
– 2.5mm² heat-resistant cable (standard PVC melts at 70°C; cooking surfaces hit 200°C+)
– 3mm contact separation in the spur switch (critical for safe disconnection)
If your kitchen lacks this, budget £80-150 for new wiring. Never daisy-chain the hob to other appliances—voltage drops cause failed ignitions and burner misfires.
Commissioning and Safety Testing: The Final Verification
Flame Failure Device Checks That Stop Gas Buildup
Engineers simulate emergencies to verify safety:
– Thermocouple test: Extinguish flame—gas must cut off within 15 seconds
– Flame picture check: Blue base with yellow tips (orange flames indicate dangerous incomplete combustion)
– Ignition speed: All burners must light within 10 seconds
If thermocouples fail, gas floods your kitchen during cooking. This test is why annual professional servicing is mandatory—not optional.
User Safety Demonstration You Must Demand
Before paying, ensure your engineer:
– Shows you the emergency isolation valve location (within 2m of hob)
– Demonstrates manual lighting during power cuts
– Explains flame failure symptoms (hissing sounds, orange flames)
– Provides manufacturer’s manual with model-specific warnings
This isn’t courtesy—it’s Gas Safe requirement J12. If skipped, report them immediately.
Cost Considerations: Budgeting Without Surprises
Professional Installation Costs Breakdown
| Service | Cost Range | Why It Varies |
|---|---|---|
| Basic installation | £150-300 | Includes hob fitting, pressure test, certificate |
| New gas pipe run | £50-100/meter | Concrete floors or long routes increase cost |
| Electrical spur | £80-150 | Required if no nearby socket |
| Worktop modification | £100-200 | Granite cutting costs 2x laminate |
Critical tip: Get written quotes specifying “Gas Safe certification included.” Bargain installers often skip pressure tests or use non-compliant hoses—a false economy risking £25,000 insurance claims.
DIY vs Professional Reality: The Hard Truth
Myth: “I’ll just connect the gas pipe myself to save £200.”
Reality:
– Your home insurance voids immediately for any gas-related damage
– Property sales stall until a certified engineer reinspects (costing £300+)
– Manufacturers void warranties on DIY-installed hobs
– You face unlimited liability if a leak injures others
Gas Safe engineers carry £10 million public liability insurance. You don’t. Period.
Key Takeaways for a Safe, Compliant Installation
Installing a gas hob in your kitchen demands professional expertise at every stage—from verifying 22mm gas pipe diameter to executing 150 mbar pressure tests. As a homeowner, your role isn’t to connect pipes but to:
1. Verify Gas Safe registration (check ID card number at gas-safe-register.co.uk)
2. Demand visible pressure testing—no bubbles, no payment
3. Confirm certificate issuance before the engineer leaves
4. Schedule annual servicing to maintain thermocouple reliability
Never compromise on certification. A £250 installation fee pales against £50,000 insurance deductibles or irreversible health damage from undetected leaks. When your engineer presents that Gas Safety Certificate, you’re not just getting a document—you’re holding proof that your kitchen won’t become a hazard. Book only through Gas Safe-registered professionals, and insist on seeing their certification for “cooking appliances” (category CK2). Your safety isn’t a DIY project—it’s a professional obligation.

