
Your morning coffee ritual grinds to a halt as the faucet sputters out a weak trickle. Or maybe you spot gritty black specks swirling in your drinking glass. Nine times out of ten, the culprit isn’t a broken faucet—it’s debris clogging your system. How to flush kitchen faucet issues is simpler than you think, and this field-tested method clears construction grit, mineral scale, or city-pipe sediment in minutes. Ignoring it risks permanent valve damage and costly replacements. Below, you’ll learn exactly when and how to flush your kitchen faucet for instant flow restoration—and how to prevent future clogs with a monthly 5-minute ritual.
Why Your Faucet Suddenly Slows Down (And What Debris Does)
When city crews repair water mains or you install a new sink, sediment invades your lines. Copper filings from pipe cutting, plumber’s tape shreds, or mineral chunks break loose during supply shutoffs. These particles lodge in three critical spots: the aerator screen, cartridge channels, or pull-down spray head. Left unflushed, they cause permanent damage—scratching ceramic valve seats until seals fail and drips begin. The worst offenders? Construction debris (immediate low flow) and hard water scale (gradual pressure loss). Flushing your kitchen faucet within 24 hours of any water disruption stops 90% of long-term damage. If your stream looks like a showerhead after a vacation rental stay, skip the plumber—start with the two-minute flush below.
Quick Faucet Flush for Instant Pressure Recovery
Use when: Water pressure drops after city work, new installation, or sudden flow reduction. Time required: 2 minutes.
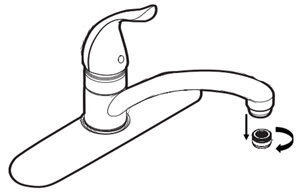
Step 1: Remove the Aerator Without Losing Parts
Twist the faucet tip counter-clockwise by hand. If stuck, wrap a rubber jar opener around it—never use metal pliers directly on chrome. Critical: Catch the black rubber washer that sits above the aerator. It’s tiny and sinks fast. Place both parts on a paper towel to inspect: if the screen looks like a pepper shaker full of black sand, you’ve found your culprit.
Step 2: Blast Loose Debris From Valve Body
Move the handle to the middle (hot/cold mix position) and open both valves wide. Let water roar for exactly 120 seconds. The high-velocity surge pushes particles straight past the spout. Why 120 seconds? Shorter intervals leave debris; longer wastes water. Watch for color changes—a rusty start clearing to clear water confirms success.
Step 3: Reinstall Components Correctly
Hand-tighten the aerator, then add only 1/8 extra turn with pliers wrapped in a washcloth. Overtightening cracks ceramic inserts. Test flow: if the stream is solid and quiet, you’re done. If not, debris is deeper—proceed to the deep-flush method.
Deep-Flush for Stubborn Grit After Plumbing Repairs
Use when: Quick flush fails, metallic flecks appear, or after major pipe work. Time required: 15-20 minutes.
Shut Off Water and Relieve Pressure Safely
Turn both under-sink shutoff valves clockwise until firm. Never skip this: Open the faucet handle to bleed residual pressure—water spurting during disassembly causes slips and damage. Place an old towel in the sink basin to catch dropped parts.
Remove Cartridge Without Damage
Pop off the decorative cap with a flathead screwdriver. Remove the handle screw and lift straight up—wiggling cracks plastic bases. Grasp the cartridge stem firmly and pull; it slides out like a drawer. Pro tip: Snap a phone photo of its orientation. Reversing hot/cold ports during reassembly causes scalding risks.
Flush Valve Body With Controlled Surge
Place an upside-down bucket over the open faucet to deflect water downward. Crack the supply valves open for 45 seconds—enough to blast the cavity without flooding. Water rockets upward, carrying embedded chips. Close valves, reinstall the cartridge (aligning with your photo), and reassemble handles. Run water for one minute before reinstalling the aerator. Leaks around handles mean the cartridge isn’t fully seated—pull and retry.
Unclog Pull-Down Spray Head With Vinegar Soak

Diagnose Hose vs. Head Blockage
Hold the hose fitting steady with one hand while unscrewing the spray head counter-clockwise. Turn on the faucet: strong flow from the bare hose means the head is clogged. Weak flow indicates debris in the hose—proceed to back-flushing.
Dissolve Mineral Scale Fast
Submerge the head and its mesh screen in white vinegar for 45 minutes. For rock-hard limescale, microwave the vinegar for 30 seconds first—warm acid works 3x faster. Scrub gently with an old toothbrush (never steel wool—it scratches). Warning: Commercial descalers like CLR can etch finishes—rinse thoroughly if used.
Emergency Back-Flush With a Dime (Use Sparingly)
Only when: Dinner guests arrive and flow is critical. This is a temporary fix.
- Remove the aerator.
- Press a dime firmly over the open spout to seal it.
- Open both handles fully.
- Instantly shut off under-sink valves—the pressure drop reverses flow, sucking debris backward.
- Remove the dime and run water normally.
Critical caution: Overuse can dislodge seals. Never use on ceramic disk faucets—pressure spikes crack cartridges.
Monthly Faucet Maintenance That Prevents Clogs
Hard water areas need this every 30 days; soft water zones every 90 days.
- Unscrew aerator and spray head.
- Soak parts in undiluted white vinegar overnight.
- Rinse under running water while scrubbing screens with a toothbrush.
- Reinstall hand-tight plus 1/4 turn—overtightening strips threads.
Pro tip: Tape your under-sink valves with red “OFF” labels. You’ll never hunt for shutoffs during emergencies.
Decode Faucet Symptoms With This Troubleshooting Guide
| Symptom | Hidden Cause | Exact Flush Action |
|---|---|---|
| Sudden trickle after city work | Sediment in aerator | Quick flush + aerator clean |
| Pull-down head won’t spray | Screen clogged at hose joint | Detach head, soak, back-flush hose |
| Hot water slower than cold | Debris in cartridge | Deep-flush valve body |
| Black specks in water | Pipe scale breaking loose | Deep-flush + install whole-house filter |
Safety Steps Professionals Never Skip
Always shut off water at the source valves before disassembly—never rely on the faucet handle. Relieve pressure by opening the tap after shutoff; trapped water blows parts across the room. Protect finishes with painter’s tape when using wrenches—polished chrome scratches with one slip. Check anti-scald stops on single-handle faucets before running hot water; limit stops prevent accidental scalding. Replace damaged cartridges immediately—they cost $15 and stop hidden leaks wasting 30 gallons daily.
Under-Sink Checklist: Laminate This
- Aerator off → 2. Hot/cold open 120 sec → 3. Aerator on
- Still slow? → Deep-flush valve body
- Monthly: Vinegar soak aerator & head
Tape this checklist under your sink. When flow drops, you’ll fix it before the coffee pot fills. How to flush kitchen faucet isn’t plumbing magic—it’s knowing when sediment strikes and acting fast. Do this once, and you’ll never pay $150 for a “clogged faucet repair” again. For persistent issues after deep-flushing, inspect your home’s main shutoff valve—a partially closed valve mimics clog symptoms.

