
That pristine vinyl finish on your kitchen cabinets has started peeling at the edges, bubbling near the handles, or worse—completely detaching in large sections. These unsightly defects instantly age your kitchen, making even spotless countertops feel neglected. The good news? Most how to fix peeling vinyl kitchen cabinets projects require basic tools you likely own and can be completed in a weekend. Whether you’re dealing with minor edge lifting or full panel replacement, this guide delivers proven techniques to restore your cabinets’ sleek appearance without costly professional help. You’ll learn to diagnose damage types, apply the right adhesives, and prevent future peeling—saving hundreds while extending your cabinets’ life.
Diagnose Your Vinyl Cabinet Damage Type
Before grabbing tools, accurately identifying your peeling pattern determines the repair approach. Misdiagnosis leads to wasted effort and temporary fixes that fail within months. Examine each cabinet under bright light, pressing gently on suspect areas to assess severity.
Spot Minor Edge Lifting Early
Look for vinyl lifting less than 2 inches at corners or along door edges—common near hinges where movement stresses adhesive bonds. These small separations expose raw substrate but haven’t yet compromised structural integrity. Act immediately: Delaying allows moisture penetration that weakens the underlying particleboard, turning minor repairs into full replacements. Early intervention with wood glue solves 80% of peeling issues before they escalate.
Identify Surface Bubbles Forming
Press your palm across cabinet fronts to detect air pockets trapped beneath the vinyl. These bubbles—often near heat sources like ovens or dishwashers—indicate adhesive failure without surface tearing. Critical distinction: Bubbles feel spongy under pressure versus hard tears. Left untreated, they expand as moisture seeps into the gap, eventually causing large-scale delamination. Target these with precision injection techniques before they rupture.
Confirm Complete Panel Failure
Check for vinyl fully detached in areas larger than a credit card, or sections with visible tears exposing raw substrate. This advanced damage occurs when moisture saturation compromises the entire adhesive layer. Do not attempt spot repairs: Trying to glue large loose sections creates uneven seams and poor adhesion. You’ll need full panel replacement for a seamless, lasting result—skip this section only if damage is truly extensive.
Gather Your Vinyl Repair Toolkit

Using incorrect adhesives or tools guarantees failure. Vinyl requires specific bonding agents that won’t warp surfaces or leave visible residue. Assemble these essentials before starting—half-finished repairs invite further damage.
Choose the Right Adhesives
Wood glue (like Titebond II) works exclusively for minor edge lifting where substrate remains intact. Its water content slightly swells wood fibers for tighter bonds. For bubble repairs or full replacements, contact cement (such as DAP Weldwood) is mandatory—it creates an instant, waterproof seal when activated. Never substitute PVC cement or super glue; they’ll discolor vinyl or cause brittleness. Grab a paint syringe ($3 at hardware stores) for injecting glue into bubbles without messy overflow.
Essential Application Tools
- Xacto knife with #11 blade for precise bubble incisions
- J-roller (or rolling pin) to eliminate air pockets during reapplication
- Serrated-edge utility knife (not Xacto) for clean trimming—standard blades tear vinyl
- Cotton swabs for controlled glue application in tight corners
- Router with flush-trim bit (optional but recommended for pro results)
Pressure Application Gear
Masking tape (2-inch width) provides temporary hold for small repairs without residue. For larger sections, use C-clamps with ½-inch thick plywood spacers to distribute pressure evenly—direct clamp pressure dents particleboard. Heavy books or weights work for flat cabinet faces when clamps aren’t feasible. Never skip this step: inconsistent pressure causes re-peeling within weeks.
How to Fix Minor Edge Lifting on Vinyl Cabinets
Small edge separations are the easiest to resolve if caught early. This 15-minute fix requires only wood glue and household items—no special skills needed.
Apply Adhesive Precisely
Lift the peeling edge gently with an Xacto knife handle. Dip a cotton swab into wood glue and work it into the exposed substrate using circular motions—avoid excess glue that seeps out and leaves white residue. Apply just enough to coat the bare area; too little won’t bond, too much creates a messy cleanup. Let the glue sit for 2 minutes to partially absorb into the particleboard.
Reattach Vinyl Section
Starting at one end, press the vinyl firmly back onto the substrate, using your thumb to “iron” out air pockets toward the loose edge. Work slowly: Rushing traps air that reforms bubbles. For curved corners, use a plastic credit card to apply even pressure without scratching. If the vinyl resists lying flat, place a warm, damp cloth over it for 30 seconds to make the material pliable.
Secure With Temporary Pressure
Lay 2-inch masking tape strips perpendicular to the repaired edge, extending 3 inches onto the surrounding surface. Place heavy books or small C-clamps over the tape—check alignment hourly to ensure even pressure. Leave in place for 24 hours; premature removal causes re-peeling. Remove tape at a 45-degree angle to avoid lifting fresh repairs.
Fix Surface Bubbles in Kitchen Cabinet Vinyl
Bubbles signal hidden adhesive failure needing surgical intervention. Attempting to “pop and glue” without proper technique traps moisture that accelerates damage.
Create Access Points
Hold an Xacto knife at a 15-degree angle and make a single straight incision across the bubble’s center—never cut in circles which weakens the vinyl. The slit should be barely visible (1-2 inches long) and parallel to the grain pattern. Wipe away dust with a dry cloth; moisture here compromises adhesion.
Inject Adhesive Solution
Fill a paint syringe with wood glue and insert the tip through the incision. Squeeze gently while withdrawing the syringe to deposit glue evenly under the bubble—use half the amount you think necessary. Over-injection causes glue seepage that stains visible surfaces. Target the glue toward the bubble’s outer edges where adhesion failed first.
Flatten and Seal
Immediately press the bubble flat with your palm, working from center to edges to force out trapped air. Cover the area with masking tape and place a flat board weighted with books on top. Critical step: Check after 10 minutes—reapply pressure if the bubble reappears, indicating insufficient glue. Leave weighted for 48 hours; bubbles often re-form if curing time is cut short.
Replace Damaged Vinyl Panels Completely
When vinyl is torn or detached over 30% of a panel, replacement delivers the only durable solution. Matching material is key—mismatched grain patterns look worse than peeling vinyl.
Source Matching Material
Take a 2×2 inch cabinet sample to specialty vinyl suppliers (not big-box stores). Grain pattern matters more than color: Lighting changes make color variations less noticeable than misaligned wood grains. Request 10% extra material for trimming errors—vinyl batches vary slightly. If exact matches are unavailable, consider full-cabinet rewrapping for uniformity.
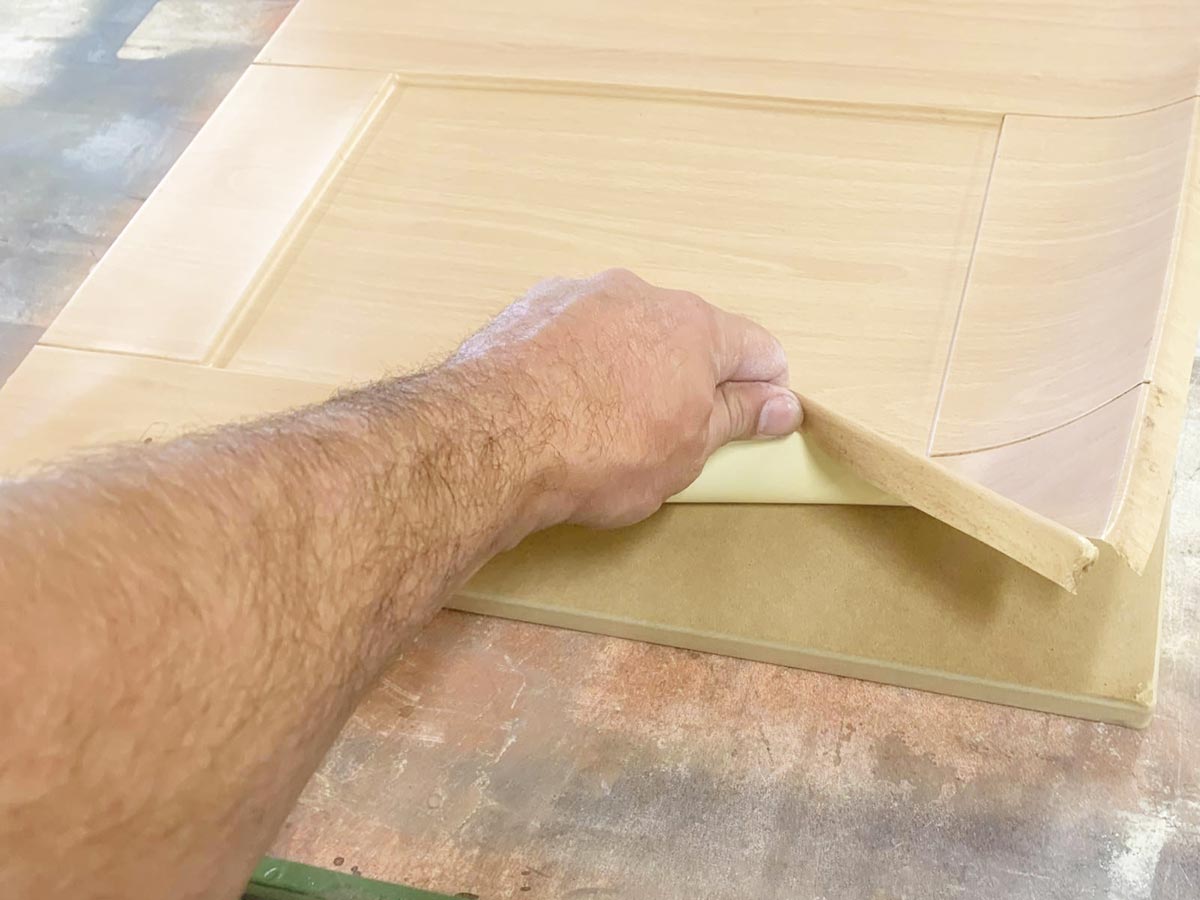
Cut Oversized Replacement Pieces
Measure the damaged area and cut vinyl 2 inches larger on all sides. Why oversized? It allows repositioning during application and ensures full coverage over damaged edges. Place the new vinyl grain-side down on a clean surface—never stretch it, as tension causes future peeling. Use a straightedge and serrated knife for clean cuts.
Apply Contact Cement Correctly
Brush contact cement onto both the cabinet substrate and vinyl backing in thin, even coats. Critical timing: Wait until the adhesive turns from glossy to matte (15-30 minutes)—this “tack stage” ensures maximum bond strength. Never apply in humid conditions; moisture prevents proper curing. Work on one cabinet door at a time to avoid cement drying prematurely.
Position and Smooth Methodically
Align the vinyl’s grain pattern with adjacent cabinets before making contact. Once placed, use a J-roller with firm, overlapping strokes from center outward—start vertically, then horizontally to eliminate all air pockets. If wrinkles form, gently lift and reposition; contact cement bonds instantly on second contact. Apply even pressure across the entire surface for 5 minutes.
Trim Excess Material Professionally
After 24 hours of curing, trim overhang using a router with flush-trim bit set to the cabinet’s edge thickness. No router? Score along the edge with a utility knife guided by a straightedge, then peel away excess. Sand trimmed edges lightly with 220-grit paper to remove burrs—visible cut marks ruin the finish.
Maintain Pressure During Critical Curing
Adhesive strength depends entirely on consistent pressure during curing. Skipping this step causes 90% of repair failures.
Wood Glue Curing Timeline
Most wood glues require 24 hours under pressure for full bond strength. Check repairs after 12 hours—if edges lift when tapped, reapply pressure. Avoid cabinet use during this period; even light handle contact disrupts curing. Humidity below 50% accelerates drying but reduces bond strength—ideal conditions are 70°F and 40% humidity.
Contact Cement Activation Process
Contact cement needs precise timing: 15-30 minutes to become tacky plus 72 hours for full cure. Never rush alignment—once surfaces touch, they’re permanently bonded. During the first 6 hours, check pressure points hourly to redistribute clamps if vinyl shifts. Full bond strength develops only after 72 hours, so avoid heavy use.
Pressure Distribution Techniques
Place ½-inch plywood spacers between clamps and vinyl to prevent dents. Key trick: Lay a towel over the cabinet first—it absorbs excess glue and protects surfaces. For curved cabinet fronts, use rolled-up towels as custom pressure points. Release clamps gradually: remove 50% after 24 hours, the rest after 48.
Prevent Future Vinyl Peeling Proactively
Repairs fail without addressing root causes. Implement these habits to double your cabinets’ lifespan.
Control Moisture Exposure Immediately
Install a 100+ CFM exhaust fan above your stove—steam is vinyl’s biggest enemy. Wipe spills within 10 seconds; prolonged moisture exposure dissolves adhesives. Place a moisture-absorbing box (like DampRid) under sinks to combat humidity from plumbing.
Use Vinyl-Safe Cleaning Methods
Never use ammonia-based cleaners (like Windex) or abrasive pads—they degrade adhesive bonds. Mix 1 tsp castile soap with 1 quart warm water for safe cleaning. Dry surfaces immediately with a microfiber cloth. Test new cleaners on hidden areas first.
Monitor for Early Warning Signs
Check cabinet edges monthly with a flashlight held parallel to surfaces—this highlights subtle lifting invisible in normal light. Address micro-bubbles immediately with syringe injection; waiting lets moisture compromise larger areas. Reapply edge sealant annually on high-moisture zones near sinks.
Successfully executing how to fix peeling vinyl kitchen cabinets starts with matching your repair method to the damage severity. Minor edge lifting demands wood glue and masking tape pressure, while bubbles require surgical glue injection through precise incisions. For torn or detached panels, vinyl replacement with contact cement delivers professional results when you prioritize grain matching and proper curing pressure. Crucially, prevent recurrence by controlling kitchen humidity, using pH-neutral cleaners, and inspecting edges monthly. These proven techniques transform eyesore cabinets into like-new surfaces for under $20—proving that with the right approach, restoring your kitchen’s heart doesn’t require a full remodel. Your cabinets’ renewed sleek finish will make every meal feel special again.

