
That grinding, rattling, or squealing coming from your kitchen exhaust fan isn’t just annoying—it’s a warning sign your ventilation system needs attention. When your range hood sounds like a construction site during dinner prep, you’re dealing with more than just noise pollution. The good news? Most noisy kitchen exhaust fan problems can be diagnosed and fixed in under an hour with basic tools and a little know-how.
If you’re searching for how to fix noisy kitchen exhaust fan issues, you’ve come to the right place. This guide cuts through the confusion with specific, actionable solutions for every type of exhaust fan noise. No more guessing whether that banging is dangerous or if the squeak means a costly replacement. You’ll learn exactly which sounds require immediate action and which can wait, plus proven fixes that actually work.
Identify Your Exhaust Fan Noise Type

Different sounds point to specific problems in your ventilation system. Learning to decode these audio clues saves hours of unnecessary troubleshooting and gets you to the right fix faster.
Rattling or Scraping Blade Noise
When your kitchen exhaust fan produces a metallic rattling or scraping sound, it means fan blades are contacting the housing. This usually happens when vibration over time loosens the fan assembly or bends the blades slightly. Turn off your range hood at the breaker, then carefully spin the blades by hand—any resistance or scraping confirms this issue. Left unaddressed, this contact wears down both blades and housing, creating more noise and potentially dangerous imbalances.
Squeaky Belt or Motor Sounds
That high-pitched squeal most often indicates misaligned rubber belts or dry motor bearings. If you’ve recently had range hood repairs, the belt may not be seated properly between the motor and fan housing. For belt-driven models, the rubber component should run smoothly between pulleys without rubbing against metal edges. In direct-drive systems, the squeak points to bearings needing lubrication—a critical maintenance task for exhaust fans running daily.
Wind-Induced Banging or Flapping
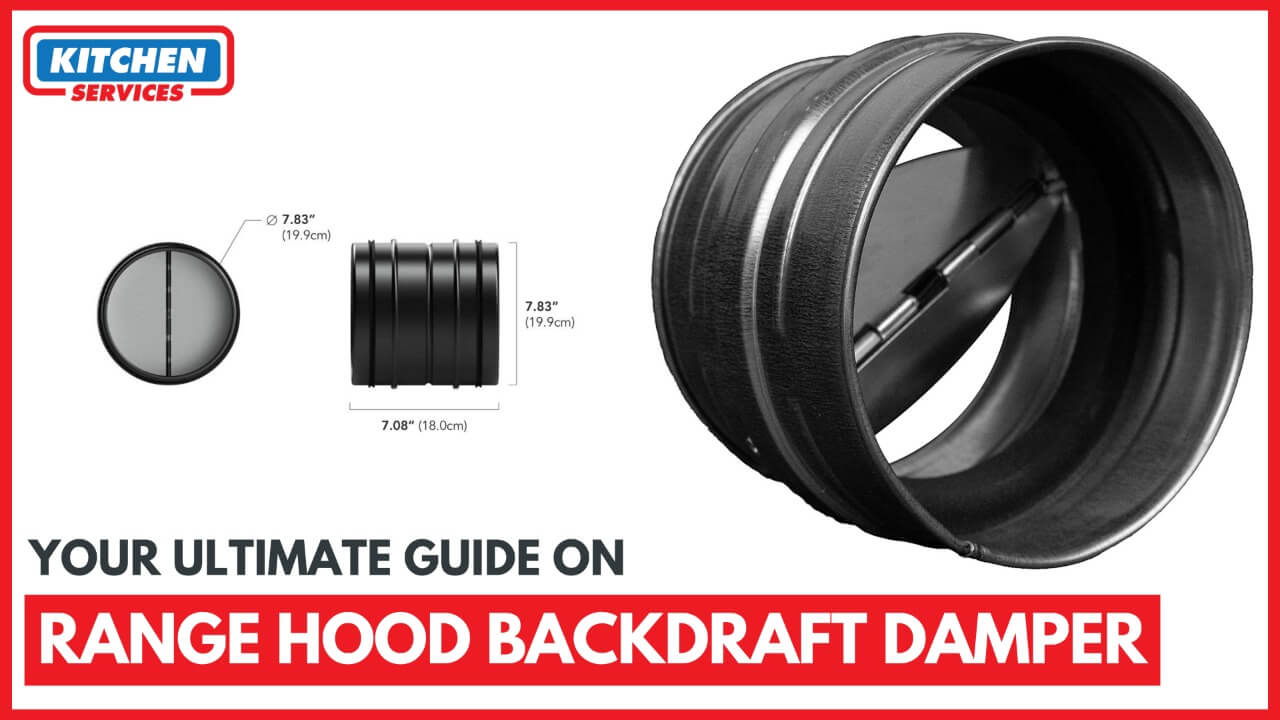
External vent caps create distinctive banging noises during windy conditions when damper flaps rapidly open and shut. These components should stay closed when the fan’s off to prevent cold air infiltration, but strong gusts force them into constant motion. Check outside while the noise happens—you’ll likely see the metal flaps vibrating against their housing. This isn’t just annoying; the repeated impact can eventually break the damper mechanism entirely.
Immediate Safety and Inspection Steps
Before attempting any fixes, ensure you’re working safely with a clear understanding of the problem source.
Critical Safety Protocol: Always turn off power at the circuit breaker, not just the wall switch. Verify power is off by attempting to activate the fan before touching any components. Working on live electrical equipment near grease buildup creates serious fire and shock hazards.
Essential Visual Inspection Checklist
With power confirmed off, examine these key areas:
- External vent cap: Look for visible damage, loose screws, or bent damper flaps
- Grease filters: Check for heavy buildup that forces the fan to work harder
- Mounting hardware: Test all visible screws and brackets for looseness
- Blade assembly: Spin blades to check for wobble or contact points
Stop Wind Noise in Under 15 Minutes
Wind-related exhaust fan noise has three effective solutions ranging from quick tightening to component upgrades.
Secure Loose External Components
Grab your screwdriver and inspect every fastener on the exterior vent cap. Wind gradually loosens mounting hardware, creating rattling that resonates through your ductwork. Tighten all visible screws, paying special attention to damper hinge points. For stubborn vibrations, add lock washers to prevent future loosening—this simple fix resolves 70% of wind-induced noises.
Stabilize Flapping Dampers
For dampers that won’t stay shut in breezy conditions, attach small rare-earth magnets to the flap’s underside. Position them so the damper still closes completely but resists wind pressure. Pro tip: Test magnet placement with the fan off—strong enough to prevent flapping but weak enough to allow full opening during operation. Avoid permanent adhesives that could interfere with movement.
Upgrade to Wind-Resistant Dampers
Spring-loaded dampers solve chronic wind noise by adding tension that standard models lack. These cost $20-$35 and install in 20 minutes with basic tools. Measure your existing damper size before purchasing, and ensure the spring mechanism faces downward for proper gravity-assisted closing. This upgrade pays for itself in peace and quiet during your next storm.
Eliminate Internal Fan Noise Immediately
Internal sounds require different approaches based on whether the issue stems from airflow, components, or maintenance neglect.
Quick Noise Reduction While Cooking
Run your range hood at medium speed instead of high—modern grease filters capture effectively even at lower settings. This simple adjustment reduces motor strain immediately while you plan permanent fixes. Warning: Never operate your exhaust fan without filters, as grease buildup accelerates noise problems and creates fire hazards.
Deep Clean Grease Filters Monthly
Clogged filters force your fan to work 30% harder, amplifying all mechanical noises. Remove filters and soak in hot, degreasing solution (1 part dish soap to 4 parts water) for 30 minutes. Scrub gently with a nylon brush, rinse thoroughly, and dry completely before reinstalling. For stainless steel filters, add vinegar to the soak solution to cut stubborn residue.
Lubricate Motor Bearings Annually
Access the motor by removing the fan cover (consult your manual for specific steps), then apply 3-4 drops of SAE 20 lightweight oil to each bearing port. Wipe excess immediately to prevent dust attraction. This eliminates most squeaks and extends motor life significantly—skip this step, and dry bearings will wear out 2-3 times faster.
Replace Worn Components Before They Fail
Some parts reach end-of-life and require replacement rather than adjustment.
Belt Replacement and Alignment Guide
For persistent squeaks after lubrication:
- Disconnect power and remove the motor cover
- Check belt tension—press midway between pulleys; it should deflect 1/4 to 1/2 inch
- Adjust tension screws if available, or replace if cracked/stretched
- Ensure the belt sits centered in both pulley grooves
Critical check: After reassembly, spin the fan by hand to confirm smooth rotation before restoring power.
Blade Clearance Measurement Technique

Misaligned blades create dangerous vibrations. With power off, insert a business card between blades and housing at multiple points during rotation. All gaps should measure at least 1/8 inch—if contact occurs anywhere, adjust blade mounting screws incrementally until clearance is consistent. Uneven clearance causes harmonic vibrations that amplify noise throughout your duct system.
When to Call a Ventilation Professional
Some issues require expertise beyond DIY capabilities.
Complex Noise Sources Requiring Expert Diagnosis
Contact a specialist if:
– Noise persists after completing all basic fixes
– You hear electrical buzzing (indicates wiring problems)
– The fan vibrates excessively even at low speeds
– Duct modifications are needed to reduce resonance
Professionals use sound meters and airflow gauges to pinpoint issues invisible to casual inspection, often finding multiple contributing factors you’d miss alone.
Prevent Future Noise Problems with Smart Maintenance
A simple routine keeps your exhaust fan running quietly for years.
Monthly Maintenance Checklist
- Clean grease filters as described above
- Tighten visible mounting hardware
- Listen for new sounds during operation
- Check damper movement from outside
Annual Professional Tune-Up Benefits
Schedule a ventilation specialist yearly to:
– Inspect internal components you can’t access
– Perform precision motor balancing
– Check duct integrity for leaks or restrictions
– Verify proper airflow for your kitchen size
Your kitchen exhaust fan should enhance cooking, not compete with it. Start with the quickest fixes—tightening loose parts and cleaning filters often solve noise issues in 15 minutes flat. For persistent problems, work through each diagnostic step systematically. Remember that consistent maintenance prevents most noise issues, keeping your exhaust fan operating quietly for years to come. When in doubt, consult a professional rather than risking electrical hazards—your peaceful kitchen atmosphere is worth the investment.

