
Your Cuisinart blender suddenly dies while crushing ice for margaritas. The motor hums but blades won’t spin, or worse—you smell burning plastic. Before replacing this $100+ appliance, know that 80% of Cuisinart blender failures have simple DIY fixes. Most repairs take under 30 minutes with basic tools and solve problems across popular models like CPB-380 countertop units and CSB-75 Smart Stick immersion blenders. You’ll learn to diagnose power failures, motor issues, and model-specific problems that manufacturers don’t highlight in manuals.
Stop wasting money on replacement blenders when safety switch jams or worn couplers cause most breakdowns. This guide delivers exact troubleshooting steps verified through Cuisinart repair forums and service manuals. Within 15 minutes, you’ll identify whether you’re facing a $5 fix or need to consider replacement—saving you unnecessary repair costs.
Safety Switch Failures That Block Power
Why Your Cuisinart Won’t Power On
Food debris jamming the safety switch causes most “dead blender” scenarios. This critical mechanism at the cup attachment port prevents operation if the container isn’t properly locked. Sticky smoothie residue or dried pulp immobilizes the switch, tricking your blender into thinking the cup is insecure. Don’t replace the motor yet—this takes 5 minutes to diagnose.
Immediate Fix Protocol:
– Unplug the unit and remove the blending cup
– Locate the small rectangular switch behind the connection port
– Dip a cotton swab in rubbing alcohol and scrub around the switch
– Press the switch 10 times to ensure full movement
– Reattach the cup firmly until it clicks
– Test with the power dial at lowest setting
If cleaning fails, inspect the power cord for internal breaks. Fraying occurs where the cord enters the base from repeated bending. Critical warning: Never tape damaged cords—this creates fire hazards. Replace cords immediately using these steps:
- Unplug and flip the blender base upside down
- Remove 4-6 base screws with a Phillips screwdriver
- Note original wire color positions (black to black, white to white)
- Disconnect old cord and install new 16-gauge replacement
- Reassemble and test with 1 cup of water
Intermittent Power Fixes for Jittery Operation
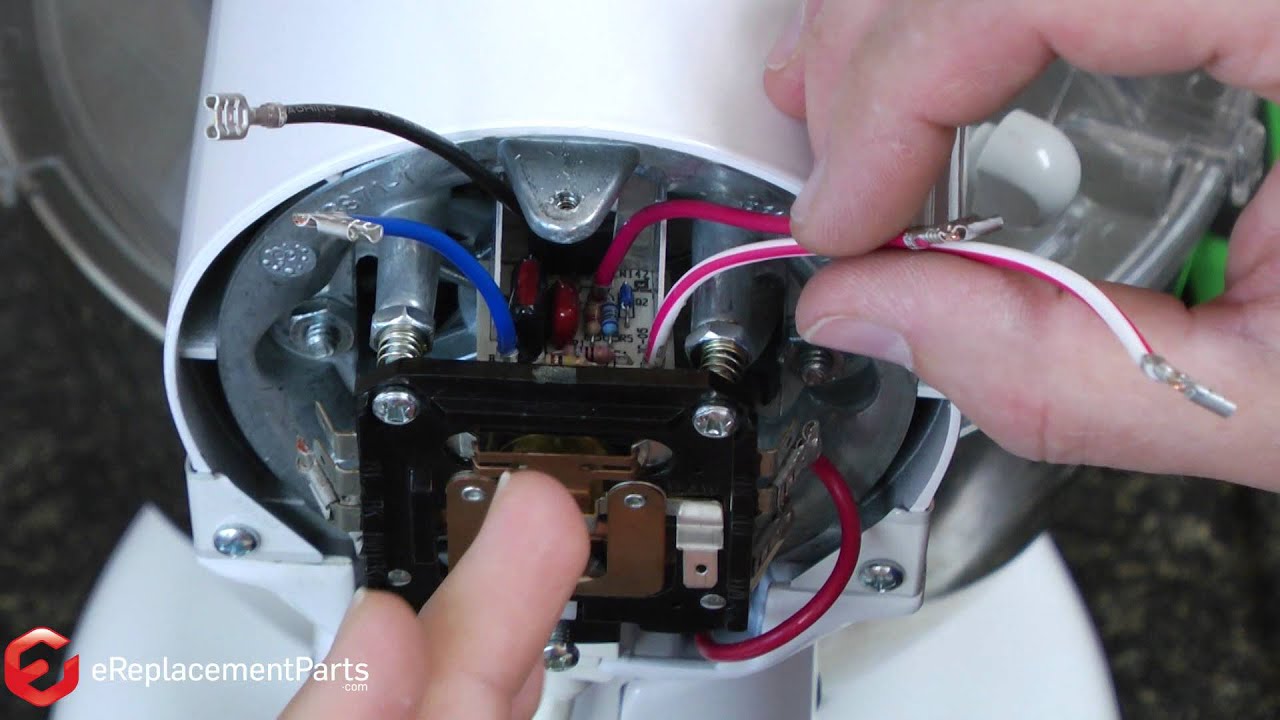
When your Cuisinart only works when you wiggle the cord, loose internal connections are the culprit—not the outlet. Vibration cracks solder joints where wires meet the power switch board over time. This requires component-level repair:
- Remove the base cover as described above
- Gently wiggle each wire at the circuit board connection
- Look for cracked solder joints (small black cracks near metal pins)
- Pro tip: Reflow joints with a 60W soldering iron—heat until solder melts and re-solidifies
- Test continuity with a multimeter before reassembly
Motor and Blade Performance Failures

Smoke or Burning Smell From Base Unit

Stop using the blender immediately if you detect smoke or burning odors. This indicates irreversible motor winding damage from overloading frozen ingredients or continuous operation beyond 60 seconds. Cuisinart motors overheat when processing thick mixtures like nut butters without pauses. Motor replacement requires precision:
- Remove base screws and lift housing
- Locate the cylindrical motor connected to the blade coupler
- Photograph all wire connections before disconnection
- Install matching replacement motor (verify part number on label)
- Run empty for 30 seconds before first use
Cost reality check: New motors cost $60-$70 (60-70% of a new blender). If your unit is over 5 years old, replacement is usually more economical unless sentimental value applies.
Weak Blending Power Fixes for Struggling Motors
When your Cuisinart runs but won’t crush ice, the motor often isn’t the problem. Three common failures reduce performance:
Blade Assembly Inspection Checklist:
– Remove blades and check for hair/string wrapped around the shaft
– Examine blades for bends or chips (replace if damaged)
– Test spin resistance—should rotate smoothly with light finger pressure
– Critical: Tighten blade nut to finger-tight plus 1/4 turn (over-tightening damages bearings)
Coupler Failure Diagnosis:
The plastic coupler transfers motor power to blades and strips after 2-3 years. Perform this test:
– Hold blade assembly stationary
– Try spinning the motor coupler with your fingers
– If it spins freely without moving blades: Coupler is stripped
– Replacement takes 2 minutes—just pop out the old piece and insert new
Cuisinart Smart Stick CSB-75 Emergency Repairs
Handle Lock Failure Fixes
The CSB-75’s detachable shaft lock fails after 2-3 years due to worn plastic tabs. Instead of buying a $40 replacement, restore function with household items:
- Remove the shaft completely
- Inspect plastic locking tabs inside the handle for wear
- Smooth rough edges with 220-grit sandpaper
- Apply food-grade silicone grease to moving parts
- If tabs are broken: Replacement handles cost $15-$20 (search part #CSB-75-LOCK)
Immersion Blender Power Restoration
Smart Stick power failures stem from food debris in the two-speed slide switch. Cleaning requires disassembly:
- Unplug and remove 3 handle screws
- Separate handle halves carefully
- Spray electrical contact cleaner into switch mechanism
- Work the switch back/forth 30 times
- Air-dry for 10 minutes before reassembly
Never submerge the handle—water damage voids all warranties and causes permanent shorts.
Blade Bearing Lubrication Protocol
Grinding noises signal dry bearings. Lubrication prevents motor burnout:
- Detach the blending shaft
- Twist blade assembly counterclockwise to remove
- Scrape out old grease with a toothpick
- Apply one pea-sized drop of food-grade silicone grease
- Reassemble and test in water before food use
- Warning: Excess grease contaminates food and attracts debris
Essential Repair Toolkit for Cuisinart Blenders
Skip expensive specialty tools—these household items solve 90% of repairs:
Basic Kit (Under $10):
– Phillips #1 and #2 screwdrivers
– Flathead screwdriver for prying covers
– Needle-nose pliers for wire handling
– Cotton swabs and rubbing alcohol
Advanced Additions:
– 60W soldering iron for cord repairs ($15)
– Multimeter for electrical testing ($20)
– Food-grade silicone grease ($8)
Safety non-negotiables: Always unplug for 10+ minutes before repairs—capacitors retain dangerous charges. Never immerse motor bases in water.
Prevent Future Breakdowns With Daily Habits
Extend your blender’s life 3x with these manufacturer-hidden practices:
Daily Prevention:
– Rinse blades immediately after use—dried food jams mechanisms
– Wipe the safety switch area weekly with alcohol
– Never exceed 60-second continuous run time
– Always add liquid before frozen ingredients
Monthly Deep Maintenance:
– Soak blades in warm soapy water for 10 minutes
– Clean coupler area with a soft toothbrush
– Inspect power cord for nicks at stress points
– Lubricate Smart Stick bearings every 3 months
Repair vs Replacement Decision Matrix
Stop second-guessing whether to fix or replace—use this Cuisinart-specific guide:
Repair When:
– Unit is under 3 years old
– Problem involves safety switch, coupler, or blade assembly
– Replacement parts cost under $25
– You’ve successfully handled similar DIY repairs
Replace When:
– Motor emits smoke or burning smells
– Unit is over 5 years old
– Multiple components failed simultaneously
– Repair costs exceed 50% of new model price
Your Cuisinart blender likely has years of life left with targeted fixes. Start with the simplest solution—safety switch cleaning solves half of reported power failures. For persistent issues, systematically test couplers, blades, and connections before considering motor replacement. Most repairs cost under $15 and take less time than ordering a new appliance. By mastering these techniques, you’ll transform from frustrated user to confident home repair expert while keeping functional appliances out of landfills. Remember: 70% of “broken” blenders just need a 5-minute safety switch cleaning—so grab that cotton swab before calling it quits.

