You reach for your air fryer to make dinner, but it won’t turn on—no lights, no sounds, nothing. This common frustration affects countless home cooks daily, but most “dead” air fryers suffer from simple issues you can fix yourself. Learning how to fix an air fryer that won’t turn on saves you money and gets your favorite appliance back in action fast.
Before you consider expensive repairs or replacement, know that 80% of power failures stem from basic power supply problems, incorrect positioning, or reset needs. This guide provides systematic troubleshooting steps that solve most issues in under 30 minutes, putting you back on track for perfectly crispy meals.
Verify Your Power Source Before Blaming the Air Fryer
Don’t assume your air fryer is broken when the problem could be your electrical supply. Many units appear dead simply because they’re not receiving proper power.
Test Your Electrical Outlet Immediately
Plug a working lamp or phone charger into the same outlet your air fryer uses. If this device fails, your circuit breaker may have tripped. Locate your electrical panel and check for breakers that aren’t fully in the “on” position. Reset any suspect breakers by flipping them completely off, then back on. Retest the outlet before reconnecting your air fryer.
Confirm Proper Voltage Requirements
Your air fryer requires specific voltage to function—110-120V AC in North America or 220-240V internationally. If you’ve recently moved or are using an adapter, mismatched voltage could prevent startup. Use a multimeter to verify your outlet delivers the correct voltage for your model. Never operate your air fryer with insufficient voltage, as this can cause permanent damage.
Spot and Fix Damaged Power Cords on Your Air Fryer

Physical cord damage causes 25% of air fryer power failures. A quick inspection takes just two minutes but could solve your problem immediately.
Identify Dangerous Cord Damage
Run your fingers along the entire cord length, paying special attention to where it enters the plug and connects to the air fryer body—these stress points fail most often. Look for:
– Cuts or fraying in the insulation
– Areas where wires might be exposed
– Thinning or weakened sections
– Discoloration from overheating
Never use an air fryer with visible cord damage—replace the cord or entire unit for safety.
Repair Plug Connection Problems
Examine the plug’s metal prongs for bending or corrosion. Gently straighten slightly bent prongs using needle-nose pliers, working slowly to avoid breakage. Clean corrosion with fine-grit sandpaper or a wire brush. The plug should fit snugly without wobbling—loose connections prevent proper power transmission to your appliance.
Reset Overheated Air Fryer Thermal Protection in 60 Minutes
Automatic thermal cutoff systems shut down your air fryer when internal temperatures become unsafe. These systems often trigger during normal cooking and require cooling periods.
Allow Proper Cool Down Time
If your air fryer was recently used, thermal protection may prevent immediate restart. Unplug the unit and move it to a cool, well-ventilated area. Wait 30-60 minutes for internal components to cool completely—thermal protection systems reset automatically once temperatures drop to safe levels.
Clear Blocked Vents Preventing Airflow
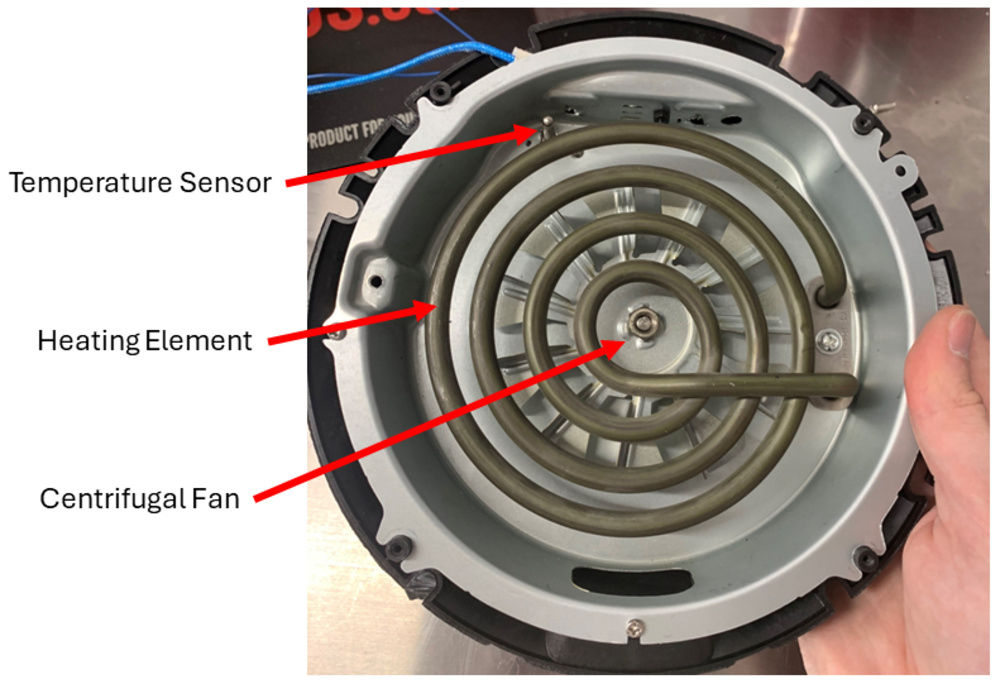
While waiting for cooling, inspect all air vents around your air fryer. Blocked vents cause rapid overheating and repeated shutdowns. Use a soft brush or compressed air to remove grease buildup, dust, or food particles from vent openings. Ensure at least 4 inches of clearance around the unit during operation for proper airflow.
Fix Basket Positioning Issues Preventing Air Fryer Startup
Safety interlock systems prevent operation when components aren’t correctly positioned. These systems frequently cause “dead” unit symptoms when baskets sit slightly askew.
Properly Seat the Basket for Power Activation
Remove the basket completely and check the cavity for food debris or foreign objects. Reinsert the basket firmly until you hear or feel it click into place. Many users unknowingly prevent startup by inserting the basket at a slight angle—ensure it’s fully seated straight down.
Test and Clean Safety Switches
Locate the small safety switches where the basket meets the main unit—these often get stuck with grease buildup. With the unit unplugged, gently press each switch to ensure it moves freely. Clean around switches using cotton swabs lightly dampened with isopropyl alcohol. Allow complete drying before testing power.
Test and Replace Blown Fuses in Your Air Fryer (Step-by-Step)
When external checks fail, internal fuses may have blown. This requires minor disassembly but remains a DIY-friendly repair for most models.
Access Your Air Fryer’s Internal Fuse
Unplug your air fryer and allow complete cooling. Most models hide the thermal fuse behind the bottom panel or rear cover. Remove 4-6 screws typically located on the unit’s underside. Consult your user manual for specific disassembly instructions as designs vary significantly between manufacturers.
Confirm Fuse Continuity with Multimeter
Set your multimeter to continuity mode (the setting that beeps when probes touch). Touch one probe to each fuse terminal. A working fuse produces a beep or shows zero resistance while a blown fuse shows infinite resistance. Replace only with exact fuse replacements matching voltage and amperage ratings—never bypass fuses as this creates serious fire hazards.
Reset Frozen Air Fryer Control Panels Without Tools
Software glitches can freeze control panels, making air fryers appear completely dead. Simple reset procedures often restore normal function in minutes.
Perform a Complete Power Cycle Reset
Unplug your air fryer for a full 30-60 minutes to allow internal capacitors to discharge completely. Some models respond to holding specific button combinations while plugging the unit back in—common combinations include holding the power button plus temperature down for 10 seconds. Check your user manual for model-specific reset procedures.
Clean Unresponsive Control Buttons
Stuck or dirty buttons prevent proper operation. Test each button individually for responsiveness. Clean around buttons using cotton swabs lightly dampened with isopropyl alcohol—avoid excessive moisture that could seep into electronics. Allow the alcohol to evaporate completely before testing power-on function.
Clear Motor and Fan Obstructions Stopping Air Fryer Power

Seized motors or fan obstructions can overload electrical systems, preventing startup. Quick inspections identify these mechanical issues before they cause permanent damage.
Manually Test Fan Blade Movement
With the air fryer unplugged and basket removed, locate the fan blade visible through the cooking chamber. Attempt to rotate the blade gently using your finger. The blade should spin freely with minimal resistance. Stiff or seized rotation indicates motor bearing failure requiring professional repair or replacement.
Remove Hidden Obstructions Immediately
Check the fan area thoroughly for foreign objects. Common obstructions include:
– Packaging materials left after first use
– Food wrappers that slipped through the basket
– Broken components from previous use
– Large food pieces that migrated downward
Never operate the unit with debris present as this permanently damages the motor.
7 Signs Your Air Fryer Needs Professional Repair (Not DIY)
Some power issues require expertise beyond DIY repairs. Recognize these situations to avoid safety hazards and warranty voidance.
Verify Warranty Coverage First
Locate your air fryer’s serial number—usually found on a sticker on the bottom or rear panel. Contact the manufacturer to check warranty status before attempting repairs. Most brands provide 1-2 year limited warranties covering electrical failures. DIY repairs on complex electrical systems void warranty coverage and create safety risks.
Identify Control Board Failure Indicators
If you observe any of these during inspection, seek professional help:
– Burnt components or melted plastic on control board
– Swollen capacitors visible through inspection points
– Burning smell when attempting startup
– Visible arcing or sparking during operation
Manufacturer websites typically list certified repair facilities by location for these complex issues.
Prevent Air Fryer Power Failures With These 3 Maintenance Habits
Simple maintenance prevents most power-related air fryer failures. Establish these habits to extend your unit’s lifespan significantly.
Implement Weekly Vent Cleaning Routine
Clean removable components weekly using manufacturer-recommended methods. Focus particularly on air vents and safety switch areas where grease and debris accumulate. Accumulated grease causes 60% of electrical failures in air fryers—use a soft brush or compressed air to remove buildup. Never submerge electrical components—wipe exterior surfaces with damp cloths only.
Follow Proper Storage and Usage Guidelines
Store your air fryer in a dry location with the basket removed to prevent moisture accumulation. Wrap the power cord loosely without sharp bends at connection points. During operation, maintain 4-6 inches of clearance around the unit for adequate ventilation and follow manufacturer fill level recommendations to prevent motor strain.
Your air fryer should now respond to power commands after completing these systematic checks. If these steps don’t restore function, professional service may be necessary—but you’ve eliminated the most common causes that affect 8 out of 10 “dead” units. Implement these preventive maintenance habits to avoid repeating this frustrating experience and enjoy years of reliable, crispy cooking.


