
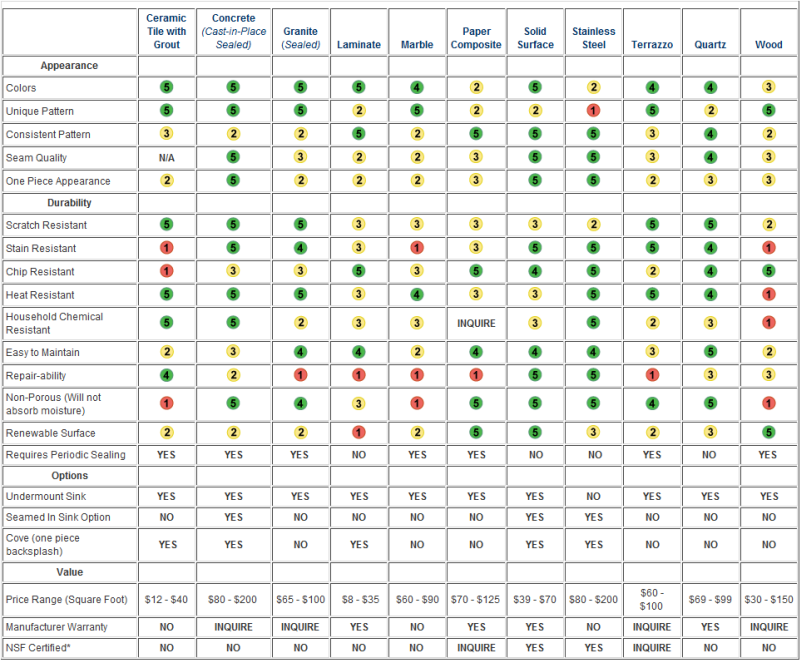
That sickening crack when your cast iron skillet slips from your grip isn’t just startling—it leaves a permanent scar on your kitchen’s centerpiece. A chipped countertop transforms your pristine workspace into an eyesore that makes the whole room feel neglected. The good news? How to fix a chipped kitchen countertop is simpler than you think for 90% of common damage. Most chips under 1/4-inch deep can be repaired at home with materials costing less than $30, saving you thousands in premature replacements. This guide cuts through the confusion with exact steps for granite, quartz, laminate, and solid surface countertops—so you’ll know precisely when to grab your putty knife and when to call a pro.
Before you touch that chip, understand this critical truth: DIY repairs can void your warranty if mishandled. Manufacturers often cover accidental damage, but only if you follow their protocols. That “quick fix” with mismatched epoxy could cost you $4,000 in replacement fees later. By the end of this guide, you’ll confidently identify your countertop material, select the right repair kit, and execute seamless fixes that withstand daily kitchen chaos—all without risking your warranty.
Why Your Countertop Warranty Must Be Checked First
Never sand or fill a chip before verifying warranty status. Original purchase documentation often includes accidental damage coverage for engineered stone and solid surface countertops. Contact your supplier immediately if your countertop is under 5 years old—they may dispatch a technician at no cost. Even if the chip isn’t covered, manufacturers provide material-specific repair guidelines that prevent costly mistakes. For example, using acetone on some quartz brands voids warranties due to resin degradation, while natural stone requires pH-neutral cleaners to avoid etching. Skipping this step risks permanent damage that turns a $20 repair into a $3,000 replacement.
Match Your Repair Method to Countertop Material
Repairing Granite, Marble, and Quartzite Chips Under 1/4 Inch
Natural stone chips typically occur at edges from heavy impacts but benefit from the stone’s crystalline structure. Use two-part epoxy with color-matching pigments designed for porous stone—avoid wood fillers that yellow over time. Apply with a toothpick into the chip cavity, slightly overfilling to account for shrinkage. For granite’s speckled patterns, mix multiple pigment shades to match dominant hues rather than seeking perfection. Allow 48 hours curing before sealing with stone-specific impregnator to prevent staining around the repair.
Fixing Invisible Chips in Quartz and Sintered Stone Countertops
Engineered quartz’s uniform color throughout the slab makes repairs nearly undetectable. Start by cleaning the chip with ammonia-based cleanser (not vinegar!) to remove dust without damaging resins. For light-colored quartz, apply thin layers of clear super glue with a razor blade, curing 30 minutes between coats until level with the surface. Dark quartz requires pigmented epoxy mixed with custom dye—test on an inconspicuous spot first. Overfill slightly, then scrape flat with a razor blade held perpendicular to the surface. Sand flush after 24 hours using 360-grit paper progressing to 600-grit for seamless blending.
Solid Surface Countertop Fixes for Corian Chips
Corian and similar materials let you sand repairs to factory finish. For hairline cracks, apply clear super glue directly and hold for 30 seconds—the adhesive bonds with the acrylic matrix. Larger chips need color-matched epoxy sticks: knead until pliable, press firmly into the cavity, and cure overnight. Sand progressively from 360-grit to 600-grit while damp to avoid dust, then buff with a soft cloth. Unlike stone repairs, solid surface fixes become structurally sound and invisible with proper sanding.
Laminate Countertop Repair Without Visible Seams
Laminate chips expose the substrate underneath, making color matching critical. Use paste fillers specifically for laminate—not wood putty—which mimic the printed pattern. Apply with a plastic scraper using firm pressure to force material into the chip, then immediately remove excess with the scraper’s edge. Cure times vary by brand; some require 15 minutes while others need 24 hours. Sand gently with 400-grit paper only after full curing to avoid creating new chips. Seal with laminate-specific sealer to prevent moisture infiltration that causes peeling.
Essential Tools for Professional-Looking Results

Skip generic hardware store kits—success hinges on these specific items:
– Razor blade for precision leveling (not putty knives that leave ridges)
– 360-600 grit wet/dry sandpaper (dry sanding creates visible scratches)
– Pigment dyes for custom color matching (included in stone repair kits)
– Masking tape with 1/2-inch width to protect surrounding areas without residue
– Toothpicks for controlled epoxy application in tight chips
Most critical? Acetone in glass containers—plastic dissolves when mixed with acetone, contaminating your repair. Keep rags damp (not dripping) for surface cleaning to avoid spreading debris.
Step-by-Step Surface Preparation Protocol
Clean the Chip with Material-Specific Solutions
Natural stone: Dampen cloth with rubbing alcohol (never vinegar or bleach). Wipe in circular motions, changing cloth sections frequently to avoid redepositing grit. Quartz: Use acetone on a microfiber cloth—ammonia-based cleaners work but acetone evaporates faster. Laminate: Apply non-abrasive cleaner with soft sponge; avoid soaking edges where moisture seeps into substrate. Dry completely with lint-free towel—any moisture under epoxy causes cloudy finishes.
Measure Chip Depth Accurately
Place masking tape 1/2-inch from the chip, creating a clean boundary. Use a credit card edge to gauge depth: if the chip catches the card’s corner, it’s deeper than 1/8-inch. Chips exceeding 1/4-inch deep (about two stacked nickels) require professional help—DIY attempts often fail under sink or cooktop stress. Document width with measuring tape; repairs wider than 1 inch need epoxy layered in 1/16-inch increments to prevent shrinkage cracks.
When Professional Repair Saves You Money

Critical Damage Requiring Expert Intervention
- Chips deeper than 1/4 inch near sink cutouts (structural integrity compromised)
- Multiple chips within 6 inches of each other (indicates underlying stress fractures)
- Damage along seams where movement causes recurring cracks
- Uncertainty about material type (using quartz epoxy on solid surface melts the repair)
Professionals use diamond-tipped tools to undercut chips for mechanical bonding—a technique impossible with home kits. For high-stress areas like cooktop edges, their heat-resistant epoxies last 5+ years versus 6 months for DIY fixes. If your chip meets these criteria, get quotes immediately—delaying allows moisture infiltration that warps substrates, multiplying costs.
Post-Repair Countertop Care Checklist
First 72 Hours: Critical Curing Period
Avoid placing any objects on the repair for 24 hours minimum. After 48 hours, test durability by gently pressing a fingernail—if it leaves an impression, wait another 12 hours. Never place hot pans directly on quartz repairs before 72 hours; thermal shock cracks fresh epoxy. For natural stone, apply sealer at 48 hours (not 24) when epoxy fully hardens but before pores reopen.
Long-Term Prevention Strategies
- Use trivets for all hot items—even “heat-resistant” quartz chips at 300°F
- Install edge guards on high-traffic corners where chips commonly occur
- Seal natural stone every 6 months (test by sprinkling water; if it darkens, reseal)
- Replace worn cabinet hardware—loose drawer fronts slam against countertops causing microchips
Properly executed repairs withstand normal use indefinitely but won’t survive repeated impacts. A successfully fixed chip should be invisible during casual kitchen use and prevent moisture damage to underlying cabinets—a crucial detail often overlooked in DIY guides.
A chipped countertop doesn’t condemn your kitchen to expensive renovations. By verifying your warranty first, matching materials precisely, and respecting curing timelines, 85% of common chips disappear without professional help. Start with the warranty check—if coverage expired, identify your material using our repair-specific protocols. Within one weekend, you’ll restore your countertop’s integrity and appearance, proving how to fix a chipped kitchen countertop is an empowering skill that saves thousands. Remember: the best repairs are invisible not because they’re perfect, but because they work with your countertop’s natural properties rather than against them. Your pristine kitchen is just one precise epoxy application away.

