
Your kitchen cabinets are installed, countertops are level, but something feels unfinished. Those awkward gaps above and below your wall cabinets scream for attention. Cornice and pelmet molding transform basic cabinetry into custom-built masterpieces—yet many DIYers avoid this final step, fearing complex corner joints and visible fixings. Properly fitted kitchen cornice pelmet creates that seamless, built-in look that separates amateur installations from professional results.
This guide walks you through professional techniques for fitting both cornice (top molding) and pelmet (bottom trim) with confidence. You’ll learn exact cutting methods, hidden fixing systems, and corner joint secrets that deliver showroom-quality results. Whether you’re finishing a single wall of cabinets or tackling an entire L-shaped kitchen, these step-by-step instructions will help you achieve clean lines and tight joints.
Essential Tools and Materials for Perfect Installation

Skip cheap tools that guarantee frustration. For professional results when you fit kitchen cornice pelmet, invest in these specific items:
Critical cutting tools:
– Quality mitre saw with sharp blade (Elu brand recommended for precision)
– Sliding mitre saw for perfect 45-degree corner cuts
– Tape measure with clear markings and pencil for accurate measurements
Secure fixing hardware:
– Appropriately sized wood screws (length varies by cabinet thickness)
– Small L-shaped brackets for pelmet attachment
– Flat angle brackets for corner reinforcement
Professional adhesive systems:
– Mitrebond or Mitremate cyanoacrylate kit (£6-7 for instant bonding)
– Polyurethane wood glue for maximum structural strength
– Paintable caulk or clear silicone for light sealing and gap filling
Pro tip: Avoid hot glue guns—they create 1/16″ gaps and poor long-term performance. Wickes brand adhesives have inconsistent results according to professional installers.
Measure and Plan Your Layout Before Cutting
Start by mapping your installation sequence. For L-shaped or U-shaped runs, identify external corners where mitre joints will be most visible. Internal corners can accommodate slight imperfections since they’re less prominent.
Key measurements to take:
– Cornice: Distance from cabinet front to ceiling (standard is ~12 inches)
– Pelmet: Cabinet bottom to countertop clearance
– Allow 2-3mm extra length per piece for final trimming
Critical planning step: Mark joint locations on cabinet tops before cutting. External mitres should align with cabinet edges for clean sightlines. Determine your installation order—start with the longest wall section, then work toward corners.
Cut Perfect Mitre Joints for Seamless Corners
Setting Up Your Saw for Precision Cuts
Set your mitre saw to exactly 45 degrees using a digital angle gauge. Even 1-degree deviation creates visible gaps at corners. Test cuts on scrap material first to verify accuracy—your final kitchen cornice pelmet installation depends on these precise angles.
Cutting Sequence for Different Corner Types
External corners (most visible):
1. Cut first piece square at starting wall
2. Cut mating piece at 45-degree angle
3. Test fit without adhesive first
4. Adjust saw angle if gaps appear
Internal corners: These can be butted together rather than mitred, but mitres provide cleaner appearance. Cut both pieces at 45 degrees with the angle opening toward the inside corner.
Warning: Cut pieces slightly long initially. You can always trim more, but you can’t add material back. Check cabinet level before final cutting—irregular ceilings require scribed edges.
Install Kitchen Cornice Molding Securely

Top-Down Screw Fixings (Preferred Method)
When ceiling clearance exceeds 12 inches, this method provides strongest attachment:
- Position cornice against cabinet top with 2mm reveal at front
- Drill pilot holes through cornice into cabinet carcase
- Drive screws downward every 200-300mm
- Countersink screws slightly below surface
Gap solution: Wall unit sides often extend 1mm above tops. Tightening screws usually pulls cornice flush. Persistent gaps indicate cabinet assembly issues requiring shimming.
Internal Cabinet Fixings for Tight Spaces
For minimal clearance situations:
- Access inside cabinet after removing shelves
- Mark cornice position through cabinet top
- Use right-angle drill or extension bit
- Screw upward through cabinet top into cornice
Critical check: Ensure screw length won’t penetrate cornice face. Test on scrap material first to avoid visible damage.
Fit Pelmet Below Cabinets with Hidden Fixings
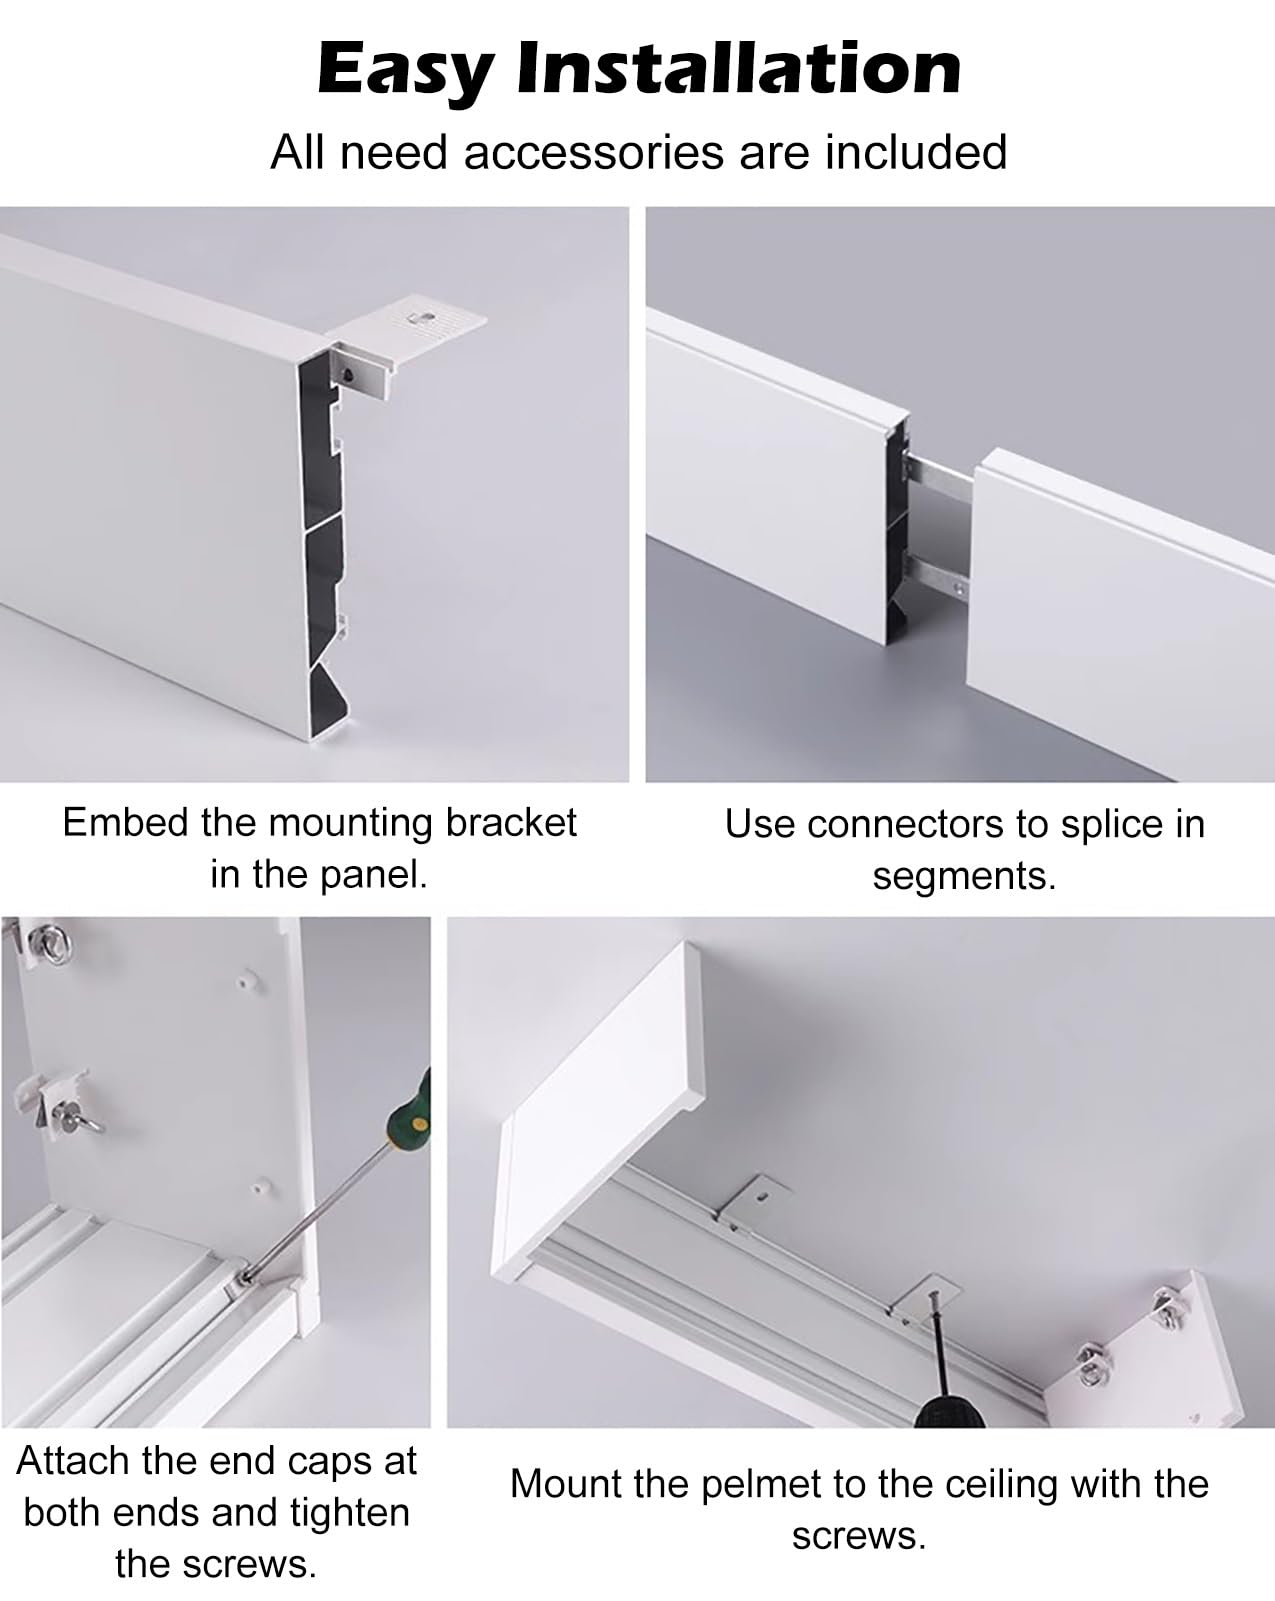
Shelf-Support Style Bracket System
This creates completely hidden fixings for your kitchen cornice pelmet installation:
- Drill two holes in pelmet back, 50mm from each end
- Insert screws leaving 5mm protruding
- Position pelmet against cabinet bottom
- Mark corresponding screw positions
- Drill cabinet bottom and attach with center screw
L-Bracket Alternative for Maximum Strength
- Flatten standard brackets to 135-degree angle using hammer
- Attach brackets to pelmet rear face
- Corresponding screws into cabinet bottom
- Adjust bracket angle for perfect alignment
Lighting integration tip: When installing pelmet over under-cabinet lights, apply thin bead of paintable caulk along pelmet top edge. Smooth with damp finger for invisible seal that prevents light leakage from LED strips.
Assemble Corner Joints That Last
Cyanoacrylate Method (Fastest Professional Technique)
Mitrebond system for instant results:
1. Cut pieces to exact length
2. Apply activator to one mitre face
3. Apply adhesive to opposite face
4. Press together for 20 seconds
5. Full strength achieved immediately
Perfect alignment trick: Use masking tape as clamp while adhesive sets. Tape across joint on cabinet-facing side for invisible support that won’t mar your finish.
Polyurethane Glue Method (Maximum Strength)
For critical load-bearing joints:
1. Lightly dampen both mitre surfaces
2. Apply thin layer of polyurethane glue
3. Clamp with masking tape or small brackets
4. Allow 2-hour cure time before handling
Troubleshoot Common Installation Problems
Gap Problems and Solutions
Cornice ceiling gaps:
– Check cabinet level before installation
– Scribe cornice bottom edge for irregular ceilings
– Use flexible caulk for gaps under 3mm
Pelmet alignment issues:
– Verify cabinet bottoms are level
– Adjust bracket angles as needed
– Scribe pelmet top edge for perfect fit
Joint Separation Prevention
Before final installation:
1. Dry-fit all joints without adhesive
2. Mark exact positions on cabinet
3. Assemble joints with adhesive
4. Install pre-assembled sections
5. Avoid stressing joints during final positioning
Warning: When cornice must return to wall on single wall units, securing the front piece can pull mitre joints apart. Always secure mitre joints before final installation in these scenarios.
Professional Finish Details for Showroom Results
Final Quality Check Before Completion
Critical inspection points:
– No visible fasteners from normal viewing height
– Consistent 2mm reveal along cabinet fronts
– Tight mitre joints without gaps
– Smooth caulk lines where needed
Pro tip: Install in pre-assembled sections where possible—cut all pieces to length, pre-assemble external mitres on workbench, then install as complete sections. Leave internal corner pieces for last as they’re easier to conceal.
Essential Maintenance Tips
Annual checks:
– Tighten any loose screws
– Touch up paint or finish as needed
– Caulk any new gaps from seasonal movement
Pro maintenance schedule: Quick inspection during spring cleaning prevents major issues later. Pay special attention to corners and joints where movement is most likely to occur.
Your kitchen transformation is complete. The crisp lines of properly fitted cornice and pelmet create that custom-built appearance that separates professional installations from basic cabinet hanging. With these techniques mastered, your next kitchen project will showcase the attention to detail that defines quality craftsmanship. Whether you’re fitting kitchen cornice pelmet on a single wall or complex U-shaped configuration, these professional methods ensure flawless results every time.

