
That warm, rustic glow of knotty pine kitchen cabinets creates a cozy atmosphere you love—but years of cooking grease, steam, and daily wear have left them looking dull and sticky. The moment you try to wipe them down with your regular kitchen cleaner, you realize knotty pine demands special care. Unlike standard painted cabinets, those distinctive knots and natural resin pockets in pine can react badly to the wrong cleaning products, potentially causing permanent damage to your cherished wood surfaces.
Knowing how to clean knotty pine kitchen cabinets properly is essential because one wrong move can strip finishes, discolor the wood, or leave behind residue that attracts even more dirt. Many homeowners make the critical mistake of using harsh cleaners that work on other surfaces but damage pine’s delicate character. The right approach depends entirely on whether your cabinets have a protective finish or remain in their natural, unfinished state.
This guide gives you precise methods to restore your knotty pine cabinets’ natural beauty without causing harm. You’ll learn how to identify your cabinet’s condition, select the perfect cleaning solution, and implement a maintenance routine that keeps your kitchen looking fresh for years to come.
Identify Your Cabinet Finish Before Cleaning

Water Drop Test for Instant Finish Identification
Before applying any cleaner, you must determine whether your knotty pine cabinets are finished or unfinished—this single factor dictates your entire cleaning approach. Finished cabinets have a protective coating like polyurethane, lacquer, or oil that repels moisture, while unfinished pine absorbs liquids directly into the wood fibers.
Conduct this simple test in a hidden area:
– Place a single water droplet on the cabinet surface
– If it beads up: You have a protective finish that needs gentle cleaning
– If it absorbs immediately: Your cabinets are unfinished and require stronger degreasers
– Check cabinet interiors: They’re often unfinished even when exterior faces have a finish
Spot Weathered Areas Needing Special Attention
Examine surfaces near your stove and sink closely. Gray, patchy discoloration indicates finish failure where protective coatings have broken down. These areas require careful treatment to avoid further damage. If you notice dark, oily-looking spots where the wood appears saturated, the finish has completely deteriorated in those sections, requiring different cleaning techniques than intact areas.
Clean Unfinished Knotty Pine Without Harm
TSP Deep Clean for Raw Wood Restoration
Unfinished knotty pine acts like a sponge, absorbing decades of kitchen grease deep into the wood grain. Trisodium phosphate (TSP) is your most effective option for cutting through this stubborn buildup without damaging the wood structure itself.
Required materials:
– TSP powder or liquid concentrate
– Two buckets (one for solution, one for rinse water)
– Soft cloths or sponges
– Rubber gloves and eye protection
Step-by-step process:
1. Mix solution: 1/4 cup TSP per gallon of warm water
2. Test first: Apply to hidden area for 2 minutes before full application
3. Work in sections: Clean 2-3 cabinet faces at a time to prevent solution drying
4. Dwell time: Let solution sit 2-3 minutes to break down grease molecules
5. Rinse thoroughly: Use clean water and fresh cloths to remove all residue
6. Dry completely: Allow 48-72 hours before applying any finish or using cabinets
Critical warning: TSP can irritate skin and eyes. Always wear protection and work with windows open. If your home was built before 1978, test for lead before using TSP on painted surfaces.
Restore Finished Knotty Pine Cabinets Safely
Murphy’s Oil Soap for Routine Maintenance
Finished cabinets with intact sealants need gentle cleaning that won’t strip protective coatings. Murphy’s Oil Soap removes everyday grease while conditioning the wood—a perfect combination for regular maintenance without damage.
Perfect dilution ratio: 1/4 cup per gallon of warm water
Effective cleaning technique:
1. Dampen microfiber cloth in solution and wring out thoroughly
2. Follow wood grain direction for cleaning to avoid scratches
3. Detail work: Use soft toothbrush around hinges and handles
4. Rinse cycle: Clean water with fresh microfiber cloth
5. Final dry: Buff with dry cloth to prevent water spots
Pro tip: Over-diluting Murphy’s creates an oily residue that attracts dust. Stick to the recommended ratio for best results and longest-lasting cleanliness.
Vinegar Solution for Heavy Grease on Finished Surfaces
When your finished cabinets have significant buildup but intact protective coating, reach for this natural degreaser that won’t strip finishes.
Mix in spray bottle: Equal parts white vinegar and warm water
Application method:
1. Spray generously on greasy areas
2. Wait 1-2 minutes for vinegar to congeal grease
3. Use plastic scraper for thick deposits (never metal)
4. Wipe clean with paper towels
5. Rinse and dry thoroughly to prevent lingering vinegar smell
Remove Extreme Grease Buildup From Pine Surfaces
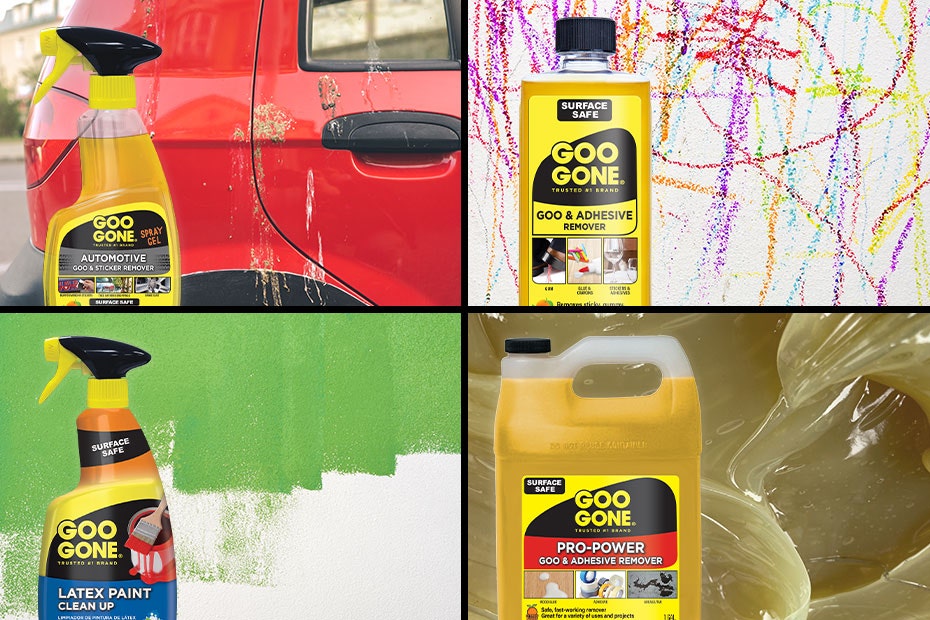
Goo Gone for Baked-On Kitchen Residue
Some knotty pine cabinets develop rock-hard grease deposits that resist all gentle methods. Goo Gone dissolves these stubborn spots without harming wood finishes when used correctly.
Effective application process:
1. Spray directly on problem areas
2. Wait 2-3 minutes—increase dwell time for thicker buildup
3. Wipe down with rag soaked in hot water
4. Dry immediately with terry cloth to prevent streaking
5. Follow up with regular cleaning method to remove residue
Hot Water Power Wash Technique
This cost-effective approach uses heat and time to break down grease molecules naturally.
Optimal mixture:
– Water temperature: As hot as your hands can tolerate
– Soap ratio: 2 tablespoons Dawn per quart of water
– Dwell time: 3-5 minutes before scrubbing
– Rinse water: Must be equally hot for complete removal
Critical timing: Never let soap solution dry on wood—work in small sections and rinse immediately to prevent water damage.
Choose the Right Cleaner for Your Knotty Pine Cabinets
Commercial Products That Deliver Results
Cabinet Magic (Home Depot): Cleans and polishes simultaneously. Ideal for quick touch-ups between deep cleanings but not for severe buildup.
TSP substitutes: Safer for frequent use but significantly less effective than real TSP for decades-old grease. Reserve for light maintenance only.
Professional-Grade Solutions for Severe Cases
Denatured alcohol + lacquer thinner mix: Only for severely degraded finishes that appear dark or oily.
Warning: Use equal parts in well-ventilated area. This will remove existing finish entirely—only use if you’re planning to refinish.
Daily Maintenance for Long-Lasting Pine Cabinets
Prevent Grease Buildup Before It Starts
Daily habits that save hours later:
– Dust with static brush or vacuum brush attachment daily
– Never use direct vacuum hose on wood surfaces
– Wipe spills immediately—pine stains easily
– Keep range hood filters clean to reduce airborne grease
Weekly Quick Clean Routine
5-minute maintenance ritual:
1. Damp microfiber cloth for general wipe-down
2. Mild detergent solution for stubborn spots
3. Immediate drying prevents water damage
4. Hardware check—tighten loose screws while cleaning
Prepare for Refinishing After Deep Cleaning
When Refinishing Becomes Necessary
After deep cleaning, assess whether your cabinets need new protection. Look for these telltale signs:
- Color variations across cabinet faces
- Water spots that don’t disappear after drying
- Rough texture where finish has worn away
- Gray or black areas indicating wood damage
Pre-Refinishing Steps You Can’t Skip
Critical waiting period: Unfinished wood must dry 48-72 hours after TSP cleaning. Rushing this step traps moisture and ruins new finish.
Surface preparation checklist:
1. Light sanding with 220-grit paper smooths raised grain
2. Vacuum thoroughly to remove all dust particles
3. Tack cloth picks up remaining microscopic particles
4. Test finish on hidden area before full application
Fix Common Knotty Pine Cleaning Problems
Uneven Cleaning Results Explained
If some areas clean differently than others:
– Apply additional cleaner to resistant spots with longer dwell time
– Recognize finish differences—some areas may be more worn than others
– Consider spot refinishing severely different areas after assessment
Removing Sticky Residue After Cleaning
Sticky residue after oil-based cleaners indicates improper rinsing:
– Re-clean with dish soap solution
– Use hot water rinse to cut through remaining oils
– Check for tackiness—if still sticky, finish is likely damaged
– Consider professional help for extensive finish failure
Safety Rules Every Homeowner Must Follow
Always test first: Every cleaning method on a hidden area before full application.
Ventilation requirements: Open windows and use fans when using any chemical cleaners.
Protective gear: Gloves for all cleaning, eye protection for spray products.
Food safety: Keep cleaning solutions away from countertops and food prep areas.
Your knotty pine cabinets can maintain their warm, rustic charm for decades with proper care. The secret to knowing how to clean knotty pine kitchen cabinets successfully lies in matching your method to the actual condition of the wood—not what you think it should be. Start with the gentlest approach possible and escalate only as needed. Most importantly, establish a regular maintenance routine that prevents the heavy buildup that makes deep cleaning necessary. With these techniques, your knotty pine cabinets will regain their natural beauty while preserving their distinctive character for years to come.

