

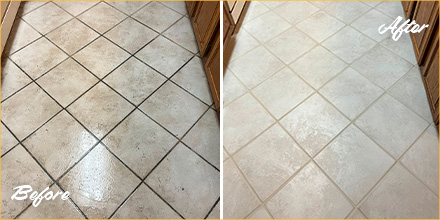
Your kitchen grout shouldn’t resemble a crime scene from spilled marinara or coffee mishaps. Yet here we are—staring at dingy, discolored lines that no amount of wiping fixes. Unlike floor grout, kitchen countertop grout faces relentless assaults from grease splatters, acidic food residues, and daily moisture exposure. This constant bombardment turns porous grout into a breeding ground for bacteria and stubborn stains within months. The good news? You can transform those grimy lines into crisp, clean accents without replacing your entire countertop. This guide delivers proven kitchen counter grout cleaning methods tested against real-world kitchen messes—from light discoloration to decade-old grease buildup.
Most DIYers make critical mistakes: using vinegar on unsealed grout (accelerating deterioration), skipping the seal test (wasting effort), or applying cleaners that damage stone surfaces. We’ve cut through the Pinterest clutter to give you actionable steps tailored to your grout’s specific condition. Whether you’re battling mildew in your backsplash or grease-locked grout behind the stove, you’ll discover the exact method that works—plus critical safety steps most guides omit.
Diagnose Your Grout Damage Before Cleaning

Water Bead Test for Seal Integrity
Press a dropper full of water onto your grout line. If it beads up like rain on a windshield, your grout is properly sealed and can handle stronger cleaners. If it soaks in within 30 seconds, your grout is unsealed—stick to gentle baking soda pastes until after resealing. Unsealed grout acts like a sponge, absorbing both stains and harsh cleaners that weaken its structure over time. Never apply vinegar or acid-based solutions to unsealed grout; this common mistake etches the surface, making future stains worse.
Identify Stain Types to Target Correctly
Grease stains (dark brown with oily sheen) require degreasers like dish soap or commercial alkaline cleaners. Mold/mildew (black or fuzzy green growth) needs hydrogen peroxide or oxygen bleach—never chlorine bleach, which feeds mold regrowth. Food pigments (tomato red, turmeric yellow) respond best to baking soda’s mild abrasion. Age-related yellowing often indicates mineral deposits from hard water, requiring acid-based cleaners like Zep Grout Brightener. Misidentifying stains leads to wasted effort—applying baking soda to grease stains just creates a muddy paste that pushes oil deeper.
Check for Structural Damage First
Run a fingernail along grout lines. Crumbling texture or powdery residue means the grout is failing—cleaning won’t help. Gaps wider than 1/8 inch or missing sections require regrouting before any cleaning. Attempting to clean severely damaged grout just dislodges more material, creating larger holes. If your grout fails this test, skip cleaning and focus on repair: remove loose debris, apply premixed grout with a putty knife, and allow 48 hours drying before sealing.
Pre-Cleaning Prep That Prevents Disaster
Clear Countertops and Vacuum Debris
Remove every item from your counter—including that spice jar you’ve never opened. Use a handheld vacuum with a brush attachment to extract crumbs from grout lines. Skipping this step turns your cleaning solution into muddy slurry that re-stains surfaces. Focus on corners behind the stove and sink where grease traps debris. This dry removal step alone lightens grout by 20% as surface particles release.
Dry Scrub Before Applying Liquids
Use a stiff-bristled grout brush (not wire—too harsh) to loosen embedded particles. Work in 6-inch sections with firm back-and-forth motions. Pro tip: Wrap an old credit card in microfiber cloth for tight corners behind appliances. This mechanical action lifts surface grime without moisture that could spread stains. You’ll see immediate improvement—darker grout often just needs this simple step.
Safety Setup for Toxic-Free Cleaning
Open windows and run exhaust fans even with natural cleaners—concentrated vinegar fumes irritate lungs. Wear nitrile gloves (latex dissolves in acids) and knee pads for comfort. Keep pets and kids out of the area; wet floors near counters become slipping hazards. Most critical: never mix vinegar and hydrogen peroxide—this creates corrosive peracetic acid that damages grout and tiles.
Natural Cleaning Methods for Daily Maintenance
Baking Soda Paste for Light Stains
Mix 2 tablespoons baking soda with 1 tablespoon water to form toothpaste consistency. Apply directly to grout using a gloved finger, pressing paste into crevices. Wait 15 minutes—this dwell time allows alkali action to break down organic matter. Scrub in circular motions with a toothbrush, then wipe with a damp microfiber cloth. Critical step: Rinse twice with plain water to remove residue that attracts new dirt. Effective for weekly upkeep on sealed grout.
Vinegar-Baking Soda Reaction for Moderate Stains
Apply baking soda paste first, wait 10 minutes, then pour undiluted white vinegar along grout lines. The fizzing action lifts deep-set stains in 3 minutes—never premix, as this wastes the reaction. Scrub immediately after bubbling stops. Warning: Skip this on unsealed grout or natural stone (marble, limestone); vinegar’s acidity permanently etches surfaces. Test on a hidden spot first by checking for chalky residue after drying.
Degreasing Dish Soap Blend for Grease Traps
Combine ¼ cup warm water, 2 tbsp baking soda, and 1 tsp dish soap in a spray bottle. Shake gently (don’t create suds). Spray on greasy grout behind stovetops, wait 5 minutes, then scrub with a nylon brush. The soap cuts through oil while baking soda lifts discoloration. Rinse thoroughly—soap residue becomes sticky grime magnets. Ideal for pre-cleaning before deep treatments.
Commercial Cleaners for Stubborn Kitchen Grout
Zep Grout Cleaner for Heavy Grease Buildup
This acid-based powerhouse works in minutes but requires precision. Apply only to vertical surfaces by tipping the bottle to run liquid along grout lines—no brushing needed. Wait exactly 3 minutes (set a timer!), then scrub with a stiff brush. Overexposure eats grout; underexposure leaves residue. Triple-rinse with clean water using a microfiber cloth. Restores 20-year-old grout to near-original color but never use on natural stone. Wear eye protection—splashes cause serious injury.
The Pink Stuff Paste for Vertical Surfaces
Its thick consistency clings to backsplash grout without dripping. Apply with a damp sponge, wait 5 minutes, then scrub in tight circles. The mild abrasives remove years of buildup without scratching tile. Unlike liquid cleaners, it won’t run onto countertops below. Pro tip: Use an old electric toothbrush for joints behind the refrigerator—vibration lifts deep grime. Reseal grout within 24 hours as this paste temporarily opens pores.
Hydrogen Peroxide Paste for Mold and Mildew
Mix 3% hydrogen peroxide with baking soda to form a runny paste. Apply to blackened grout lines, wait 10 minutes, then scrub gently. The oxygen release kills mold at the root without chlorine’s regrowth risk. Critical: Rinse thoroughly—peroxide residue yellows grout over time. Test on a small area first; may lighten colored grout. Most effective when applied at night for undisturbed dwell time.
Deep Cleaning for Severely Stained Countertop Grout
Multi-Stage Attack for Decade-Old Stains
Start with Zep Cleaner on sealed grout: apply, wait 3 minutes, scrub, rinse. If stains persist, follow with hydrogen peroxide paste (wait 10 minutes). For unsealed grout, use only baking soda paste followed by peroxide. Work in 2-foot sections you can complete within 15 minutes—dried cleaner becomes harder to remove than the stain. After each step, inspect with a flashlight held at 45 degrees to spot missed areas. Expect 2-3 applications for heavily soiled grout near sinks.
Steam Cleaning for Chemical-Free Results
Use a handheld steamer with a narrow nozzle held 1 inch from grout. The 240°F vapor dissolves grease without chemicals. Slow your pace: spend 30 seconds per inch for deep penetration. Immediately wipe loosened grime with a microfiber cloth—don’t let it re-settle. Best for grease-based stains but ineffective on mold. Requires patience: 10 minutes per square foot for neglected grout. Never steam near electrical outlets or unsealed grout (traps moisture).
Seal Your Grout Within 48 Hours
Dryness Check Before Sealing
Press a white paper towel against grout for 60 seconds. Any moisture transfer means wait longer—sealing damp grout traps moisture, causing mold under the sealant. Ideal drying time is 24-48 hours in low-humidity conditions. For urgent use, place a fan 3 feet away for gentle airflow (never direct heat).
Precision Sealer Application
Use a foam brush dipped lightly in penetrating sealer (like Miracle 511). Paint only grout lines—avoid tile surfaces where sealer creates hazy film. Wipe excess immediately with a lint-free cloth. Critical: Apply in one direction for even coverage. Most sealers dry to touch in 2 hours but require 72 hours for full cure. Test success by sprinkling water—it should bead instantly.
Daily Habits That Prevent Future Grout Stains
Post-Cooking Wipe-Down Routine
Keep a spray bottle of 1:1 water and vinegar (for sealed grout only) under your sink. After cooking, spritz grout lines and wipe with a microfiber cloth. Vinegar’s acidity neutralizes alkaline food residues before they set. For unsealed grout, substitute with diluted dish soap. This 20-second habit prevents 80% of deep stains.
Weekly Baking Soda Maintenance
Sprinkle baking soda on problem areas, mist with water, wait 5 minutes, then scrub gently. Focus on high-risk zones: behind the stove, around the sink, and near cutting boards. The mild abrasion lifts developing stains without harsh chemicals. Always rinse thoroughly—baking soda residue attracts grease.
Emergency Spill Response Protocol
For red wine, coffee, or tomato spills: blot immediately with a dry cloth (don’t rub!), then apply baking soda paste. Wait 10 minutes while finishing cooking, then scrub and rinse. This stops pigments from penetrating within the critical 5-minute window. Keep a grout pen handy for permanent stains—match your grout color and apply like a marker for instant camouflage.
Clean kitchen counter grout isn’t about perfection—it’s about smart maintenance that keeps your space hygienic and visually cohesive. Start with the gentlest method suitable for your grout’s condition, escalate only when needed, and always seal after deep cleaning. Within 90 minutes, you’ll transform those grimy lines into crisp accents that make your entire kitchen feel renewed. The next time marinara splatters, you’ll wipe it away knowing your grout won’t hold onto yesterday’s mistakes. Keep this guide handy for your next quarterly deep clean—and share your before/after photos with the hashtag #GroutGlowUp.

