

Your Cuisinart air fryer transforms crispy favorites with minimal oil, but that convenience fades when grease builds up and affects flavor. Whether you own the popular TOA-60 or the digital TOA-65, proper cleaning keeps your appliance performing like new while preventing smoke and off-tastes in tomorrow’s dinner. A neglected air fryer doesn’t just produce inferior results—it can become a fire hazard as grease accumulates near heating elements.
This guide walks you through proven cleaning methods that protect your investment and ensure food safety. You’ll learn daily maintenance tricks that take less than five minutes, deep-cleaning techniques that restore performance, and model-specific tips that most owners never discover. By the end, you’ll know exactly how to clean Cuisinart air fryer components without damaging their non-stick coatings or electrical systems.
Unplug and Cool: Critical Safety Steps Before Cleaning
Never skip the cooling period—your Cuisinart air fryer’s interior remains dangerously hot long after cooking stops. The metal basket retains heat like a cast-iron pan, and rushing cleaning can cause severe burns or warp components. Always unplug the unit completely before starting any cleaning process; even digital displays draw residual power that creates shock risks when water is involved.
How Long to Wait Before Cleaning Your Cuisinart Air Fryer
Wait at least 30 minutes after your last cooking session before attempting any cleaning. Test the exterior top panel with the back of your hand—if it feels warm, give it another 15 minutes. The basket requires the longest cooling time due to its metal construction; never handle it while still warm to the touch. For safety-conscious users, set a timer immediately after turning off your air fryer to avoid guessing when it’s safe to proceed.
Protect Your Countertop During Cuisinart Air Fryer Cleaning
Place two old kitchen towels or silicone mats beneath your work area before disassembling components. Cuisinart’s compact models especially can drip residual grease during cleaning, which permanently stains natural stone or laminate countertops. If you’ve ever wondered why your counter has mysterious brown spots after air frying, this is likely the culprit. Keep paper towels within arm’s reach to immediately absorb any drips from the basket or crumb tray.
Daily Cleaning Routine: 5 Minutes That Save Hours of Scrubbing
Immediate Basket and Crumb Tray Maintenance After Cooking
Remove both the basket and crumb tray while they’re still warm (but not hot) to wipe away loose debris with paper towels. This crucial step prevents grease from hardening into stubborn residue that requires aggressive scrubbing later. For best results, spray a light coat of cooking oil on the basket before your first use—this creates a barrier that makes post-cooking cleanup significantly easier. If you skip this daily wipe-down, you’ll face exponentially more difficult cleaning sessions within just a few weeks.
Stainless Steel Exterior Cleaning Without Streaks
Cuisinart’s premium stainless steel finishes show every fingerprint and water spot, making regular exterior cleaning essential. Use a microfiber cloth dampened with water (no chemicals needed) and wipe in the direction of the grain—not in circles. For stubborn smudges, add one drop of dish soap to your cloth, then immediately follow with a dry microfiber towel to prevent water spots. Never use abrasive cleaners or paper towels on the exterior, as they create microscopic scratches that trap dirt and accelerate wear.
Interior Spot Cleaning for Fresh Cooking Results
Quickly inspect the interior walls for splatters immediately after cooking while surfaces are still warm. A damp microfiber cloth with a single drop of mild dish soap handles fresh messes before they bake onto surfaces during your next cooking session. Pay special attention to the area directly below the heating elements where grease tends to accumulate. This simple daily habit prevents the persistent smoke that plagues many air fryer owners who neglect interior spot cleaning.
Weekly Deep Cleaning: Complete Component Restoration
Step-by-Step Disassembly for Thorough Cleaning
Begin by removing all removable parts: basket, crumb tray, rack, and any accessories like pizza stones. Consult your model’s manual—some Cuisinart units have hidden filters behind removable panels that collect grease unnoticed. Before taking anything apart, snap photos of rack positions with your phone; Cuisinart’s multiple rack configurations can be confusing to reassemble correctly. If you own a TOA-65 digital model, gently wipe the control panel with an electronics-safe cloth before proceeding.
Non-Scratch Basket Cleaning Method That Preserves Coating
Fill your sink with hot water and two drops of dish soap, then submerge the basket and accessories for 15 minutes while you clean other components. After soaking, use a non-abrasive sponge (the blue Scotch-Brite type) with gentle circular motions—never metal scrubbers that permanently damage Cuisinart’s non-stick coating. For hard-to-reach corners, a soft-bristled toothbrush works wonders without scratching. Rinse thoroughly with cool water and air dry completely before reassembly; trapped moisture causes rust spots on metal components.
Interior Wall and Heating Element Cleaning Without Damage
Wrap a damp microfiber cloth around a chopstick to gently clean upper heating elements—never spray cleaners directly onto these components as liquid can seep into electrical connections. For interior walls, mix equal parts water and white vinegar in a spray bottle, lightly mist surfaces, wait exactly three minutes, then wipe clean. This solution cuts through grease without damaging finishes or leaving chemical residues that affect food taste. Avoid commercial oven cleaners at all costs—they contain chemicals that compromise Cuisinart’s non-stick surfaces when heated.
Eliminating Stubborn Residue: Burnt Food and Baked-On Grease Solutions
Baking Soda Paste Technique for Tough Spots
Create a thick paste using baking soda and water (toothpaste consistency), then apply it to problem areas with a soft cloth. Let the paste sit for 20 minutes to break down hardened grease, then gently scrub with a soft-bristled brush in circular motions. The mild abrasiveness of baking soda lifts residue without scratching non-stick surfaces. Rinse thoroughly with a damp cloth—any remaining baking soda will create unpleasant flavors during your next cooking session. This method works especially well on the crumb tray’s corners where grease accumulates.
Burnt Food Removal Without Damaging Non-Stick Coating
For stubborn food particles stuck to the basket, avoid metal utensils that permanently damage non-stick surfaces. Instead, soak the affected area in hot water for 10 minutes, then use a wooden spatula to gently lift debris. If that doesn’t work, boil water in the basket (only if your model is stovetop-safe) for five minutes before attempting removal. Never use steel wool or abrasive pads—these create microscopic scratches that accelerate future sticking and compromise the non-stick coating’s integrity.
Model-Specific Cleaning Variations You Need to Know
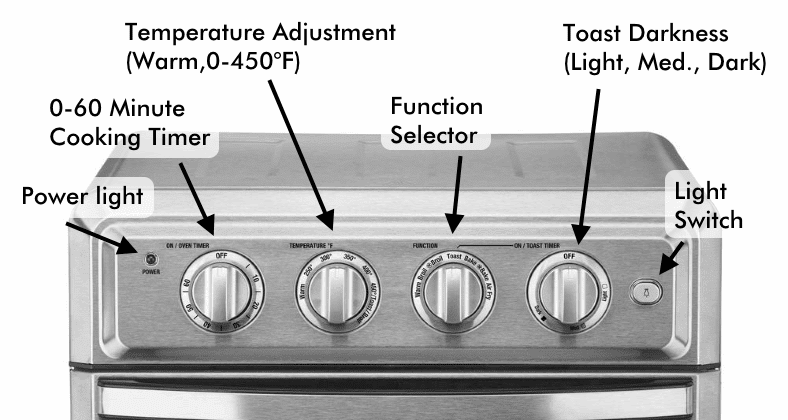
TOA-60 Analog Model Cleaning Secrets
The traditional knobs on Cuisinart’s analog models can be removed for thorough cleaning—gently pull straight off, wash separately with mild soap, and ensure they’re completely dry before reattaching. These models feature a larger interior opening that allows easier wall cleaning compared to compact units. When reassembling, align the notches on the knob bases with the control panel indicators to maintain proper function.
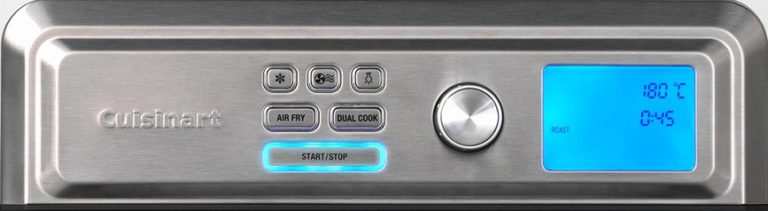
TOA-65 Digital Model Care for Sensitive Components
Use electronics-safe cleaning wipes on the touch screen—never spray liquids directly onto the control panel as moisture can seep into electrical components. When cleaning around the built-in interior light, use a dry microfiber cloth only; this component isn’t user-replaceable if damaged during cleaning. Digital models have tighter interior spaces, so use cotton swabs dipped in vinegar solution to reach narrow areas without scratching.
Monthly Maintenance Tasks That Extend Your Air Fryer’s Life

Filter Inspection and Cleaning Protocol
Check behind or below your unit for removable filters that trap grease particles. Rinse these under warm running water using a soft brush for stubborn spots, then air dry completely for at least 24 hours before reinstalling—trapped moisture causes electrical issues when the unit heats up. Most Cuisinart owners don’t realize their model has filters, leading to persistent smoke problems they mistakenly attribute to other causes.
Door Seal Maintenance for Optimal Performance
Wipe rubber door seals weekly with a damp cloth to remove grease buildup that prevents proper sealing. These seals maintain cooking temperature—replace them immediately if cracked or loose, as heat loss forces your air fryer to work harder and increases cooking times. A simple test: close the door on a dollar bill—if you can pull it out easily, your seal needs replacement.
Critical Cleaning Mistakes That Destroy Cuisinart Air Fryers
Never submerge the entire unit or base in water—this forces moisture into electrical components causing permanent damage. Cuisinart’s base houses critical electronics that cost more to repair than replacement. Avoid steel wool, bleach, or oven cleaner entirely; these damage finishes and create toxic fumes when heated during your next cooking session. Skip high-pressure water or steam cleaning methods, as they force moisture into areas that should remain dry.
Storage and Prevention Tips for Long-Term Success
Store your Cuisinart air fryer with the door slightly ajar to prevent moisture buildup and odors, especially important in humid climates. Line the crumb tray with perforated aluminum foil (punch small holes for airflow) to catch drips while allowing proper circulation. Empty the crumb tray after every use, not just weekly—this simple habit prevents the persistent smoke that plagues many air fryer owners.
Key Takeaway: Consistent light cleaning prevents the heavy scrubbing sessions that damage your Cuisinart air fryer. Five minutes of daily maintenance saves hours of difficult cleaning monthly and extends your appliance’s life significantly. Mark your calendar for the first Sunday each month to perform thorough maintenance—your future self (and tomorrow’s perfectly crispy dinner) will thank you. Proper care ensures your Cuisinart air fryer delivers restaurant-quality results for years rather than months, making it a kitchen investment worth protecting.

