
Grease splatters clinging to your cabinets. Lingering fried food odors that won’t quit. That sticky film on your walls after every meal prep. Without a properly selected kitchen hood, your cooking space becomes a magnet for grime and moisture that damages your home over time. Whether you’re remodeling or replacing an old unit, how to choose a kitchen hood correctly affects air quality, cabinetry longevity, and even your home’s resale value. This guide cuts through the confusion with precise sizing formulas, layout-specific recommendations, and critical performance metrics most buyers overlook—so you’ll make a decision that works for your actual cooking habits and kitchen structure.
Why Skipping a Kitchen Hood Costs You More Than Money
Ignoring proper ventilation creates immediate and long-term consequences you’ll pay for in multiple ways. A kitchen hood isn’t decorative—it actively removes carbon monoxide, microscopic food particles, and moisture that causes mold behind walls. Without it, steam condensation triggers peeling paint and warped cabinet frames within months. Health inspectors note that grease buildup near cooking surfaces becomes a serious fire hazard when neglected. Real estate agents confirm homes without proper hoods face lower appraisal values and buyer negotiations—many lenders now require documented ventilation for loan approval. Most damaging? That persistent greasy film on upper cabinets and walls forces you into constant deep cleaning just to maintain basic cleanliness.
Ducted vs. Ductless: The Performance Difference That Changes Everything
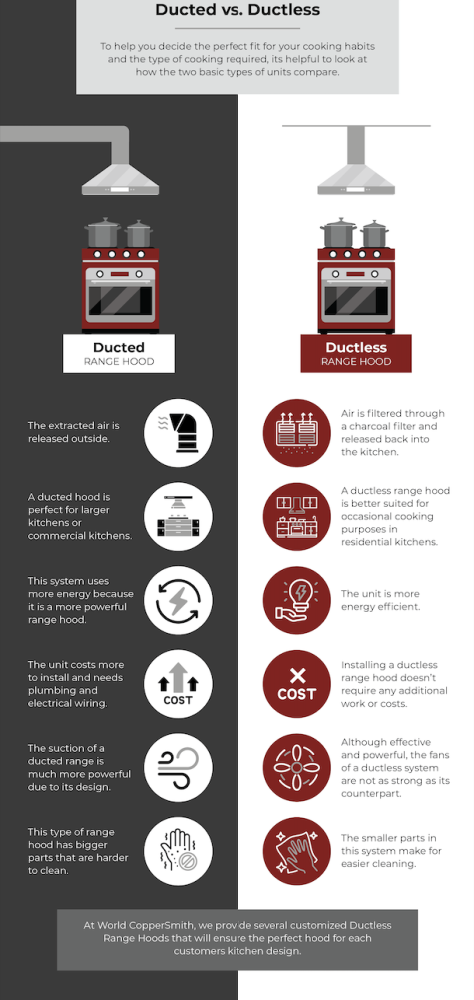
Your ventilation method determines whether pollutants leave your home or recirculate indoors. Ducted systems exhaust air outside through rigid ductwork, removing 100% of moisture, heat, and cooking byproducts. They require the shortest possible duct run (under 35 feet with no more than two 90-degree elbows) and never vent into attics or crawlspaces—this causes catastrophic moisture damage. Ductless units recirculate air through charcoal filters that only trap particles and odors while leaving humidity behind. They’re necessary in apartments without exterior access but require carbon filter replacements every 3–6 months. Convertible models offer flexibility but perform dramatically better when ducted—always choose this option if future exterior access might be possible.
Why Ducted Ventilation Is Non-Negotiable for Serious Cooks
- Removes steam completely, preventing mold in walls and ceilings
- Eliminates heat buildup during summer cooking sessions
- Captures microscopic grease particles that coat surfaces over time
- Requires only monthly aluminum filter washes (no recurring costs)
Match Hood Style to Your Kitchen Layout (6 Specific Mounting Options)

Your existing cabinetry and cooktop placement eliminate incompatible styles immediately. Under-cabinet hoods mount beneath existing cabinetry with 18–22 inch depth, hiding ductwork inside the cabinet above—ideal when upper cabinets exist directly over your cooktop. Wall-mount chimney hoods become the visual centerpiece when no cabinets exist above the range, requiring 22–24 inch depth for proper coverage. Island hoods suspended from ceilings need 24–26 inch depth to compensate for no wall enclosure and require ceiling duct chases. Downdraft systems pop up behind cooktops but capture less than 50% of pollutants since they fight natural heat rise—reserve these only for impossible layouts. Over-range microwaves combine convenience with poor performance: their shallow depth (15–18 inches) and high noise levels make them unsuitable for frequent cooking. Insert liners let you build custom enclosures around standardized blowers—size them 1–3 inches wider than your cooktop for optimal coverage.
Size Your Hood Correctly: Width, Height, and Depth Rules
Width must equal or exceed your cooktop width—add three inches on each side when possible for full coverage. A 30-inch stove needs at least a 30-inch hood, but 36 inches captures significantly more rising steam. Mounting height varies by cooktop type: electric requires 20–24 inches above the surface while gas needs 24–30 inches clearance for flame safety. Depth reality check: Standard wall or under-cabinet hoods need 18–22 inches depth, but island models require 24–26 inches to offset the lack of a wall. If your cabinets are only 12–15 inches deep, reconfigure cabinetry rather than compromising hood depth—shallow units capture less than half the pollutants of properly sized models.
Calculate Exact CFM Power: 3 Methods + Duct Loss Adders
Don’t guess your airflow needs—use these three calculations and select the highest result:
Kitchen volume method: Multiply length × width × height, then divide by 4. For a 10×10 foot kitchen with 8-foot ceilings: (10 × 10 × 8) ÷ 4 = 200 CFM.
Cooktop width method: Allocate 100 CFM per linear foot. A 30-inch (2.5-foot) stove requires 250 CFM.
Gas burner BTU method: Total all burner outputs, then divide by 100. Four 10,000 BTU burners need 400 CFM (40,000 ÷ 100).
Add duct loss CFM to your highest calculation:
– 1 CFM per straight foot of duct
– 25 CFM per 90-degree elbow
– 40 CFM for roof or wall caps
Critical warning: Hoods exceeding 400 CFM trigger makeup air requirements under IRC 2009+ codes—budget $500–$2,000 extra for engineered solutions.
Noise Control: How to Find a Range Hood You’ll Actually Use
If your hood is too loud, you won’t run it during cooking—defeating its purpose entirely. Target 3 sones or less at your typical cooking speed (1 sone equals a refrigerator hum). Hoods exceeding 4 sones become conversation disruptors. Choose units with HVI-certified low-sone ratings specifically tested at 200 CFM. For dramatically quieter operation, install remote blowers on the roof or in-line within duct runs. Perimeter aspiration designs use edge suction to move equal air volume with less noise—look for this feature in premium models. Always test sound levels in showrooms at multiple speeds before buying.
Capture Efficiency Secrets: Why Most Designer Hoods Fail

Capture efficiency (CE) measures the percentage of pollutants actually captured at your cooktop surface. Research shows deep hoods with 7+ inch internal height achieve 80%+ CE when properly sized, while flat “designer” hoods and over-range microwaves capture less than 50%. The visual appeal of low-profile hoods comes at a steep performance cost—steam and grease escape over the top before being captured. Always prioritize hoods with documented CE ratings of 80% or higher. If HVI labeling isn’t available, avoid models shallower than 7 inches internally and ensure the hood extends fully over your burners.
Filter Types Compared: Maintenance Schedules That Work
Aluminum mesh filters work best in ducted systems—toss them in the dishwasher monthly to maintain peak performance. Stainless baffle filters (common in commercial-style hoods) require degreasing monthly but last decades. Charcoal filters are exclusive to ductless units and must be replaced every 3–6 months—neglecting this reduces effectiveness by 50% or more. Set phone reminders for filter maintenance since most people forget until performance drops noticeably. Indicator lights on premium models solve this problem automatically, but verify they actually track usage rather than just running time.
Smart Features Worth Paying For (And Those to Skip)
Essential features include variable speed controls (not just high/medium/low), auto-shutoff timers that continue ventilation after cooking stops, and heat sentry sensors that ramp fan speed during boil-overs. Worth considering are dimmable LED lighting, filter maintenance alerts, and Wi-Fi connectivity for remote monitoring. Skip decorative elements like non-functional chimney extensions or overly complex control panels that increase failure points. Prioritize functional design over aesthetics—your hood should disappear during cooking except for the task lighting.
Safety Checks You Must Complete Before Buying
Never mount hoods closer than 18 inches above electric cooktops or 24 inches above gas ranges—this creates immediate fire hazards. Verify your home has adequate combustion air for furnaces and water heaters when high-CFM hoods operate, as they can cause dangerous backdrafting. Professional installation is mandatory for new ductwork to prevent moisture traps and ensure proper sealing. Always check local codes for makeup air requirements if exceeding 400 CFM—this often gets overlooked until inspections fail.
Real Budget Breakdown: Hood + Installation + Hidden Costs

Hood unit costs range from $100–$400 for basic under-cabinet models to $1,200–$3,000+ for luxury pro-style units. But installation costs often match or exceed the hood price for complex jobs:
– New ductwork: $300–$1,000+
– Makeup air systems: $500–$2,000
– Electrical work: $150–$400
Budget 50–100% of the hood cost for installation on major projects. Broan and Whirlpool serve rental properties on tight budgets, while GE Profile and Zephyr offer mid-range value. Viking and Wolf command luxury premiums for serious cooks—Vent-A-Hood excels in custom installations.
Final Decision Checklist: 10 Must-Complete Steps
- Confirm duct feasibility—can you reach an exterior wall or ceiling?
- Measure cooktop—width determines minimum hood size (+3 inches each side)
- Calculate CFM—use all three methods, add duct losses
- Verify height clearance—24–30 inches for gas, 20–24 for electric
- Check local codes—400+ CFM triggers makeup air requirements
- Prioritize noise levels—≤3 sones at working speed
- Demand 80%+ capture efficiency—avoid low-profile designs
- Select filter type—ducted (washable) vs. ductless (replaceable)
- Set complete budget—hood + installation + potential extras
- Schedule professional install—especially for new duct runs
Choosing how to select a kitchen hood properly pays daily dividends through cleaner air, protected cabinetry, and maintained home value. Take time to calculate—not guess—your requirements using these precise measurements and performance metrics. A correctly sized, professionally installed hood delivers decades of reliable service, turning your kitchen from a grease trap into a space you’ll enjoy cooking in for years.

