

Opening your kitchen drawers shouldn’t feel like a daily excavation. Yet for most households, that’s exactly what happens—spatulas wander into spice territory, kids’ plates disappear under mountains of mismatched lids, and that one corn cob holder somehow ends up in the towel drawer. The good news? Transforming chaotic drawers into precision-engineered storage zones takes just one weekend and costs less than a single takeout dinner.
This guide walks you through a proven system that professional organizers charge hundreds to implement. You’ll learn exactly where every item should live, which organizers actually work, and how to maintain the system long-term. No more playing hide-and-seek with your own kitchen tools. If you’re wondering how to arrange kitchen drawers effectively, you’re about to discover the exact workflow-based method that turns frustration into function.
Map Your Kitchen Triangle Before Organizing
Before touching a single organizer, grab a piece of paper and sketch your kitchen’s three power points: stove, sink, and refrigerator. Your most-used drawers should sit within this triangle—ideally no more than 26 feet total walking distance between all three points. Most chaotic kitchens violate this fundamental rule, forcing you to zigzag across the room mid-cooking.
Your frequency zones break down like this:
– Zone 1 (daily warriors): Flatware, cooking utensils, everyday plates
– Zone 2 (weekly players): Special baking tools, serving pieces, extra cutlery
– Zone 3 (holiday heroes): Stock pots, turkey basters, specialty gadgets
Walk your kitchen clockwise once, noting which drawers currently violate these zones. That spatula drawer across the room from your stove? First on the chopping block. Positioning your cooking utensil drawer within 36 inches of the stove saves you hundreds of unnecessary steps weekly.
Empty and Audit Every Drawer Ruthlessly
Pull everything out onto your countertop—yes, everything. Create three ruthless piles:
- Keep: Used in the past 12 months
- Relocate: Belongs elsewhere (holiday items to basement storage)
- Donate: Duplicates beyond two of any tool, forgotten gadgets
Most households discover 30-40% of drawer contents should never have been there. That ice cream scoop living beside your measuring spoons? Relocate. Three identical pizza cutters? Keep the sharpest, donate the rest. While drawers sit empty, measure interior dimensions precisely—standard drawers are 22-24 inches deep, but older homes often have odd sizes. Note width, depth, and height; your organizer shopping depends on these numbers.
Flatware Drawer Setup: Dishwasher-Adjacent Positioning
Your flatware drawer earns prime real estate—position it directly beside or directly above your dishwasher. This single change saves thousands of bending motions over a year.
What belongs here:
– 6-12 everyday place settings
– 4-6 steak knives
– Short specialty pieces (espresso spoons, corn cob holders)
Optimal organizer: Expandable bamboo tray with 5-7 compartments ($29). Arrange pieces front-to-back, not sideways—this prevents the dreaded sliding silverware avalanche when you slam the drawer. If you run the dishwasher daily, consider a two-tier organizer: the $187 Rev-A-Shelf system keeps daily flatware on top, holiday pieces below. Pro tip: Avoid plastic trays that warp over time; bamboo withstands daily use.
Knife Storage That Saves Fingers and Counter Space

Stop storing knives in a bulky block on your counter. Instead, use one of these space-saving methods:
In-drawer solution: Two side-by-side cork-lined blocks (14-slot + 7-slot) secured with expandable dividers. This holds 8-14 knives safely while freeing 2-3 square feet of counter space. Anchor them firmly—you never want knives rattling loose during drawer operation.
Essential knife lineup:
– 8″ chef’s knife (your workhorse)
– 7″ santoku (for precision tasks)
– 4″ paring knife (peeling, trimming)
– Bread knife (serrated for crusty loaves)
– Kitchen shears (multi-purpose cutting)
– 6 steak knives (for daily use)
Critical safety note: Never store knives loose in drawers—blade guards or dedicated blocks prevent serious cuts during searches.
Cooking Utensil Drawer: Stove-Proximity Rule
This drawer should sit within 36 inches of your stove—close enough to grab a spatula mid-stir without leaving the burner.
Essential contents:
– 6-8 spatulas (silicone for non-stick, wood for cast iron)
– 4 tongs (12″ for grilling, 9″ for stovetop)
– 2 whisks (balloon and flat styles)
– Pizza wheel, can opener, garlic press
Best organizer: 16″ expandable mesh tray ($14-25) with 6-8 compartments. For deep 24″ drawers, add a diagonal tray insert to maximize corner space—you’ll gain 15% more storage without sacrificing accessibility. Declutter trigger: If a tool serves only one purpose (avocado slicer, egg separator) and you use it less than monthly, relocate it immediately.
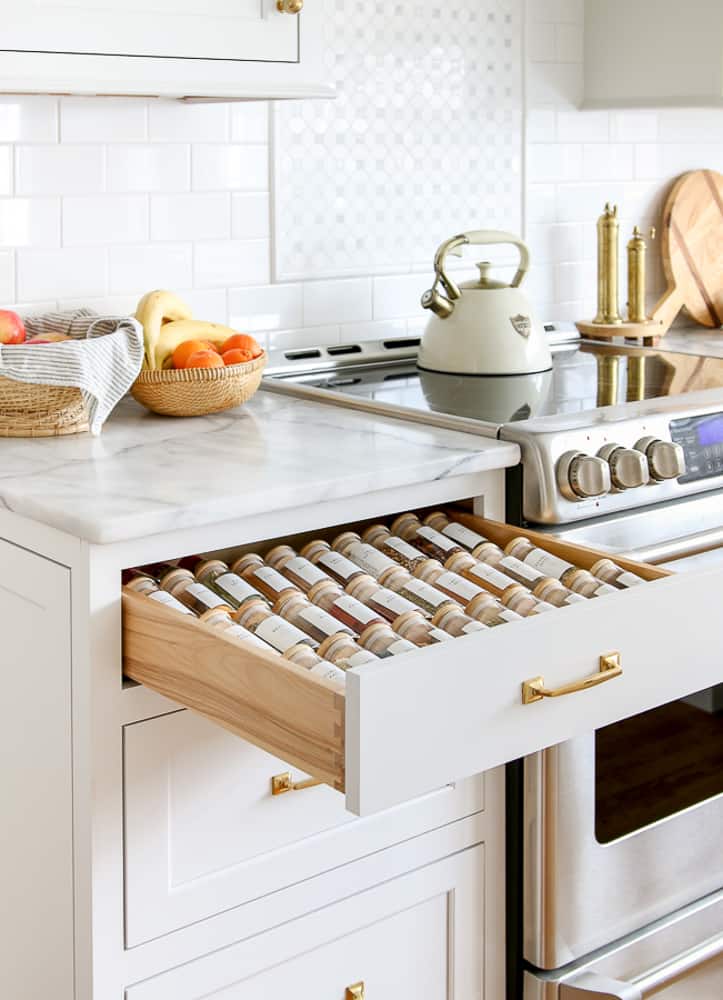
Spice Drawer Alphabetization System

Transform your spice chaos into an at-a-glance system:
Requirements:
– 24-36 uniform 4 oz glass jars with shaker tops
– Expandable 3-tier bamboo rack ($17) angled at 15°
– Waterproof 1″ x 2″ labels for jar lids
Layout method:
1. Alphabetize left-to-right, front-to-back
2. Reserve top tier for high-frequency spices (salt, pepper, garlic powder)
3. Label both lid tops and jar sides for instant scanning
This system reduces cooking prep time significantly—you’ll never hunt for paprika again. Pro tip: Keep frequently used spices at eye level in the drawer; tuck rarely used ones (like saffron) toward the back.
Pots and Pans: Vertical Storage Solution
Deep 24″ drawers work best for cookware, but only if you store items vertically. Horizontal stacking causes the dreaded lid avalanche.
Drawer 1 (Everyday):
– 2-qt saucepan
– 12″ skillet
– Mini non-stick set
– Use pan dividers to keep vertical
Drawer 2 (Heavy/Specialty):
– Cast-iron skillet
– Carbon steel pan
– Stock pot
– Never nest cast iron—use silicone pan protectors between each piece
Lid storage hack: Create a separate 6″ narrow drawer fitted with adjustable pegboard to hold lids vertically. This keeps them accessible without the stacking nightmare. If space is tight, store lids sideways on respective pans using vertical dividers.
Kids’ Drawer: Independence at Child Height
Designate the lowest drawer in your island for kid-friendly items:
Contents:
– Unbreakable plates and bowls
– Sippy cups
– Kid-sized utensils
Organizer: 6-compartment bamboo tray ($14) with picture labels for each section. This teaches organization skills while keeping adult drawers clutter-free. Position this drawer at standing height for children—no more reaching or climbing. Critical note: Avoid drawers with heavy slides; opt for soft-close mechanisms to prevent finger injuries.
Junk Drawer: Controlled Chaos
Every kitchen needs one—just make it intentional:
Essential contents:
– Chargers and batteries
– Flashlight
– Tape, mini tools, pens
– Coupons and takeout menus
Organization method: 8-10 clear acrylic modular bins arranged Tetris-style, anchored with museum gel dots to prevent drift. Add a hidden outlet (USB-A + USB-C) inside the rear wall for a discreet charging station. Pro tip: Place frequently accessed items (tape, scissors) at the front; tuck seasonal items (grill lighters) toward the back.
Maintenance: 5 Minutes Monthly, 30 Minutes Quarterly
Monthly routine:
– Remove obvious junk
– Re-align rolled towels
– Re-stack spice jars
Quarterly deep-dive: Pick one drawer per weekend and repeat the full empty-and-evaluate process. Most households find they naturally refine their system over the first 90 days. Annual check: Tighten drawer slide screws and lubricate soft-close mechanisms with dry Teflon spray—this prevents the gradual sag that ruins perfect organization.
Budget Reality Check
Basic upgrade (6-8 drawers with bamboo trays and spice rack): $250
Mid-tier (add pegboard, knife blocks, tiered cutlery): $600
Full custom (pull-outs, blind corner solutions, trash integration): $2,500-$3,500
Start with the basic tier—most households achieve 80% of professional results for under $300. Upgrade gradually as you identify specific pain points. Key insight: Bamboo organizers deliver 90% of the functionality of custom systems at 20% of the cost.
Quick Start Checklist
Print this and tape inside your first empty drawer:
- [ ] Flatware drawer positioned beside dishwasher
- [ ] Knives stored safely in-drawer or on magnetic strip
- [ ] Cooking utensils within 36″ of stove
- [ ] Spices labeled, angled, and alphabetized
- [ ] Pans stored vertically with silicone protectors
- [ ] Lids have separate vertical storage
- [ ] Plates/bowls in accessible drawer or cabinet
- [ ] Kid items in lowest drawer with picture labels
- [ ] Junk drawer contained with clear bins and outlet
The transformation happens drawer by drawer. Start with your most frustrating drawer today—by tomorrow’s breakfast, you’ll wonder how you ever lived with kitchen chaos. Now that you know how to arrange kitchen drawers for maximum efficiency, reclaim your kitchen one perfectly placed spoon at a time.

