

That frustrating puddle forming under your blender isn’t just messy—it’s a warning sign of potentially serious damage. When your blender leaking from bottom transforms your kitchen counter into a slippery hazard zone, you need solutions fast. This guide cuts through the confusion to deliver precise diagnostic methods and proven repair techniques that work across major blender brands. You’ll discover exactly why leaks happen, how to pinpoint the culprit in minutes, and whether your unit deserves repair or replacement—saving you money and preventing dangerous electrical exposure from liquid reaching motor components.
Ignoring even minor seepage accelerates internal damage, turning a simple $5 gasket replacement into a complete blender replacement. Most bottom leaks stem from preventable causes that you can address yourself with basic tools and the right technique. Whether you’re dealing with a Vitamix, Ninja, or standard countertop model, these targeted solutions will have your blender functioning safely again—often in less time than it takes to order a replacement.
Pinpoint Your Leak Source in Under 5 Minutes

Visual Inspection Method That Works
Unplug your blender immediately and examine the leak pattern before wiping anything clean. Fresh liquid pooling directly under the blade assembly typically indicates a failed seal, while sticky residue suggests long-term leakage you’ve been ignoring. Look closely for telltale signs: streaks running down the container exterior, dampness concentrated around the rubber gasket, or hairline cracks radiating from the blade housing. Critical detail: leaks originating from the container bottom rather than the sides almost always point to gasket failure or container cracks rather than overfilling.
Water Test Technique for Accurate Diagnosis
Fill your empty container with 2 cups of colored water (add food coloring for better visibility) and place it on a white paper towel. Let it sit undisturbed for exactly 5 minutes—this eliminates false positives from condensation. A small, slowly expanding wet spot confirms seal deterioration, while immediate widespread dampness indicates major structural failure. This simple test reveals exact failure points invisible during dry inspection, showing whether liquid seeps from between the blade assembly and container or penetrates through cracks in the container itself.
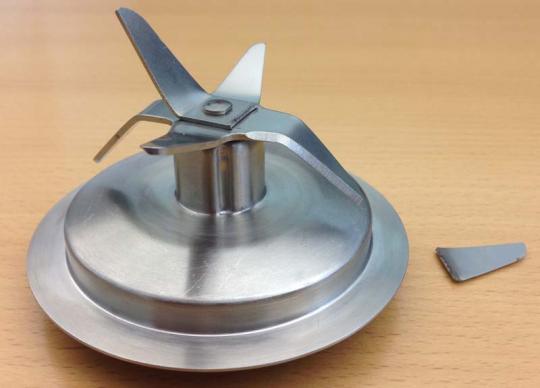
Rubber Gasket Failure: The #1 Leak Culprit

Seal Deterioration Signs You Can’t Ignore
Your blender’s rubber gasket—a thin ring between blade assembly and container—fails gradually through daily use. Replace it immediately if you notice hardened, cracked, or flattened rubber that no longer springs back when pressed. Critical warning signs include visible white calcium buildup preventing proper sealing, missing chunks or tears during inspection, or compression marks deeper than 1/16 inch. These seemingly minor issues create microscopic gaps that expand under blending pressure, transforming minor seepage into major leaks.
Quick Gasket Test Before You Replace
Remove the blade assembly and gently stretch the gasket between your fingers. Healthy rubber returns to its original shape instantly—like a fresh rubber band. Failed gaskets remain permanently stretched or tear easily during this 30-second test. Pro tip: inspect the gasket groove on both the container and blade assembly for food debris or mineral deposits that mimic gasket failure. A thorough cleaning sometimes solves “leaks” caused by trapped particles rather than actual seal damage.
Blade Assembly Problems Causing Bottom Leaks
Threading Damage From Over-Tightening
Forcing the blade assembly too tightly creates permanent damage that guarantees leaks. The proper torque means hand-tight plus just 1/4 turn—any more strips delicate plastic threads. Look for cross-threading marks on the container neck, visible as white plastic powder from shredded material, or blade assembly wobbling during operation. Critical mistake: many users tighten further when leaks appear, worsening the damage. If the assembly won’t achieve secure connection despite clean, undamaged threads, replacement is your only option.
Precision Reassembly Technique That Prevents Leaks
Follow this exact sequence for leak-proof assembly: First, clean all threads with warm, soapy water and inspect for plastic burrs using a toothpick. Apply a single drop of cooking oil to lubricate the gasket (never petroleum jelly, which degrades rubber). Hand-tighten clockwise until resistance increases noticeably, then add one firm 1/4 turn—stop immediately. Time-saving tip: perform a quick seal test with ¼ cup water before making your smoothie—this catches assembly errors before they create messes.
Container Crack Detection and Management
Finding Invisible Hairline Cracks
Thermal shock from blending hot soups then adding cold ingredients creates nearly invisible stress fractures. Use this reliable detection method: fill the container with hot (not boiling) water, add 1 teaspoon food coloring, and let sit 10 minutes on white paper. Colored seepage along stress points—particularly where the container meets the blade assembly—confirms cracks too small to see with the naked eye. Critical insight: these cracks often appear only under pressure, explaining why your blender leaks during use but seems fine when empty.
When to Repair vs. Replace Your Container
Surface-level scratches under 1 inch or external cracks not penetrating the container wall might be repairable with food-safe epoxy. However, replace the container immediately if cracks extend into the threaded area, cause actual leaks, or form multiple stress fractures. Safety first: any crack near the blade assembly compromises structural integrity—continued use risks container shattering during operation. Most manufacturers consider cracked containers non-repairable due to safety hazards.
Emergency Fixes for Active Leaks
Immediate Containment Strategies
When you need to use your blender despite active leakage, implement these rapid-response techniques: Wrap the base tightly with paper towels to create an absorbent dam (change every 30 seconds during use), or sit the blender in a shallow dish to catch drips. Process smaller batches at lower speeds to reduce pressure on the failing seal, and use pulse function instead of continuous blending to minimize liquid exposure to vulnerable areas. Critical warning: never operate a leaking blender near electrical outlets or on wet surfaces—this creates serious shock hazards.
Permanent Leak Prevention System
Daily Maintenance Routine That Works
Incorporate these simple habits to double your blender’s lifespan: Rinse the container and blade assembly immediately after use—dried residue accelerates gasket deterioration. Avoid dishwasher high-heat cycles that warp plastic and degrade rubber seals. Store components disassembled to prevent gasket compression, and inspect the seal monthly for early signs of wear. Pro tip: keep spare OEM gaskets on hand—they cost less than $10 and eliminate downtime when failure occurs.
Storage Best Practices for Longevity
Store your container upright to prevent gasket distortion from uneven pressure, and keep the blade assembly separate to avoid constant compression. Always choose a cool, dry location away from direct sunlight, which degrades rubber seals through UV exposure. Critical detail: never stack heavy items on blender containers—this creates subtle warping that prevents proper sealing even with a new gasket.
Smart Replacement Part Selection
OEM vs. Aftermarket Components Guide
Original Equipment Manufacturer (OEM) gaskets guarantee perfect fit but cost 2-3x more than quality aftermarket options. Aftermarket parts work well for basic gaskets, seals, and standard blade assemblies on common models. Critical exception: avoid aftermarket parts for high-speed blenders like Vitamix or Blendtec, where precision tolerances affect performance and safety. Never use aftermarket components on warranty-covered units—you’ll void your coverage.
Cost-Benefit Analysis: Repair or Replace?
Replace your entire blender when parts exceed $40 for basic models, multiple components fail simultaneously, the unit is over 5 years old, or the motor shows strain signs like unusual noises or slow startup. Smart calculation: if repair costs approach 50% of a new equivalent model’s price, replacement makes financial sense—especially considering newer models often feature improved seal designs.
Stop Bottom Leaks Before They Destroy Your Blender
Most bottom leaks stem from simple gasket deterioration or improper assembly—problems you can fix in minutes with basic tools. Start with the colored water test to pinpoint your exact failure point, then follow the appropriate repair path based on your diagnosis. Remember that addressing leaks immediately prevents dangerous electrical exposure and stops minor issues from escalating into major failures. Implement the daily maintenance routine to double your blender’s lifespan, and keep spare gaskets on hand to eliminate downtime. When in doubt about repair complexity, consult your manufacturer’s service manual—some models have proprietary sealing systems requiring specialized tools. By mastering these techniques, you’ll transform from leak victim to blender expert, saving money while keeping your kitchen safe and dry.

