

Your kitchen grout lines started white and pristine, but now they’re gray, stained, and making your entire floor look dirty—even when it’s freshly mopped. Sound familiar? Kitchen grout absorbs everything: cooking grease, spilled wine, food residue, and daily foot traffic. The good news? You can restore those grout lines to their original brightness without breaking the bank.
This guide reveals the most effective methods tested by professionals, from powerful commercial cleaners to DIY solutions using items already in your pantry. You’ll learn exactly which approach works best for your specific situation, how long each method takes, and what results to expect.
Zep Grout Cleaner Delivers Professional Results
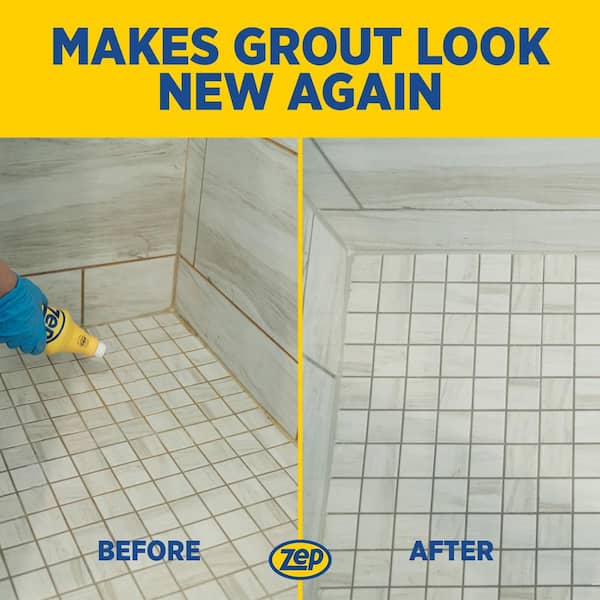
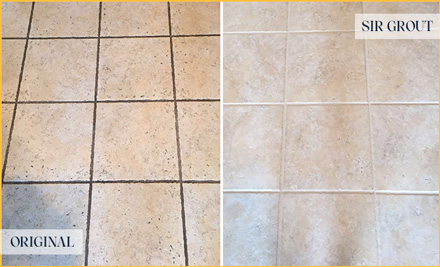
Zep Grout Cleaner & Brightener achieves the most dramatic transformation of any tested method. This professional-grade acid formula literally melts away years of built-up grout grime, delivering up to five shades of improvement in a single application. Professionals consistently report visible results within minutes as the cleaner penetrates deep into porous cementitious grout.
What you’ll need:
– Zep Grout Cleaner (32-ounce bottle)
– Cleaning gloves and eye protection
– Stiff grout brush or old toothbrush
– Wet microfiber cloths
– Ventilation (open windows or fan)
Critical application steps:
1. Clear the area and sweep away loose debris—dirt particles will interfere with cleaner penetration
2. Apply directly along grout lines from the bottle tip, focusing on stained areas
3. Respect timing: Allow exactly 3 minutes dwell time—no more, no less (set a timer)
4. Scrub vigorously with your brush using back-and-forth motions to dislodge loosened grime
5. Rinse thoroughly using wet microfiber cloths until no residue remains
6. Work in 3×3 foot sections for large kitchen floors to maintain consistent results
Safety first: This formula contains strong acids that can irritate skin and eyes. Always wear gloves and eye protection, and keep children and pets away during application. Never use on natural stone surfaces—the acid can etch marble or granite tiles. If you smell strong fumes, increase ventilation immediately.
Why this method outperforms others
Zep’s formula works by breaking down organic compounds in grime at a molecular level. Unlike surface cleaners, it penetrates deep into the grout’s pores where years of grease and dirt accumulate. For severely stained kitchen floors, you’ll often see dirt lifting away within 60 seconds of application. The cleaner’s viscosity ensures it stays in the grout lines rather than running down your tiles.
Hydrogen Peroxide Paste: DIY Gold Standard
The hydrogen peroxide and baking soda combination delivers professional-level results at a fraction of the cost. This method earned a 9/10 performance rating from testing, particularly effective on moderately dirty grout that’s lost its original brightness. The chemical reaction creates oxygen bubbles that lift stains from within the grout structure.
Create the paste:
– Mix 2 parts baking soda with 1 part hydrogen peroxide (3% solution)
– Aim for foamy, shaving cream consistency
– Mix small batches—it activates immediately and loses potency after 2 minutes
Application technique:
1. Spread paste directly onto grout lines using your finger or brush
2. Wait precisely 1-2 minutes for chemical penetration—longer causes drying
3. Scrub vigorously with a toothbrush using circular motions
4. Wipe clean using microfiber cloths before paste dries
5. Rinse thoroughly with clean water to prevent white residue
Pro tip: This method creates dramatic brightening effects on white grout but may appear slightly pale gray on darker grout colors. Test in an inconspicuous corner first. For stubborn stains, repeat the process twice with 10-minute breaks between applications.
When to choose this over commercial cleaners
Reach for your pantry when dealing with food-based stains, mildew, or moderate discoloration. The hydrogen peroxide paste works exceptionally well on backsplash grout near cooking areas where grease splatters accumulate. It’s also your safest option for households with children or pets since it leaves no toxic residues. The entire process takes about 3 hours for a standard 10×10 kitchen but requires less supervision than acid-based cleaners.
Steam Cleaning: Chemical-Free Power Solution
Steam cleaning offers the only truly chemical-free approach that sanitizes while it cleans. Using 100°C steam, this method kills bacteria and loosens grime without leaving any residue behind. It’s ideal for unsealed grout or households with chemical sensitivities.
Equipment needed:
– Steam cleaner with small nylon brush attachment
– Microfiber cloths for wiping
– Extension cord for large areas
– Knee pads for comfort during extended use
Process breakdown:
1. Start small—work in 2-3 foot sections to prevent steam from cooling
2. Apply steam while simultaneously scrubbing back and forth with light pressure
3. Wipe immediately with microfiber cloth as dirt loosens—delaying causes re-staining
4. Overlap sections slightly to prevent missed spots
5. Allow 2 hours drying time before walking on the floor
Best for: Unsealed grout preparation, households with chemical sensitivities, or families with young children who play on the floor. Steam cleaning won’t restore severely stained grout to original white but prevents further deterioration and maintains recently cleaned grout effectively.
Unsealed Grout Requires Special Care
Unsealed grout presents unique challenges due to its porous nature. These surfaces absorb stains deeply, making some discoloration potentially permanent. However, you can still achieve significant improvement with the right approach—starting gentle prevents further damage.
Safe cleaning sequence:
1. Begin with baking soda and water paste only—test in hidden corner first
2. Wait 24 hours to check for adverse reactions before full application
3. Avoid vinegar entirely—it can weaken unsealed grout over time through repeated exposure
4. Consider steam as your primary chemical-free option for regular maintenance
5. Set realistic expectations—some stains may be too deep to remove completely
Pre-sealing preparation checklist:
– [ ] Grout is completely dry (wait 48 hours after cleaning)
– [ ] All cleaning residues removed (run finger test for smoothness)
– [ ] No structural damage or missing grout sections
– [ ] Test water beading to confirm need for sealing (water should absorb immediately)
Critical warning for unsealed grout
Never use acid-based cleaners like Zep on unsealed grout without professional guidance. The acids can penetrate deeply and compromise the grout’s structural integrity, leading to crumbling within months. If your grout feels rough or powdery after cleaning, you’ve likely damaged it—stop immediately and consult a professional.
Maintenance Schedule Prevents Future Staining
Consistent maintenance keeps grout looking fresh and prevents the need for intensive deep cleaning. Your kitchen’s usage patterns determine the ideal cleaning frequency—ignore this step and you’ll face exponentially harder cleaning jobs later.
High-use kitchen schedule:
– Monthly: Deep clean high-traffic pathways (entry to sink, sink to stove)
– Weekly: Include grout in regular mopping routine with pH-neutral cleaner
– Daily: Wipe spills immediately—especially wine, coffee, or grease
– Every 6 months: Apply grout sealer to high-use areas
Low-traffic kitchen schedule:
– Quarterly: Deep clean entire floor
– Bi-annually: Apply grout sealer
– As needed: Spot clean spills or stains
Quick daily habits that prevent permanent stains:
– Keep a spray bottle with water and mild dish soap for quick spot cleaning
– Place absorbent mats in cooking zones to catch splatters
– Use a squeegee after mopping to remove excess moisture from grout lines
Troubleshooting Common Grout Cleaning Problems
Even experienced DIYers encounter challenges. Here’s how to solve the most frequent issues before they become permanent problems:
White film residue after cleaning:
– Cause: Insufficient rinsing after baking soda use
– Solution: Rinse with clean water and dry microfiber cloth
– Prevention: Use less baking soda in your mixture and always do final rinse
Ineffective cleaning after multiple attempts:
– Cause: Wrong method for stain type or grout condition
– Solution: Try stronger method (Zep for tough stains, peroxide paste for moderate)
– Prevention: Identify grout type first—epoxy grout requires different approach than cementitious
Grout color variations after cleaning:
– Cause: Uneven cleaning or different stain types in various areas
– Solution: Start with gentlest effective method and work up
– Prevention: Always test in inconspicuous area first and document results
Key takeaway: Your kitchen grout can look dramatically better with the right approach. Start with the hydrogen peroxide paste for most situations—it’s safe, effective, and inexpensive. Reserve commercial cleaners like Zep for the toughest stains, and consider steam cleaning when you want to avoid chemicals entirely. Remember, sealing your grout every 6-12 months prevents 90% of future staining issues. Before applying any cleaner, always test in a hidden corner and wear appropriate protection—your grout’s condition determines which method will deliver the best results without causing damage. For immediate results, focus first on high-traffic pathways where grime accumulates fastest, then expand to the entire kitchen floor.

