
That satisfying kitchen spray has dwindled to a weak dribble, and white crusty deposits now cling stubbornly to your faucet head. If you’re battling mineral buildup that chokes water flow and traps bacteria, you’ve landed in the right place. The best way to clean kitchen faucet head deposits requires no professional help—just 15 minutes and household items you likely already own. Mineral accumulation doesn’t just ruin aesthetics; it compromises water pressure, contaminates drinking water, and creates breeding grounds for bacteria. Skip the expensive replacements and harsh chemicals. By the end of this guide, you’ll restore powerful water flow and gleaming finishes using proven techniques tailored to your faucet’s specific needs.
Quick Vinegar Soak Method
Vinegar’s acidic properties dissolve mineral deposits without damaging most finishes, making this the fastest fix for everyday buildup. Skip boiling vinegar—extreme temperatures risk ruining gold or bronze coatings.
Prepare Your Cleaning Solution
Combine equal parts room-temperature white vinegar and water in a quart-sized plastic bag. The solution should feel cool to the touch (never hot), preserving delicate finishes. Adding water prevents over-aggressive cleaning while maintaining effectiveness against calcium and lime scale.
Secure and Soak Process
Submerge the entire faucet head in the bag, ensuring spray holes face downward into the liquid. Seal tightly with a rubber band around the faucet neck. For severe buildup, extend soaking to 60 minutes—but never exceed this, as prolonged exposure risks finish damage. Place a towel underneath to catch drips during the soak.
Flush and Polish Results
After soaking, remove the bag and run hot water for 3 full minutes to flush dislodged debris from internal channels. You’ll immediately notice restored water pressure. Finish by drying thoroughly with a microfiber cloth—this prevents new mineral spots from forming as water evaporates.
Remove and Deep Clean Aerator
When vinegar soaks fail, mineral deposits have likely invaded the aerator’s internal components. A complete disassembly tackles hidden buildup that surface cleaning misses.
Safe Removal Steps
Place a sink stopper over your drain before unscrewing the aerator. Turn it counter-clockwise using your fingers first. If stuck, wrap pliers in electrical tape to avoid scratching chrome surfaces. Never force it—applying gentle, steady pressure prevents stripped threads.
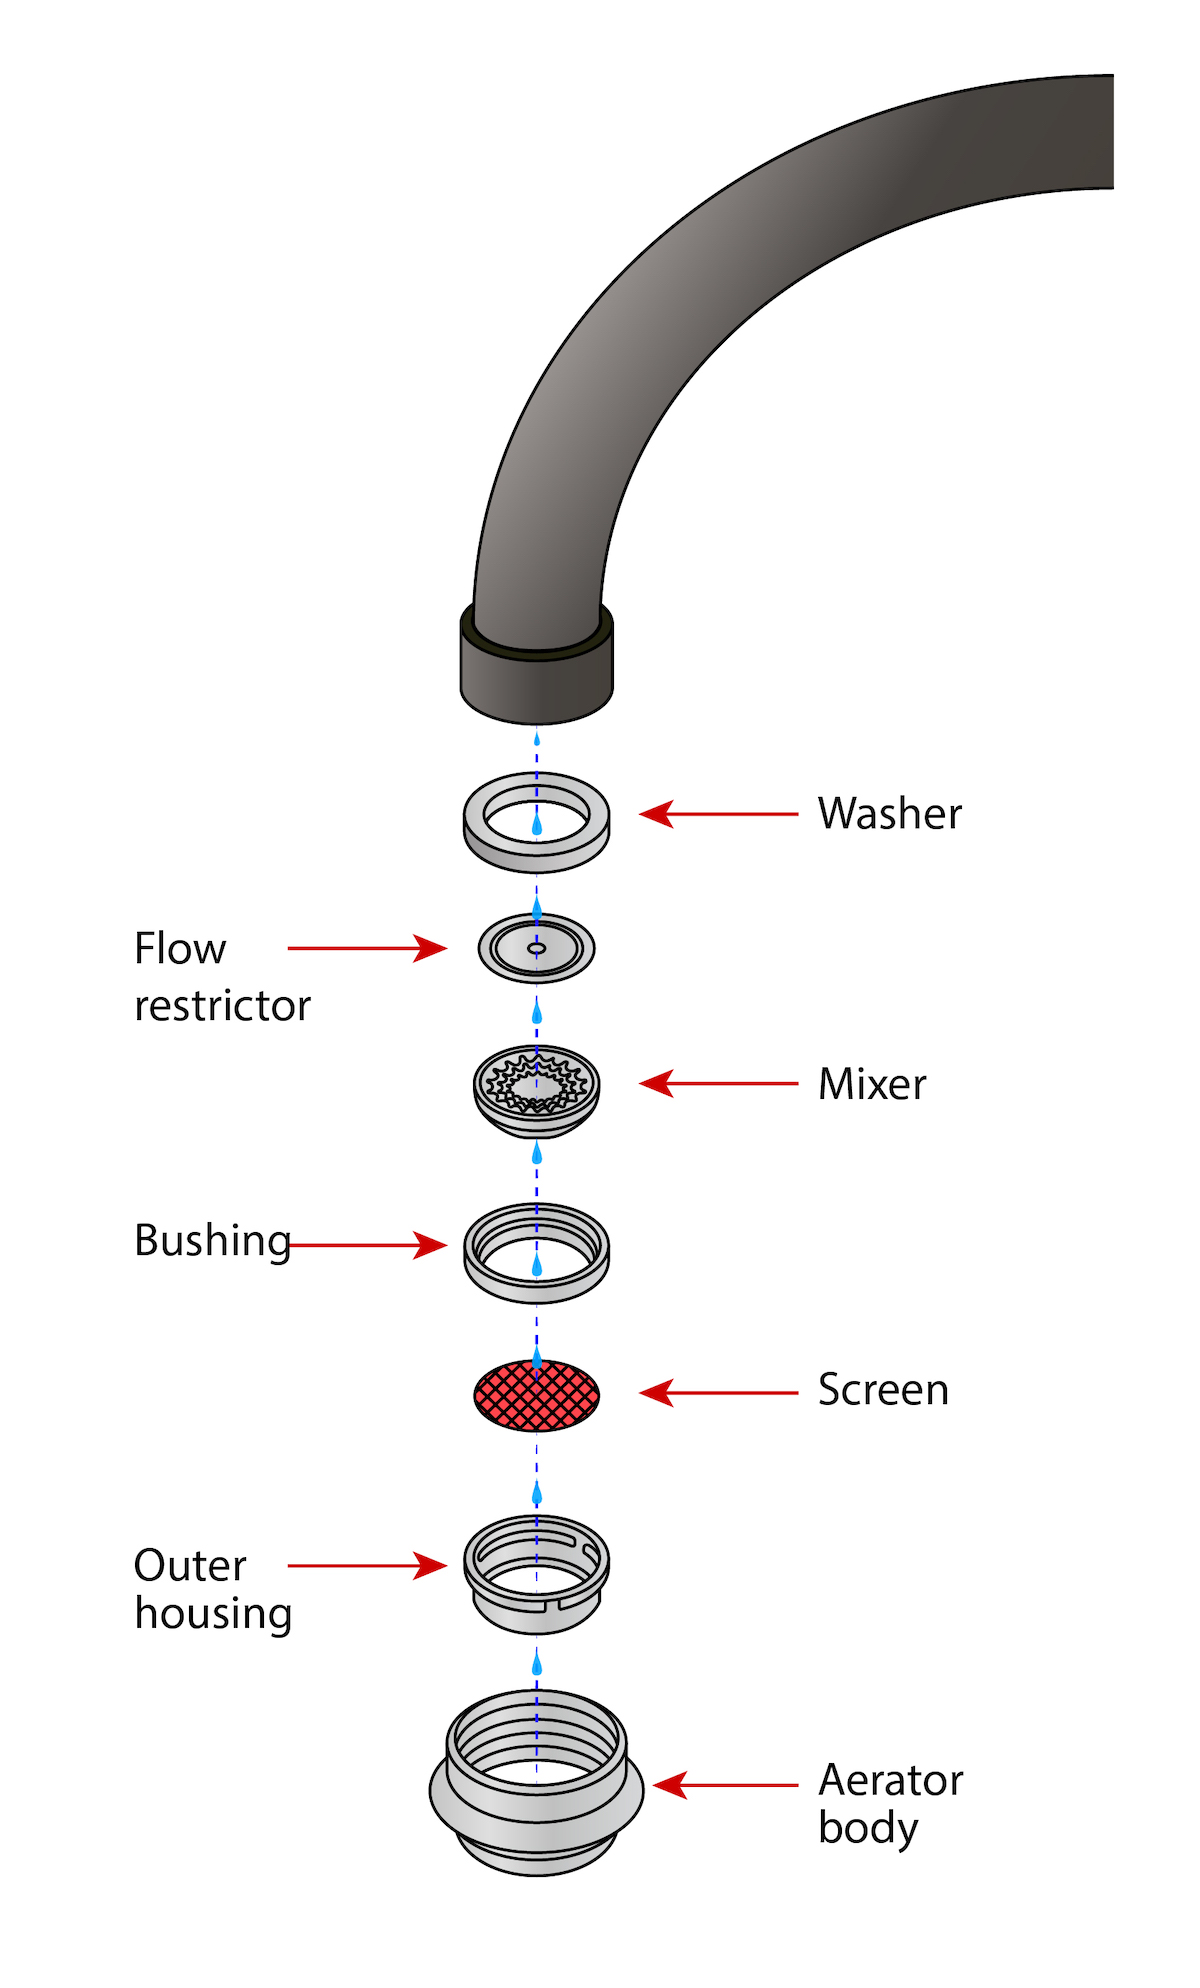
Component Breakdown
As you disassemble, note the order: outer casing, rubber washer, mesh screen, and flow restrictor. Take a photo with your phone to simplify reassembly. These tiny parts must return in exact sequence to regulate water flow properly.
Thorough Component Cleaning
Soak all parts in vinegar solution for 30 minutes. Use an old toothbrush to scrub the mesh screen’s microscopic holes—this is where stubborn deposits hide. Rinse each component under running water, checking for tears in the screen or cracks in the washer. Replace damaged parts ($2-$5 at hardware stores) before reassembly.
Daily Maintenance Prevention Strategy
Preventing buildup beats removing it. Consistent micro-habits stop minerals from hardening into stubborn crusts.
Wipe-Down Protocol
Keep a microfiber cloth beside your sink. After your final dishwashing session each night, spend 30 seconds blotting water from the entire faucet surface. This simple act stops minerals from drying onto metal—a trick endorsed by Angela Brown, CEO of Savvy Cleaner: “Always dry faucets after use to prevent trace minerals from setting.”
Weekly Quick Clean
Fill a bowl with warm water and 3 drops of mild dish soap. Remove the faucet head for a 10-minute soak, then gently brush aerator holes with a toothbrush. Rinse thoroughly and dry completely. This routine prevents the heavy accumulation requiring intensive cleaning.
Monthly Inspection Check
During kitchen cleanings, run your finger along the faucet head’s underside. If you detect roughness or white specks, perform a vinegar soak immediately. Catching buildup early means 15-minute fixes instead of hour-long deep cleans.
Heavy Buildup CLR Treatment
For extreme mineral crusts that resist vinegar, calcium-lime-rust (CLR) removers deliver professional results—but misuse risks permanent damage.
Safety Preparation
Wear rubber gloves and open windows for ventilation. Never mix CLR with vinegar or other cleaners—this creates toxic fumes. Dilute exactly per label instructions (typically 1:1 with water) in a glass bowl to avoid chemical reactions.
Application Process
Dip a soft brush into the solution and scrub the faucet head directly, focusing on thick deposits. Limit contact time to 2 minutes—CLR’s potency can etch finishes if left longer. Watch for bubbling, which indicates active mineral dissolution.
Complete Rinse Protocol
Flush water for 5 full minutes to eliminate all chemical traces. Residual CLR contaminates drinking water and corrodes metal over time. Dry immediately with a soft cloth to prevent spotting.
Steam Clean for Water Spots
Hard water spots create cloudy films that vinegar can’t penetrate. Steam cleaning lifts residues without chemicals, restoring mirror-like shine.
Steam Application Technique
Hold the steam nozzle 2 inches from the faucet head, moving in slow circles. Concentrate on crevices where the spray face meets the base—mineral deposits hide here. Steam’s heat softens deposits while pressure blows away loosened particles.
Cooling and Polishing
Let the faucet cool completely before touching (steam heats metal to 200°F+). Once cool, buff dry with a microfiber cloth. The heat often reveals a deeper luster than chemical methods alone.
Finish-Specific Cleaning Guidelines

Your faucet’s finish dictates safe cleaning methods. Using wrong products causes irreversible scratches or discoloration.
Universal Safe Cleaners
For any finish—chrome, stainless, or matte black—use Formula 409 Antibacterial All-Purpose Cleaner, Fantastik All-Purpose Cleaner, or Windex Glass Cleaner. Warm water with a soft cloth works for daily maintenance on all surfaces.
Never Use These Products
Avoid industrial cleaners, toilet bowl cleaners, green Scotch-Brite sponges, or Soft Scrub. These abrasives strip protective coatings, creating pitted surfaces that attract more minerals.
Specialty Technologies
SpotShield Technology finishes resist water spots and include antimicrobial protection—requiring only gentle soap-and-water cleaning. Brilliance finishes withstand 100+ household cleaners, making them ideal for hard water areas.
Troubleshooting Common Problems
Even after cleaning, issues may persist. These targeted fixes save unnecessary replacements.
Low Pressure After Cleaning
Check aerator reassembly order—missing screens cause weak flow. Run water without the aerator attached to test supply lines. If pressure remains low, debris may be stuck in pipes; flush lines for 5 minutes.
Uneven Spray Patterns
Clear individual holes with a plastic toothpick, working from the outer edge toward the center. Metal picks scratch spray faces, worsening the problem. For Touch-Clean spray holes (common on pull-down faucets), wipe rubber nozzles with your thumb to dislodge minerals.
Leaks at Connections
After reassembly, hand-tighten the aerator first. If dripping continues, give a quarter-turn with tape-wrapped pliers. Over-tightening strips threads—stop immediately if resistance increases.
Kitchen-Specific Contamination Issues
Kitchen faucets battle unique threats beyond hard water: grease, food particles, and humidity.
Grease Removal Protocol
Degrease first with dish soap before tackling minerals. Grease creates a barrier that blocks vinegar from reaching deposits. Wipe the entire faucet head with soapy water, then proceed with cleaning.
Food Particle Prevention
Pull-down spray heads trap food debris at connection points. Extend the hose fully weekly and wipe the entire length with a vinegar-dampened cloth. Remove spray heads monthly for deep cleaning—more frequent than bathroom faucets require.
Mold and Mildew Prevention
Kitchens stay humid longer than bathrooms. After cleaning, leave cabinet doors open for 30 minutes to dry hidden areas. In damp climates, add a silica gel packet under the sink to absorb moisture.
Safety and Best Practices
Skipping preparation risks injury or faucet damage. Follow these critical steps.
Pre-Cleaning Checklist
Turn off water supply valves under the sink to prevent accidental spraying. Clear countertops of dishes and food. Test vinegar on the faucet’s underside first—some specialty finishes react poorly.
During Cleaning Precautions
Wear gloves with CLR or prolonged vinegar use. Keep cleaning solutions away from food prep zones. In small kitchens, use exhaust fans to vent vinegar fumes that can irritate sinuses.
Post-Cleaning Inspection
Run water for 3 minutes to flush residual cleaner from pipes. Check connections for leaks, especially if the aerator was removed. Note any worn washers—replacing these $1 parts prevents future leaks.
Key Takeaway: The best way to clean kitchen faucet head combines vinegar soaks for existing buildup with daily drying routines to prevent new deposits. By dedicating 30 seconds nightly to wiping your faucet and monthly deep cleans, you’ll maintain powerful water flow and pristine finishes for years. Remember: consistent prevention beats intensive restoration—start today to keep your kitchen faucet functioning beautifully.

