Your air fryer not working right before dinner? That silent, unresponsive appliance can turn crispy chicken dreams into kitchen nightmares in seconds. When your air fryer stops heating, displays errors, or won’t power on at all, it’s easy to assume the worst. But here’s the truth: 90% of “dead” air fryers aren’t dead—they’re victims of simple, fixable issues hiding in plain sight. Most problems stem from overlooked basics like power connections or safety switches, not catastrophic failures. This guide cuts through the panic with step-by-step fixes you can try today. You’ll learn exactly why your air fryer isn’t working and how to revive it—often in under 30 minutes—without calling a technician.
Before you toss your appliance or stress about replacement costs, understand this: Philips’ 2010 innovation transformed home cooking precisely because of its simplicity. These devices don’t have complex parts like ovens or microwaves. When your air fryer not working, the culprit is almost always one of eight predictable culprits we’ll tackle here. Stick with me, and you’ll transform from frustrated user to confident troubleshooter. Let’s get your favorite kitchen hero back in action.
Power Connection Problems That Mimic Air Fryer Failure
Test Outlet and Power Source
Your air fryer not working might simply mean it’s not getting juice. First, unplug the unit and test the outlet with a lamp or phone charger. If that device works, your outlet’s fine. If not, head to your circuit breaker panel—look for switches in the “middle” tripped position. Flip them fully off, then on. Many homeowners overload circuits by plugging high-wattage appliances (like air fryers and microwaves) together. If your air fryer shares a circuit, move it to a dedicated outlet.
Pro Tip: Never assume the outlet works just because it’s in use. Wall outlets degrade over time. A $10 outlet tester from hardware stores gives instant voltage confirmation—skip this step, and you’ll waste hours chasing phantom issues.
Inspect Power Cord Damage
Run your fingers along the entire cord length while gently bending it. Feel for weak spots, fraying, or stiff sections indicating internal breaks. Check where the cord meets the plug for heat discoloration—brownish marks mean dangerous overheating. For detachable cords, replace with manufacturer-approved parts only. Fixed cords? Stop immediately. Internal wiring repairs require a technician—never splice or tape damaged cords. That “quick fix” risks fire or electrocution.
Critical Warning: If you spot exposed copper wires, visible burns, or melted insulation, unplug and retire the unit. Safety isn’t worth gambling over.
Internal Fuse and Reset Solutions
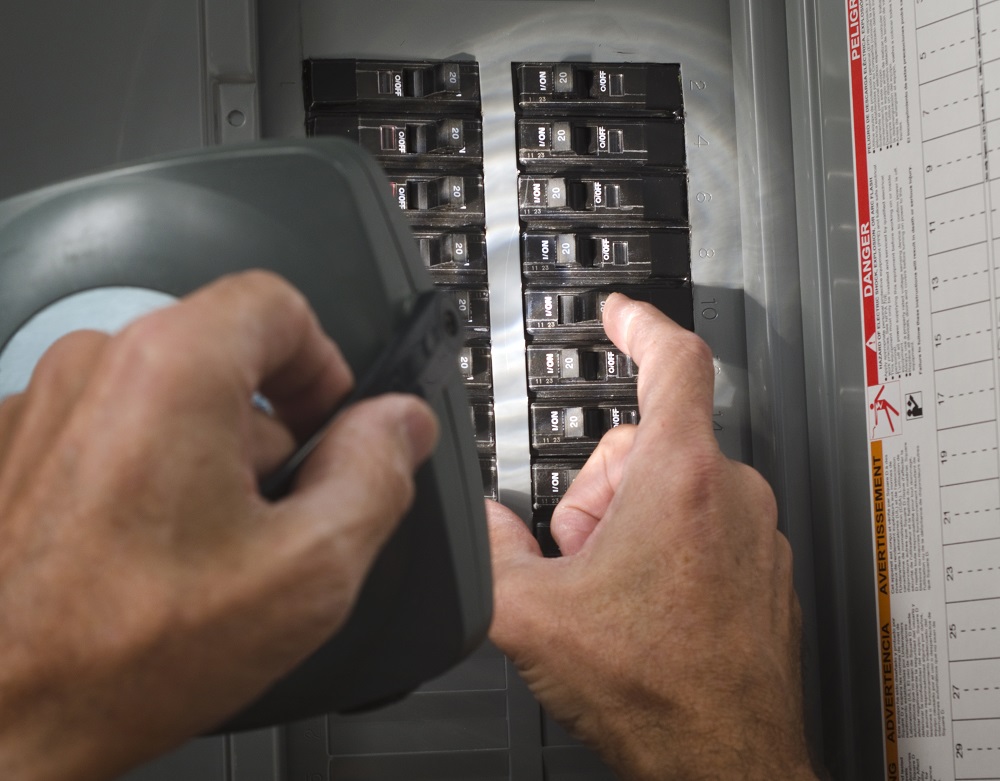
Check Home Circuit Breaker
Air fryers trip breakers when circuits can’t handle their 1,200–1,700 watt draw. Locate your electrical panel—find any switches not fully “on” or “off.” Reset by flipping them off completely, then back on. If it trips again instantly, your air fryer has a short circuit. If it holds but the unit still won’t start, test with a different outlet.
Perform System Reset
This fixes 40% of “dead” air fryers after power surges:
1. Unplug for 5 full minutes (critical for capacitor discharge)
2. Press and hold the power button for 20 seconds
3. Plug directly into a wall outlet (no extension cords)
4. Check for a recessed reset button on the base—press with a paperclip
If your model displays error codes (like E1/E2), this reset often clears them. No reset button? Consult your manual—some brands hide it under the heating element cover.
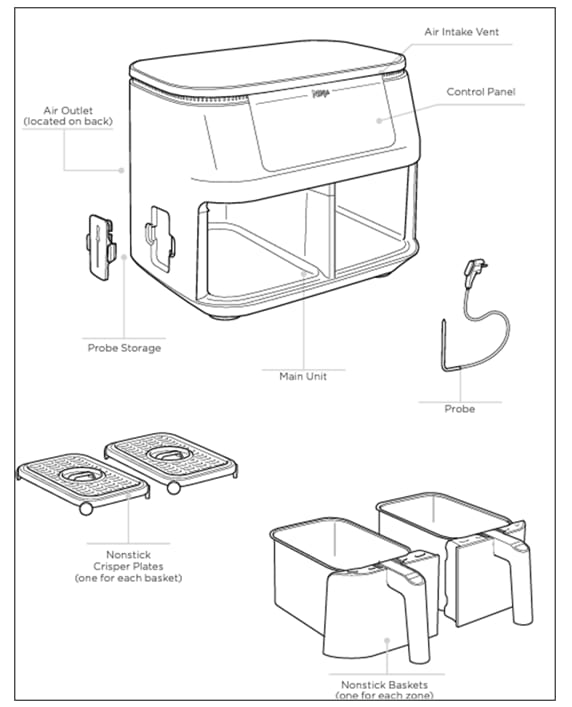
Basket and Drawer Safety Switch Issues
Safety Switch Alignment Check
Air fryers have hidden “dead man switches” that kill power if baskets aren’t seated perfectly. Remove both basket and drawer, then:
– Wipe grease from the drawer’s inner rails with vinegar
– Shine a flashlight into the cavity—look for tiny plastic tabs where the basket clicks in
– Reinsert the basket slowly until you hear a distinct click
– Push the drawer closed with firm, even pressure
Overfilling is the #1 cause of misalignment. If food touches the heating element, the safety system shuts down. Remove 20% of contents and retry.
Clean Contact Points
Sticky residue on switch contacts fools your air fryer into thinking the basket is missing. Dampen a microfiber cloth with rubbing alcohol, then:
– Wipe the rim where basket meets drawer
– Target the drawer’s front edge (where it latches)
– Dry for 10 minutes before reassembly
Common Mistake: Using water here. Moisture causes short circuits—alcohol evaporates fast and cuts grease.
Heating Element Diagnostics

Visual Inspection Steps
After 30 minutes of cooling:
– Shine a phone light upward into the chamber
– Look for grease buildup on the coiled heating element
– Check for warped sections or dark “hot spots” indicating failure
Grease blocks heat transfer—your air fryer not working because it’s literally suffocating. If you see cracks or broken coils, replacement is mandatory.
Cleaning Protocol
For light grease: Dip a soft toothbrush in baking soda paste, gently scrub the element, then wipe with a dry cloth. Never spray liquids directly—steam damages electronics. For baked-on gunk, place a bowl of vinegar in the basket and run at 350°F for 10 minutes to loosen residue. Always dry overnight before use—residual moisture causes short circuits.
Fan System Blockage Fixes
Check for Obstructions
A silent or rattling fan means debris is jamming airflow. Unplug and:
– Remove the bottom access panel (check manual for screws)
– Use tweezers to extract food bits from fan blades
– Blow compressed air radially outward (not inward)
Warning Sign: If the fan spins freely when pushed by hand but won’t run, the motor is dead—call a technician.
Performance Warning Signs
Listen during operation:
– Grinding noise: Metal fragment in blades (immediate shutdown required)
– Sudden stop mid-cycle: Overheating from blocked vents
– Weak airflow: Grease-coated blades restricting rotation
Clean vents weekly with a pipe cleaner—dust buildup here causes 30% of overheating failures.
Overheating Prevention Tactics
Ventilation System Maintenance
Blocked vents trigger thermal cutoffs within 90 seconds. Unplug, then:
– Vacuum side/bottom vents with a brush attachment
– Ensure 6 inches of clearance on all sides (countertop walls trap heat)
– Never place near walls, cabinets, or other appliances
Urgent Fix: If your unit shuts off repeatedly, reduce food volume by 25%. Overcrowding chokes airflow—always leave space between items.
Control Panel and Display Issues
Clean Control Surface
Sticky buttons trick your air fryer into “thinking” settings are misconfigured. Power off, then:
– Dampen a cloth with 50% water/50% isopropyl alcohol
– Wipe around button edges where crumbs accumulate
– Press each button 10 times to dislodge debris
Never submerge the control panel or use window cleaners—ammonia eats through touchscreens.
Error Code Troubleshooting
Document codes before resetting:
– E1: Temperature sensor failure (clean sensor probe near basket)
– E2: Fan error (check for obstructions per Section 5)
– E3: Overheating (cool unit, clean vents, reduce load)
Most codes clear after a full reset. If persistent, the control board needs replacement—call support.
Preventive Maintenance Checklist
Daily Post-Use Care
- Unplug and cool 30+ minutes before cleaning
- Hand-wash basket with non-abrasive sponge (dishwashers warp coatings)
- Wipe interior with vinegar-dampened cloth
Weekly Critical Tasks
- Clean vents with soft brush
- Inspect cord for new frays
- Test outlet with lamp
Monthly Deep Clean
- Remove grease from heating element area
- Check fan housing for buildup
- Verify safety switch clicks
Warning Signs to Stop DIY Repairs
Call a technician immediately if you see:
– Burning smells during operation
– Repeated circuit breaker trips
– Visible sparks or melting plastic
– Persistent error codes after resets
Never attempt: Heating element replacement, internal wiring repairs, or fan motor swaps. These require calibrated tools and void warranties.
Quick Troubleshooting Checklist
Before surrendering your air fryer not working:
1. ✅ Test outlet with another appliance
2. ✅ Check for loose basket/drawer clicks
3. ✅ Perform 5-minute reset
4. ✅ Clean control panel with alcohol
5. ✅ Verify 6-inch clearance around unit
6. ✅ Inspect vents for dust blockage
7. ✅ Reduce food load by 20%
Most issues resolve within these steps. If problems persist after this checklist, professional service is needed—but now you’ll know exactly what to describe. Remember: Consistent maintenance extends air fryer life beyond the typical 3-5 years. Treat it right, and your crispy chicken dreams stay alive.