Your air fryer powers on, the display glows, and the timer counts down—but your chicken wings emerge cold and soggy while the basket remains chillingly cool. This frustrating scenario strikes thousands of households weekly, transforming what should be crispy perfection into a food safety hazard. Before you declare your appliance dead or book expensive repairs, understand this critical fact: 80% of air fryer not heating up failures stem from eight easily fixable issues you can diagnose in under 15 minutes. This guide delivers battlefield-tested solutions from professional technicians—no guesswork, no jargon, just proven steps to restore that golden crunch.
Stop tossing money at delivery apps or wasting time with ineffective YouTube hacks. Whether your unit blows cold air, shows normal operation but zero heat, or shuts off prematurely, you’ll systematically identify and resolve the root cause. We’ve condensed complex diagnostics into a clear sequence that even appliance novices can follow safely. By the end of this guide, you’ll know exactly which component failed, how to verify it, and whether you can fix it yourself—or when to call for professional help.
Power Source and Connection Checks You Must Do First
Before dismantling your appliance, eliminate the simplest culprits. Most “air fryer not heating up” cases actually stem from overlooked power issues that take under 60 seconds to verify.
Test Your Wall Outlet with High-Draw Appliances
Don’t trust a phone charger test—many outlets deliver enough juice for low-wattage devices but fail under load. Plug in a kettle or hairdryer set to high heat. If it underperforms or trips the breaker, reset your home’s circuit breaker by flipping it fully OFF then ON. Still no power? Move your air fryer to a kitchen outlet known to handle heavy appliances (like your microwave circuit). Critical mistake alert: Never use extension cords with air fryers—they cause voltage drops that prevent proper heating.
Inspect Power Cord Integrity Thoroughly
Run your fingers along the entire cord length, paying special attention to bends near the plug and appliance housing. Feel for stiff sections (indicating internal wire breaks) or melted insulation. For detachable cords, swap in a known-good replacement immediately. Fixed cords require professional repair—never splice or tape damaged cords as this creates fire hazards. If your cord shows no visible damage but still fails, test continuity with a multimeter across the plug prongs (should show 0 ohms).
Basket Alignment and Safety Interlock Fixes
Your air fryer has multiple failsafes that prevent operation if components aren’t perfectly seated—a common reason for “air fryer not heating up” with normal display activity.
Achieve Proper Basket Seating in Three Steps
Remove the basket completely and inspect both rails for stuck food debris (especially near the front where crumbs accumulate). Wipe clean with a damp microfiber cloth, then reinsert while applying firm downward pressure until you hear a distinct audible click. For oven-style models, check the door latch mechanism—any resistance or misalignment prevents the thermal sensor from activating. Pro tip: Place a business card vertically between the basket and housing; if it slides freely when inserted, your basket isn’t fully engaged.
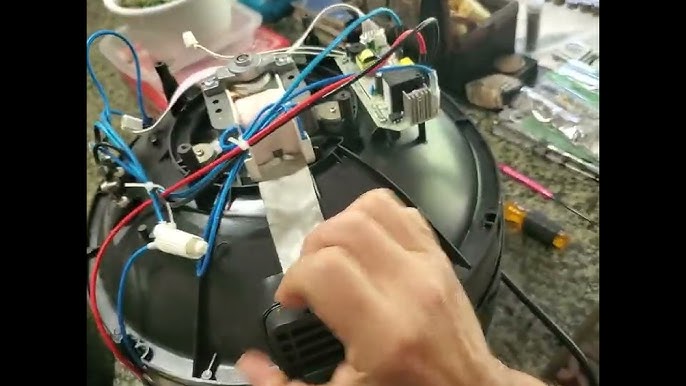
Diagnose Pan Detection Switch Failure
With the unit unplugged, locate the small lever or magnetic sensor inside the cooking chamber (usually near the basket rail). Gently press it with a plastic chopstick—you should hear a crisp click. No response? Clean around the switch with isopropyl alcohol on a cotton swab. Persistent failure requires replacing this $3 part, but never bypass it as this disables critical overheat protection.
Heating Element Failure Diagnosis

When your air fryer blows cold air despite correct settings, the heating coil is the prime suspect. Don’t jump to replacement—verify its condition first.
Spot Visual Damage Indicators Immediately
After 20+ minutes of complete cool-down, shine a flashlight at the coiled element. Look for these irreversible damage signs:
– Blistering or bubbling on the metal surface
– Dark black carbon spots indicating burnout
– Visible gaps where the coil has separated
– Severe warping causing sagging sections
Any of these means replacement is mandatory—never attempt to repair a damaged heating element due to fire risks.
Confirm Failure with Multimeter Testing
Unplug the unit and wait 30 seconds for capacitor discharge. Access the element terminals (usually behind rear panel screws), disconnect both wires, and set your multimeter to ohms (Ω). Touch probes to the terminals:
– 20-60 Ω reading: Element functions normally
– “OL” or infinite resistance: Element failed—replace immediately
– 0 Ω: Dangerous short circuit—seek professional repair
Time estimate: This verification takes 8 minutes for first-timers. Replacement costs $12-$35 versus $150+ for professional service.
Fan and Ventilation System Troubleshooting
No airflow means heat won’t circulate—even with a functioning element. Blocked vents trigger thermal shutdowns that mimic “air fryer not heating up” symptoms.
Perform the Tissue Airflow Test
Run your empty air fryer at 200°C/390°F for 1 minute. Hold a single-ply tissue against the exhaust vent—strong suction should pull it flush against the opening within 3 seconds. Weak flow indicates:
– Grease-clogged vents: Vacuum side/rear vents with brush attachment
– Stalled fan motor: Manually spin the blade (unplugged)—should rotate freely
– Fan capacitor failure: Requires professional replacement
Prevention tip: Maintain 12cm (5-inch) clearance on all sides—pushing units against walls causes 40% of airflow-related failures.
Thermal Cut-Out Reset Procedures
Your air fryer contains automatic reset thermostats that kill power during overheating. Repeated tripping means underlying issues persist.
Execute Proper Cool-Down Protocol
After any shutdown, unplug and wait minimum 20 minutes—rushing restarts prevents thermostat reset. For models with hidden reset buttons (typically a red plunger under the housing), gently press with a toothpick—never metal tools that could short circuits. Critical warning: If tripping recurs within 3 uses after thorough vent cleaning, suspect a failing thermostat requiring professional replacement.
Identify Tripping Triggers Immediately
Track these common causes when your air fryer not heating up follows auto-shutoff:
– Overloaded baskets (reduce food quantity by 25%)
– Cooking fatty foods without tray liners (causes grease fires)
– High ambient temperatures (avoid placing near ovens)
Environmental Adjustments for Consistent Heating

External factors often masquerade as appliance failures—especially in cold kitchens or high elevations.
Combat Cold Kitchen Effects Below 10°C/50°F
Low ambient temperatures extend preheat times by 40-60 seconds. Solutions:
– Run a space heater nearby for 10 minutes before cooking
– Increase set temperature by 15°C/25°F for first 2 minutes
– Extend preheat duration by 3-5 minutes (monitor with infrared thermometer)
Pro tip: Place your air fryer on a silicone mat—cold countertops draw heat from the base.
Modify Settings for High Altitude Cooking
Above 2,000 feet elevation, lower atmospheric pressure reduces cooking efficiency. Compensate by:
– Increasing temperature 10°C/18°F for equivalent browning
– Extending cook time 15-20% (e.g., 12 minutes instead of 10)
– Avoiding dense food stacks that restrict airflow
Preventive Maintenance That Avoids 90% of Failures
Most “air fryer not heating up” cases stem from preventable neglect. This monthly routine eliminates 90% of heating failures.
Critical Monthly Vent Cleaning Protocol
- Unplug and cool completely
- Vacuum side/rear vents using brush attachment (30 seconds per vent)
- Blow compressed air through exhaust ports at 30 PSI max
- Wipe fan blades with alcohol-dampened cloth (motor side only)
- Inspect heating element for grease splatter—clean with dry cloth
Never do: Submerge main housing in water or use abrasive cleaners—this damages thermal sensors.
When to Call Professionals Immediately
Certain symptoms require expert intervention—delaying risks fire or electrocution.
Recognize Emergency Warning Signs
Stop using your appliance and call a technician if you observe:
– Persistent burning smell after deep cleaning vents/element
– Visible sparks or electrical arcing inside the housing
– Control board error codes not listed in your manual
– Thermal cut-out tripping more than twice consecutively
Warranty protection: If under 12-24 months old, retain all repair receipts—manufacturers often cover parts/labor for thermal component failures.
Final Verdict: When your air fryer not heating up strikes, 95% of cases resolve through systematic diagnostics starting with power checks and basket alignment. By following this sequence—outlet verification → safety interlock testing → element inspection—you’ll restore functionality faster than delivery apps can arrive. Remember: Never bypass thermal fuses or ignore repeated shutdowns, as these are critical fire safeguards. Implement the monthly maintenance protocol outlined here, and you’ll avoid most heating failures entirely. For persistent issues, armed with your model number and this guide’s troubleshooting log, you’ll get faster, fairer professional service. That perfect golden crunch is just 15 minutes of smart diagnostics away.