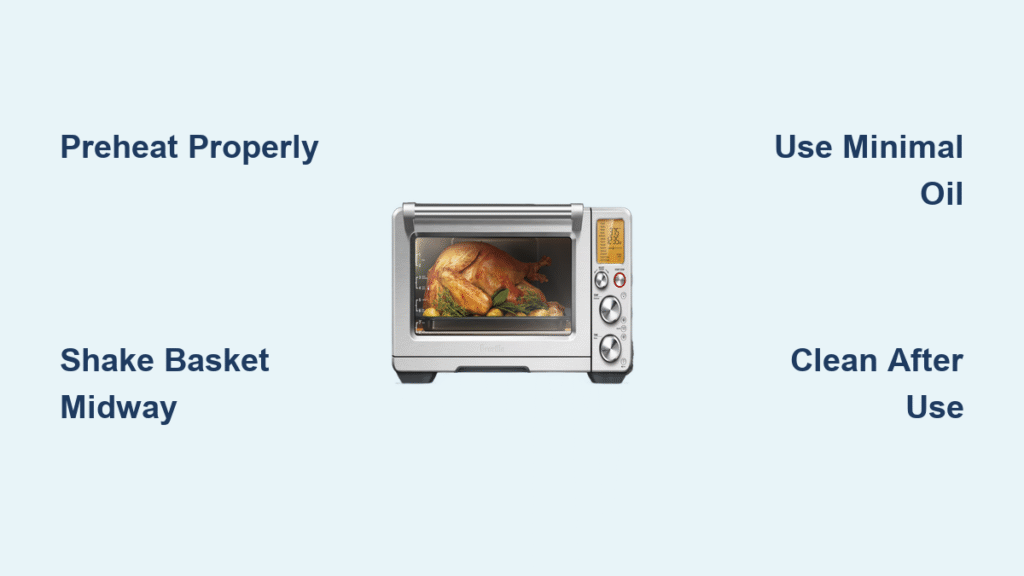
Picture this: You’re hosting a backyard cookout with burgers sizzling on the griddle, but you suddenly remember the forgotten fries inside the house. With a Blackstone air fryer combo, you can crisp up French fries right at your outdoor station—no frantic dashes indoors needed. This integrated system transforms your cooking experience by merging traditional griddle searing with modern air frying capabilities in one propane-powered unit. Unlike countertop models, the Blackstone air fryer isn’t a standalone appliance but a built-in feature requiring specific setup and operation.
Mastering how to use Blackstone air fryer functionality is essential for unlocking its full potential. This guide cuts through the confusion with field-tested steps for seamless operation, from initial electrical connections to perfectly timed fries. You’ll learn why preheating takes 20 minutes (not 5!), how wind sabotages crispiness, and why overloading baskets ruins results. Whether you’re a backyard newbie or seasoned griddle master, these protocols ensure you maximize this $400 add-on investment without propane mishaps or soggy potatoes.
Pre-Operation Setup Essentials
Electrical Power Connection
Plug the rear-mounted 75-watt fan into a grounded outdoor-rated extension cord before igniting propane—this fan circulates hot air but won’t work without electricity. Standard household extension cords fail outdoors; use a 14-gauge cord rated for 15+ amps and wrap connections in waterproof tape. This electrical component operates independently from the propane burner, so never assume the fan is running just because flames are visible. Test the fan immediately after plugging in—you should hear a steady hum confirming airflow circulation.
Propane and Assembly Considerations
Verify your propane tank has fuel by lifting it: A full 20-lb tank weighs 37 lbs; empty drops to 17 lbs since gauges aren’t built-in. The air fryer consumes 13,000 BTU—enough to noticeably reduce tank life during extended use—so keep a backup tank nearby for multi-hour cookouts. During assembly, enlist a second person to align the three heavy basket drawers; misalignment causes binding and uneven cooking. Critical mistake: Skipping the initial seasoning of basket surfaces leads to immediate rusting—apply Blackstone’s oil blend with a paper towel before first use.
Air Fryer Preheating Protocol

Temperature and Timing
Turn on the air fryer 10 minutes before the griddle to ensure both systems reach target temps simultaneously. Set the analog dial to “High” (450°F) and allow 20 full minutes—indoor air fryers heat faster, but propane systems need this time to stabilize. Use a separate infrared thermometer to verify actual basket temperature; the analog dial often runs 25°F cooler than displayed. Never skip preheating: Cold baskets create steamed, not crispy, results as moisture can’t evaporate instantly.
Heat Source Explanation
The propane burner sits directly beneath the baskets, creating intense radiant heat that requires wind management. Position your griddle so prevailing breezes hit the back (not the air intake vents), or use a commercial windscreen. Unlike electric models, this system has no heating elements—flame intensity directly controls temperature, so minor dial adjustments cause significant swings. If flames flicker erratically, check for grease buildup in the burner ports with a brass brush before relighting.
Operating Your Air Fryer Drawers
Loading and Positioning
Fill baskets only two-thirds full to maintain airflow—overloading traps steam and creates soggy zones. For fries, spread in a single layer with space between pieces; for corn, stand cobs vertically to expose maximum surface area. Pro tip: Toss foods in 1 tsp oil before loading—excess oil drips into the rear grease cup, but too little prevents crispiness. Each drawer measures 12″×8″×3″, so cut large items (like whole potatoes) into 1.5-inch cubes for even cooking.
Cooking Process Steps
- Preheat 20 minutes at target temperature (e.g., 400°F for fries)
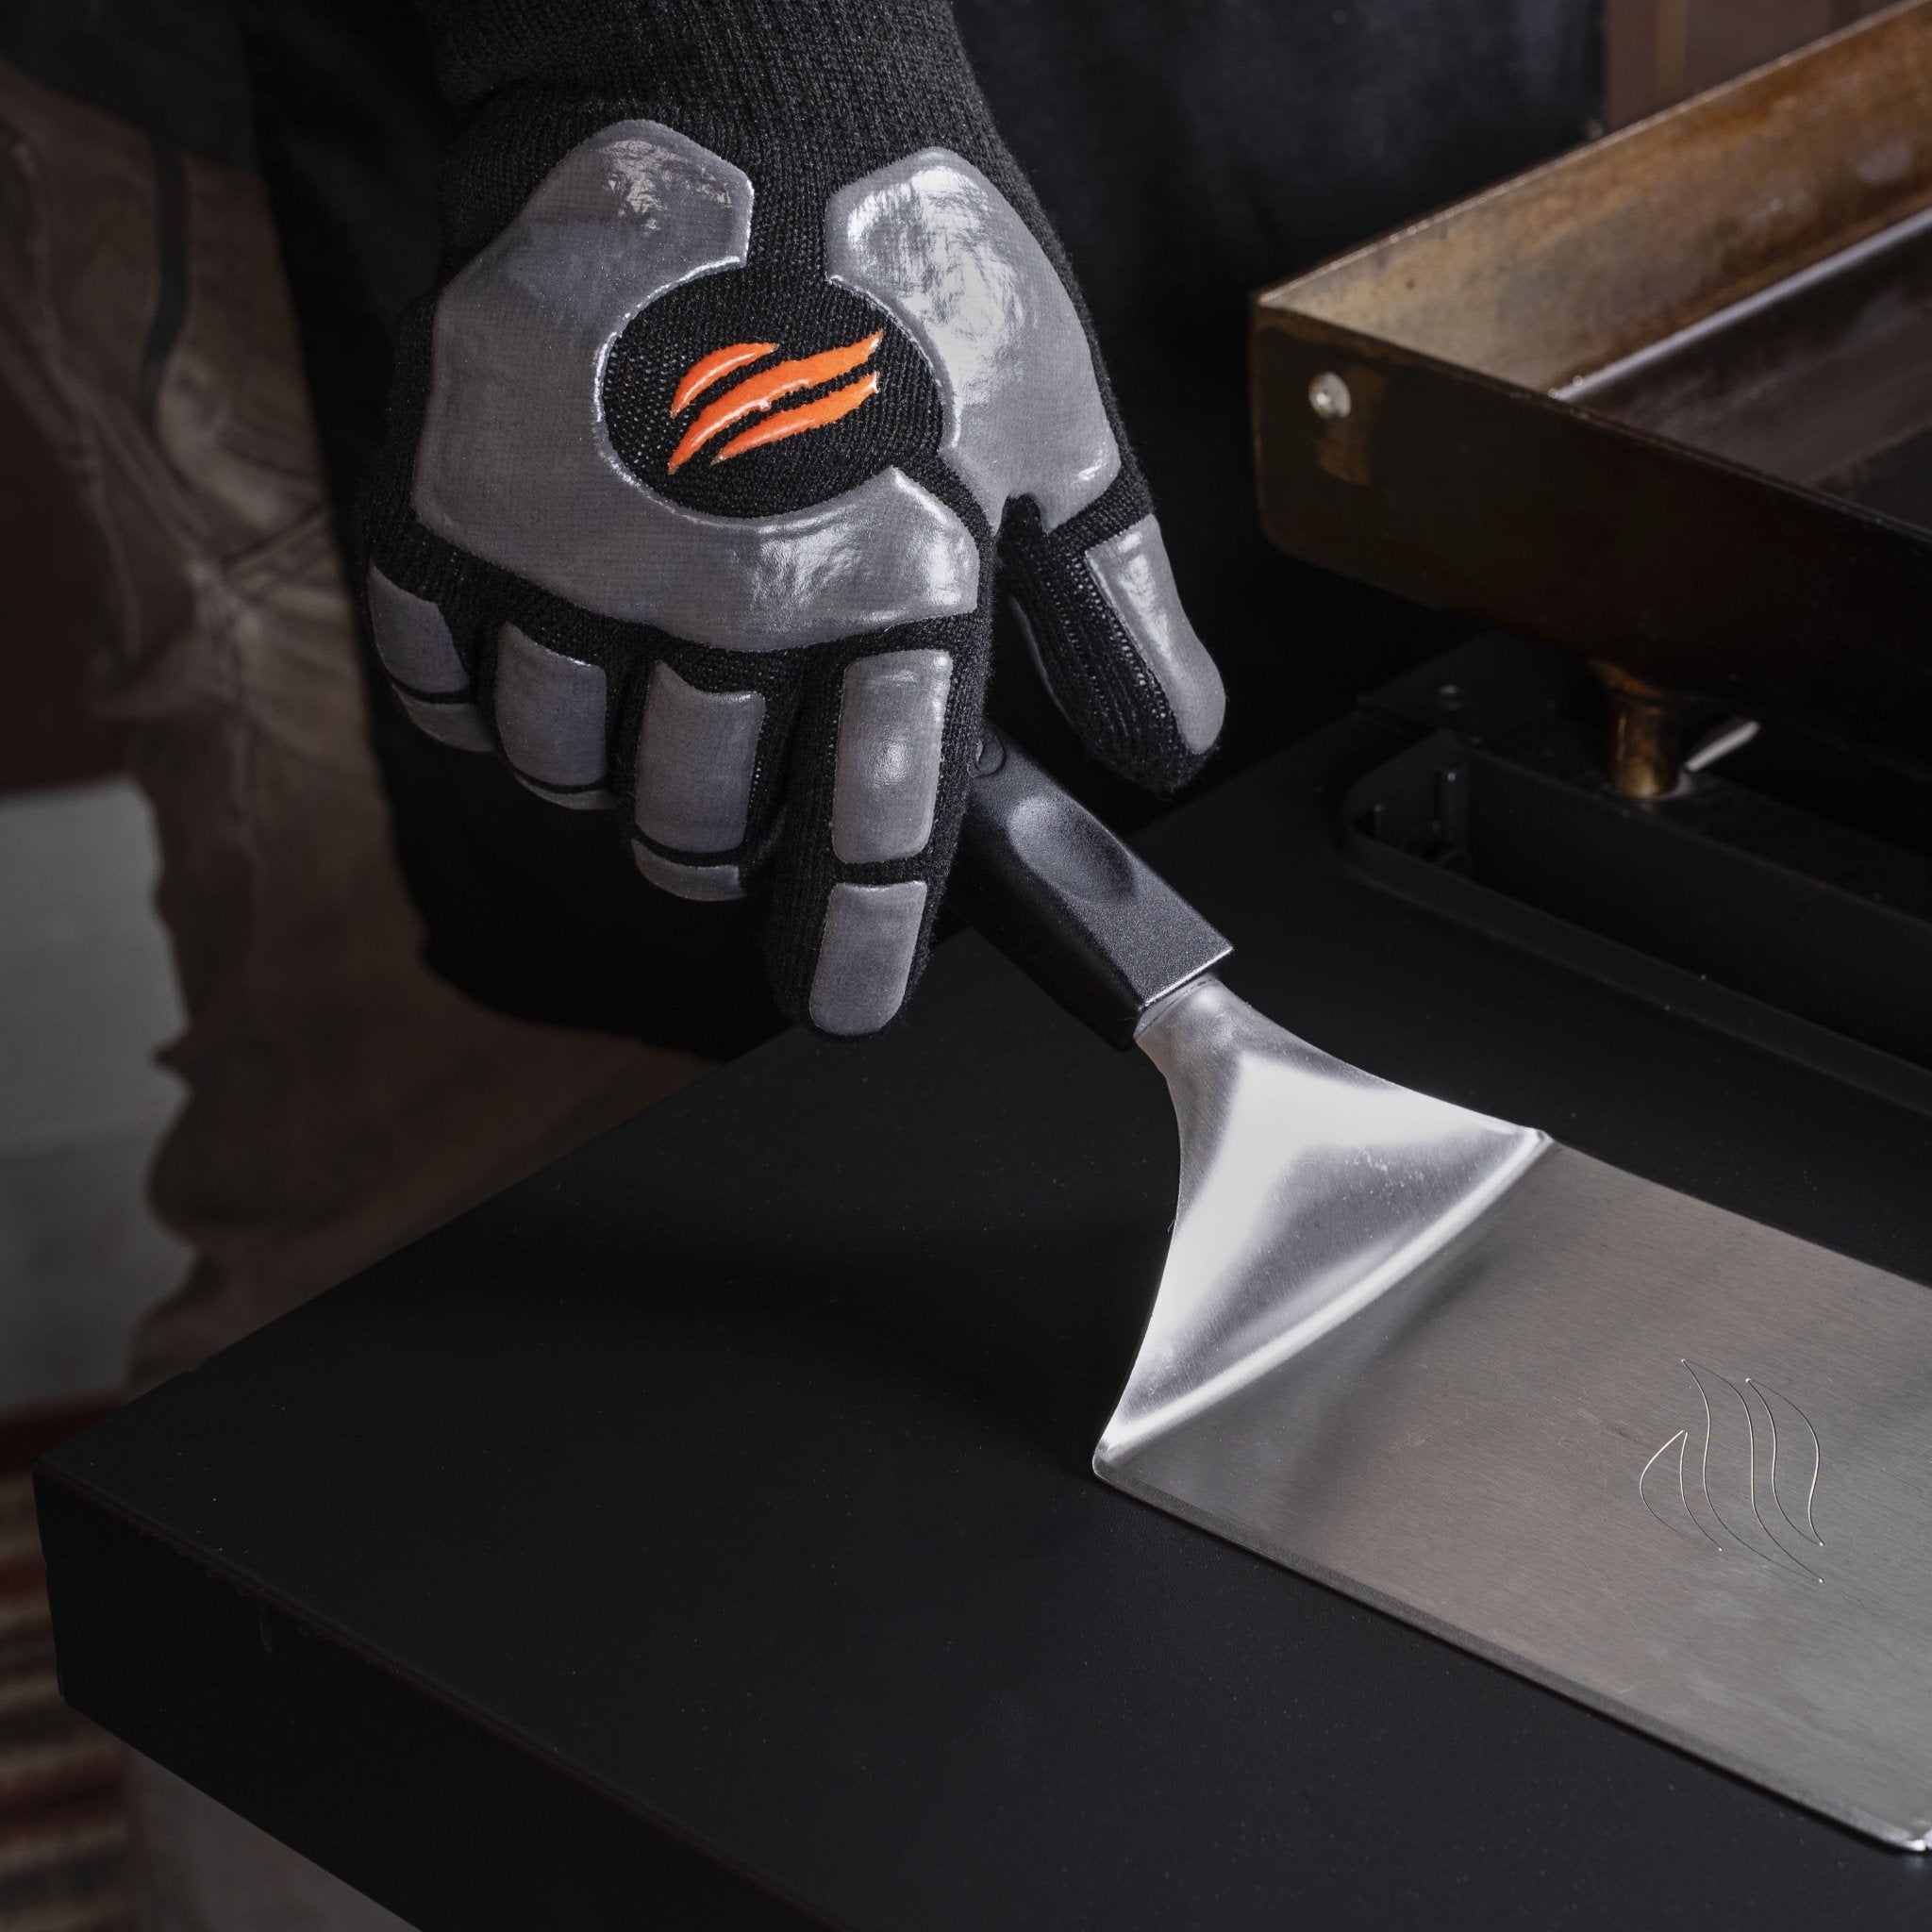
- Load food using silicone-tipped tongs to avoid basket scratches
- Set a physical timer—no audible alerts exist for doneness
- Shake baskets at the halfway mark for uniform browning
- Remove immediately with 500°F-rated gloves to prevent overcooking
- Transfer to a warming drawer or metal tray (never plastic)
Temperature Control Tips
Start recipes 25°F below recommended temps (e.g., cook fries at 375°F instead of 400°F), then increase if results are pale. High-altitude users add 25°F to compensate for thinner air. Wind alert: Gusts over 10 mph require lowering the temp dial by one notch—watch for uneven browning on windward sides. For delicate foods like fish, cover baskets with perforated parchment paper to prevent blowing.
Proven Recipe Successes
French Fries and Potatoes
Soak ¼-inch potato sticks in cold water for 30 minutes, then pat completely dry. At 400°F, toss with ½ tsp cornstarch and cook 12 minutes. Flip halfway for golden edges—under-flipping causes one-sided sogginess. Breakfast potatoes with rosemary finish in 18 minutes at 375°F; add onions in the last 5 minutes to avoid burning. Avoid baking large russets—they take 45+ minutes, wasting propane; use fingerlings instead.
Vegetable Applications
Husked corn brushed with avocado oil cooks in 12 minutes at 425°F—rotate cobs 180° halfway. For fajita veggies, cut bell peppers and onions into 1-inch strips and air-fry 9 minutes at 400°F while steak sears above. Mistake to avoid: Adding wet veggies (like zucchini) creates steam pockets—pat dry or broil first. Frozen edamame cooks perfectly in 8 minutes at 350°F for high-protein snacks.
Cleaning and Maintenance Routine

Daily Cleaning Process
Wait 15 minutes after cooking before removing baskets—premature handling warps metal. Slide baskets into the dishwasher (top rack only) with grease-cutting detergent; for stubborn residue, soak in hot water/vinegar solution for 20 minutes first. Never use metal scourers—they strip the seasoning. Empty the rear grease cup after every use; accumulated grease causes flare-ups during next preheat.
Seasonal Maintenance
Re-season baskets monthly by coating with Blackstone’s oil blend and heating at 300°F for 30 minutes. Before winter storage, disconnect propane lines and run the fan for 10 minutes to evaporate internal moisture. Critical check: Inspect the fan’s electrical cord for cracks monthly—outdoor UV exposure degrades insulation, risking shorts.
Safety Protocols and Best Practices
Heat Management
Baskets exceed 400°F even when flames seem low—always use silicone gloves with extended cuffs. Never place hot baskets on picnic tables; use a dedicated steel tray or brick patio surface. Designate a “cool-down zone” at least 10 feet from flammable objects. If smoke billows during cooking, reduce heat immediately—this indicates fat ignition, not normal operation.
Weather and Storage Considerations
After cooking, unplug the fan cord before turning off propane to prevent electrical shorts from residual moisture. In rain, drape a breathable tarp over the unit (never plastic—it traps moisture). Wind emergency: If flames blow out, shut propane off for 5 minutes before relighting to disperse gas. Store extension cords in a sealed bin to prevent rodent damage.
Maximizing Your Investment
Cost-Effective Usage
The air fryer pays for itself in 10-15 cookouts by eliminating indoor trips during parties. For weekday efficiency, air-fry sides while griddling breakfast—e.g., cook bacon above while hash browns crisp below. Pro strategy: Use the middle drawer as a warming zone for completed foods while finishing other items, syncing meal timing perfectly.
Integration Strategies
Start air-fried sides 10 minutes before griddle mains (e.g., begin fries when burgers hit the griddle). For taco nights, air-fry chicken at 375°F while griddling tortillas—both finish in 15 minutes. Never run the air fryer without the griddle cover; heat escapes, doubling preheat time.
Troubleshooting Common Issues
Temperature Inconsistencies
If fries brown on one side only, rotate basket positions (front-to-back) halfway through cooking. For persistent cool spots, clean burner ports with a paperclip—grease blockages create uneven flames. In high humidity, add 2 minutes to cook times as moisture slows crisping.
Propane Flow Problems
Weak yellow flames indicate low tank pressure—replace the tank immediately. Never operate with low flames; incomplete combustion produces dangerous carbon monoxide. If flames won’t ignite, check the piezo igniter for grease clogs; hold the knob in for 10 seconds after clicking to allow gas buildup.
Master how to use Blackstone air fryer by respecting its outdoor-specific rhythm: embrace the 20-minute preheat as prep time for ingredients, position it strategically against wind, and always monitor propane levels. Start with foolproof fries at 400°F for 12 minutes, then experiment with corn and veggies. Within three cookouts, you’ll seamlessly coordinate air-fried sides with griddle mains—no more kitchen dashes or soggy potatoes. The key isn’t speed but synchronization: let the air fryer handle sides while you focus on searing perfection above. Your backyard cookouts just became legendary.