

Your kitchen island wobbles every time you lean against it while preparing meals, threatening to spill hot liquids or topple appliances. This instability isn’t just annoying—it’s a serious safety hazard that could lead to injuries or expensive countertop damage. The good news is that securing your kitchen island properly can be accomplished over a weekend with basic tools and hardware store supplies. Whether you have a freestanding cart or a permanent fixture, this guide provides proven techniques to eliminate wobble, prevent tipping, and ensure your island remains stable for years to come.
Essential Tools and Hardware for Island Stabilization

Before starting your project, gather these critical supplies to avoid mid-installation store runs that disrupt your workflow. The right tools make the difference between a professional result and a frustrating experience.
Core anchoring equipment includes 3-inch galvanized wood screws (resistant to kitchen moisture), heavy-duty 90-degree metal brackets (minimum 4-pack), a reliable stud finder, power drill with Phillips bit, 2-foot level, and marking pencil. Select brackets rated for at least 100 lbs per pair since kitchen islands often support more weight than expected when loaded with cookware and small appliances.
Your flooring type determines additional hardware requirements. Tile floors need masonry drill bits and plastic anchors to prevent cracking. Hardwood floors require wood filler and finish nails for discreet repairs. Concrete slabs demand concrete screws and a hammer drill, while vinyl or laminate surfaces work best with construction adhesive and weighted objects during curing.
Don’t skip safety equipment—safety glasses protect your eyes from debris, work gloves prevent hand injuries, knee pads make floor work comfortable, and a shop vacuum keeps your workspace clean. Professional installers never compromise on these basics, and neither should you.
Identify Your Island Configuration Before Securing
Different kitchen island types require distinct securing approaches. Proper identification prevents costly mistakes and ensures your method matches your specific setup.
What to Look for in Freestanding Rolling Islands
These portable units typically feature wheels or legs. Carefully inspect underneath for locking mechanisms that might simply need tightening, adjustable legs with hex-key adjustment points, or cross-bracing between legs that provides inherent stability. If your island has wheels, the quickest fix involves replacing them with furniture pads or removing wheels entirely for permanent installation. Check if your model has pre-drilled holes for optional anchoring—a feature many manufacturers include but don’t always mention in documentation.
Permanent Base Cabinet Identification
These islands integrate with your kitchen’s infrastructure. Look for a 6-8 inch tall toe-kick recess at the base, electrical outlets on the sides, water lines for prep sinks, and possibly existing floor mounting brackets that have become loose over time. Permanent installations often connect to adjacent cabinets, requiring you to check for hidden brackets or attachment points before adding new hardware. Don’t overlook manufacturer labels inside cabinets that might indicate specific anchoring requirements.
Peninsula Extension Characteristics
Islands connected to existing countertops on one side present unique challenges. Identify L-shaped brackets attaching to adjacent cabinets, laminate seams where the island meets the main counter, and overhang support brackets visible underneath. These extensions require careful balancing of forces since they’re anchored on only one side. Measure the overhang distance—anything beyond 12 inches typically needs additional support to prevent tipping.
Floor-Specific Anchoring Techniques
Your flooring material dictates both the tools required and potential complications you’ll face during installation. Each surface needs specialized methods to avoid permanent damage while ensuring maximum stability.
Tile Floor Installation Protocol
Tile presents the greatest challenge due to cracking risks. Start by locating grout lines using your island’s current position—always mark bracket locations in grout joints rather than through tiles whenever possible. Drill pilot holes through grout using a masonry bit 1/8 inch smaller than your anchor size, applying steady pressure without hammer mode to prevent tile shattering. Insert plastic anchors flush with the tile surface, and if you encounter stubborn spots, angle brackets slightly to find softer grout areas. Never drill directly into tile unless absolutely necessary, as cracked tiles often require professional replacement and may not match existing patterns.
Hardwood Floor Anchoring Options
Wood floors offer multiple securing methods without permanent damage. Install L-brackets inside the toe-kick space, angled into floor joists for maximum strength while hiding hardware. For rental properties where you can’t modify floors, use construction adhesive along the island’s perimeter and weight it for 24 hours while curing. Alternatively, drill through the floor at island corners then fill holes with matching wood filler if you ever remove the island. Find joists by knocking on the floor for solid sounds or measuring 16 inches from walls—standard joist spacing in most homes.
Concrete Slab Installation Process
Basement kitchens or slab foundations require heavy-duty hardware. Use a hammer drill with masonry bits and concrete screws (Tapcon brand recommended). Mark bracket positions with a chalk line for perfect alignment, drill 2-inch deep holes, clean thoroughly with a shop vacuum, then drive concrete screws until flush. Test drill one hole first—some concrete contains rebar that requires specialized bits or professional assistance. Allow 48 hours for maximum holding strength before subjecting the island to normal use.
Bracket Installation Best Practices
Metal brackets provide the strongest connection between your island and floor. Follow this systematic approach for professional results.
Strategic Bracket Placement
Position your island in its final location and mark critical points: place corner brackets 2 inches from each corner inside the toe-kick space, add a center support bracket at the midpoint of the longest side for islands over 4 feet, and ensure all brackets sit at identical heights using your level. Critical measurement: brackets must align with floor joists or solid concrete—never anchor into subfloor alone as this provides minimal holding strength.
Proper Drilling and Securing Sequence
Drill pilot holes through bracket holes into your floor using depth stops to prevent drilling too deep. Select screws 1 inch longer than your flooring thickness (for tile over concrete, use 2.5-inch screws). Tighten screws gradually in diagonal patterns rather than sequentially to distribute pressure evenly. Over-tightening can strip holes or crack materials. Test stability by pushing the island from multiple angles before installing final screws, and adjust bracket positions if any wobble remains.
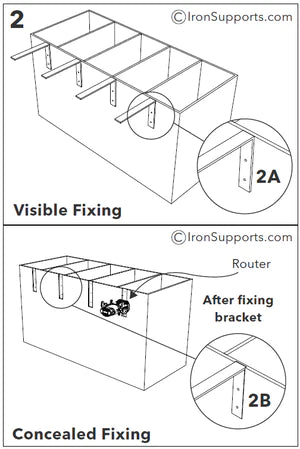
Concealment Techniques for Aesthetic Appeal
For visible islands without toe-kick space, hide brackets using inside cabinet anchoring (install brackets inside cabinet base, accessible through doors), decorative trim cover (add matching wooden trim to conceal visible brackets), or furniture leg modification (replace legs with hidden bracket-mounted supports). The goal is security without compromising your kitchen’s aesthetics.
Alternative Securing Methods When Brackets Aren’t Possible

When traditional bracket installation isn’t feasible, these creative solutions provide stability without floor modifications.
Strategic Weight Distribution System
Sometimes the simplest solution involves adding strategic weight: store heavy appliances like stand mixers and cast iron cookware on lower shelves, hide 20-pound sandbags inside decorative baskets at island corners, or extend granite or quartz overhangs to create natural stability through weight. Most islands need 50-100 pounds of low-mounted weight to eliminate wobble—place heavier items toward the island’s base for optimal stability.
Wall Connection Techniques
Connect your island to adjacent walls when floor anchoring isn’t possible: use 90-degree brackets inside cabinet to connect to wall studs, install steel supports connecting island to main counter, or extend existing backsplash to create wall-island connection. Ensure walls can handle additional load—interior walls may not support significant weight without reinforcement.
Essential Anti-Tip Mechanisms
For households with children or in earthquake-prone areas, install discreet nylon straps connecting island to wall studs, specialized earthquake brackets for seismic zones, or removable tension rods that install without permanent modifications. Place anti-tip devices at top back corners where they’re hidden from view but accessible for removal during reconfiguration.
Maintenance and Safety Verification Schedule
Secured islands require periodic checks to maintain stability as your kitchen environment changes.
Monthly Quick Stability Checks
Perform visual inspections for gaps between island and floor, physically test by pushing the island firmly from each corner, and check hardware for loose screws. Address any new squeaking sounds immediately as they indicate developing instability. Keep a small toolkit in your kitchen for quick tightening of visible hardware.
Annual Comprehensive Inspection
Conduct a complete hardware audit, removing and replacing any corroded screws or brackets. Check floor condition for tile cracks or wood floor damage, and verify level with a 4-foot level to detect settling. Replace brackets showing rust or bending stress immediately—don’t wait for complete failure.
Seasonal Adjustments for Environmental Changes
Account for humidity effects by tightening brackets in dry seasons when wood floors contract. Check concrete anchors after extreme temperature changes, and consider additional securing during periods of heavy usage like holiday cooking. Mark calendar reminders for these inspections to ensure consistency.
Your kitchen island should feel like an immovable part of your home’s foundation, not a precarious addition. By following these systematic approaches based on your specific floor type and island configuration, you’ll transform that wobbly workspace into a rock-solid centerpiece that serves your family safely for decades. The 30 minutes you spend properly securing your island prevents years of frustration and potential injuries—start with the simplest method for your situation, test thoroughly, and upgrade as needed.

