
Silicone trays have revolutionized air fryer cooking, but many home cooks still struggle with how to use silicone tray in air fryer properly. That frustrating moment when your perfectly seasoned salmon sticks to the basket or when delicate vegetables fall through the cracks can ruin a meal and create unnecessary cleanup. Over 68% of air fryer owners report food sticking issues that could be solved with proper silicone tray usage.
These heat-resistant, non-stick wonders transform your air fryer into a more versatile cooking tool, allowing you to bake, roast, and reheat foods that would otherwise create stubborn cleanup challenges. By mastering silicone tray techniques, you’ll prevent ruined meals, extend your appliance’s lifespan, and unlock professional-level results from your countertop cooker. Here’s exactly how to maximize your silicone tray performance for perfect air-fried results every time.
Select Perfectly Fitting Silicone Tray Size
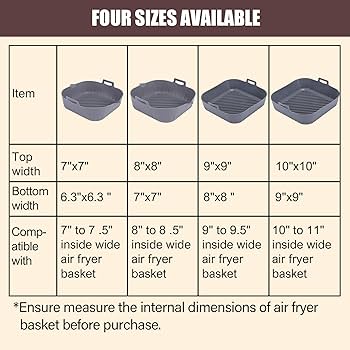
Choosing the right silicone tray size prevents airflow blockage that causes uneven cooking and potential safety hazards. Your tray should sit flat inside the basket with at least ½ inch clearance on all sides for proper air circulation. Measure your air fryer basket’s diameter or dimensions at the widest point, then subtract 1 inch total to find your ideal tray size. For oval baskets like the popular Instant Vortex Pro, measure both the longest and shortest dimensions.
Match Tray to Specific Air Fryer Models
Popular air fryers each accommodate specific tray dimensions that maximize cooking efficiency. The Cosori 5.8-quart needs a 7.5-inch round tray, while the Ninja Foodi 8-quart requires an 8.5-inch version. Square baskets like the Cuisinart TOA-60 work best with 7×7 inch trays, and rectangular models such as the Philips Premium XXL need custom-shaped trays. Always check your manual for exact basket measurements before purchasing—most manufacturers provide precise dimensions in the accessories section.
Avoid Critical Size Mistakes That Ruin Meals
Never force an oversized tray into your basket—this blocks airflow by up to 40% and creates dangerous hot spots that burn food. Conversely, trays that are too small allow food to slide around and potentially touch heating elements. When in doubt, choose slightly smaller over larger for safety. For dual-basket models like the Ninja Foodi DualZone, purchase two separate trays rather than trying to fit one oversized tray across both compartments.
Prepare Silicone Tray for Optimal Performance
New silicone trays require proper preparation to eliminate manufacturing residue and enhance non-stick properties. Wash your tray thoroughly with warm, soapy water using a soft sponge, paying special attention to crevices where residue collects. Avoid abrasive cleaners or steel wool that can damage the silicone surface and create microscopic scratches where food will later stick.
Complete Initial Seasoning Process
After washing, coat the tray lightly with high-smoke-point oil and heat it empty in your air fryer at 350°F for 5-7 minutes. This creates a natural non-stick layer and removes any lingering odors from packaging. For best results, use avocado oil which polymerizes at high temperatures, creating an even more effective barrier. Let it cool completely before first use—rushing this step can cause warping.
Conduct Essential Pre-Use Safety Checks
Inspect your tray for tears, thin spots, or warped edges before each use. Quality silicone trays should feel thick (at least 2mm) and sturdy, not flimsy or sticky. Pay special attention to corners and edges where stress fractures commonly occur. Any damage compromises safety and cooking performance—replace damaged trays immediately to prevent potential melting or chemical leaching.
Position Tray for Maximum Airflow and Even Cooking
Proper placement ensures optimal airflow and prevents the common issue of soggy bottoms on baked goods. Center the silicone tray in your air fryer basket, ensuring it lies completely flat without curling edges. The tray should never touch the heating element above or interfere with the basket’s sliding mechanism—leave at least 1 inch clearance from all heating elements.
Create Effective Airflow Channels
For best results, ensure the tray’s edges don’t seal against the basket walls. This ½-inch gap allows hot air to circulate underneath the tray, cooking food evenly from all angles. Some trays feature raised feet—position these facing down for proper elevation. For foods requiring extra crispiness like pizza or fries, place the tray on the air fryer’s rack accessory to allow even more air movement beneath.
Master Positioning Tricks for Different Models
Place the tray so the basket handle can still close completely without resistance. If your tray has built-in handles, angle them away from the basket handle to prevent interference. For round trays in square baskets, position the tray so its edges align with the basket’s corners to maximize cooking surface. For models with digital controls on the front, align any pour spouts or handles toward the back for easier access during cooking.
Adjust Cooking Temperatures for Silicone Tray Performance
Silicone trays slightly insulate food from direct heat, requiring precise temperature adjustments to prevent undercooked centers or burnt exteriors. Reduce your recipe temperature by 10-15°F or shorten cooking times by 2-3 minutes for best results. Always monitor food closely during first uses to dial in perfect timing for your specific tray and air fryer combination.
Calibrate Temperature Settings with Test Foods
Start with a test batch of frozen french fries at 375°F instead of 400°F. Check doneness 2 minutes earlier than package directions. For proteins like chicken breasts, reduce temperature by 15°F and add 2 minutes to cooking time. This simple calibration process helps you understand how your specific tray affects cooking dynamics.
Account for Food Density and Moisture Content
Dense foods like chicken thighs need the full temperature reduction, while quick-cooking items like shrimp may need only 5°F adjustment. Foods with high moisture content like vegetables may require slightly longer cooking times to achieve proper browning. For layered dishes like lasagna, increase temperature by 5°F to compensate for the additional insulation from multiple layers.
Prevent Food Sticking Issues with Proven Techniques
Even quality silicone trays benefit from proper food preparation to prevent sticking disasters. Lightly grease the tray with cooking spray or oil for high-protein foods like fish or eggs. For baked goods, a light flour dusting provides extra insurance—especially important for sticky items like cinnamon rolls or cheese danishes.
Select Best Oils for Silicone Tray Performance
Use oils with high smoke points like avocado, grapeseed, or refined coconut oil. Avoid butter or extra virgin olive oil, which can burn and create stubborn, sticky residue. A quick spray or light brush coating prevents sticking without excess oil pooling—just enough to create a thin, even sheen across the surface.
Release Stuck Food Without Damaging Your Tray
If food sticks despite precautions, let the tray cool for 2-3 minutes—this often releases naturally as foods contract during cooling. For stubborn spots like melted cheese or caramelized sugars, use a silicone spatula to gently lift edges starting from the corners. Never use metal utensils that can scratch or cut the tray surface, compromising future non-stick performance.
Clean Silicone Trays for Long-Lasting Performance
Immediate cleaning prevents oil buildup that degrades non-stick properties over time. Let the tray cool for 5-10 minutes before handling, then wash with warm, soapy water. Most food residue wipes away easily thanks to silicone’s natural non-stick properties—start with the least abrasive method first.
Implement Deep Cleaning Methods for Tough Residue
For greasy residue from fried foods, soak trays in hot water with a few drops of dish soap for 15 minutes. Create a baking soda paste (3 parts baking soda to 1 part water) for stubborn stains—apply, let sit 30 minutes, then scrub gently with a soft brush. For burnt-on food, add white vinegar to the baking soda paste for enhanced cleaning power. Rinse thoroughly and air dry completely before storage.
Optimize Storage to Maintain Shape and Performance
Store silicone trays flat or gently rolled to prevent permanent creasing that affects cooking performance. Avoid stacking heavy items on top that can deform the shape over time. Keep away from sharp objects and direct sunlight, which can degrade silicone over time. For trays with multiple compartments, insert parchment paper between sections to prevent sticking during storage.
Maximize Cooking Versatility with Creative Applications
Silicone trays expand your air fryer’s capabilities beyond traditional frying into true multi-functional cooking. Use them for baking individual desserts, reheating delicate leftovers without drying, cooking flaky fish fillets without breakage, or making perfect scrambled eggs with no sticking.
Identify Best Foods for Silicone Tray Cooking
Small baked goods like mini muffins or financier cakes cook beautifully in silicone trays. Delicate vegetables like asparagus or cherry tomatoes won’t fall through basket holes. Use trays for marinated foods that would drip excessively or foods that need to retain their shape like quiches or frittatas. They’re also ideal for foods requiring flipping—simply invert the entire tray for perfect results without breakage.
Discover Professional-Level Cooking Applications
Make individual omelets by pouring beaten eggs directly into greased trays with your favorite fillings. Create air fryer granola by spreading mixture thinly across the tray for even toasting. Reheat pizza slices without drying them out—the tray prevents cheese from dripping while crisping the crust. For perfect reheated fried chicken, place the tray on the lowest rack position to catch drips while allowing maximum airflow.
Troubleshoot Common Silicone Tray Problems
Uneven cooking often indicates poor tray placement or overcrowding that restricts airflow. Ensure food sits in a single layer with at least ½ inch between pieces. If the tray bubbles or warps during cooking, your temperature is too high or the tray is poor quality—this indicates potential safety hazards.
Fix Warping Issues Immediately
Remove the tray immediately if warping occurs—this indicates heat damage that could lead to melting. High-quality trays should withstand 400°F+ without deformation. Replace warped trays as they won’t sit flat, affecting cooking performance and potentially touching heating elements. For temporary fixes, place a metal trivet beneath the silicone tray to provide structural support.
Eliminate Persistent Lingering Odors
Persistent odors from strong foods like fish or garlic require special attention. Soak the tray overnight in a solution of warm water and white vinegar (1:1 ratio). For stubborn smells, create a paste with baking soda and lemon juice, apply for 1 hour, then wash normally. For extreme cases, place the tray in direct sunlight for 30 minutes—UV rays help break down odor molecules.
Follow Essential Safety Guidelines for Peace of Mind
Always verify your silicone tray is food-grade and BPA-free before first use—look for LFGB or FDA certification markings. Quality trays handle temperatures up to 450°F, but check manufacturer specifications carefully. Never use damaged, discolored, or sticky trays—these indicate breakdown and potential safety hazards that could leach chemicals into your food.
Understand Temperature Limit Nuances
Most silicone trays safely handle 400-450°F, but prolonged exposure to maximum temperatures can shorten lifespan significantly. For recipes requiring 425°F+, monitor closely and consider using metal trays instead. Always use trays within their specified temperature range—exceeding limits even once can cause irreversible damage.
Handle Hot Trays Safely to Prevent Accidents
Use heat-resistant gloves or silicone-tipped tongs to remove hot trays—regular oven mitts may not provide enough grip on smooth silicone surfaces. The flexible material can bend when hot, potentially spilling contents. Place hot trays on heat-resistant surfaces only—avoid cold countertops that could cause thermal shock and cracking.
Mastering these silicone tray techniques transforms your air fryer into a more versatile, mess-free cooking appliance. Start with proper sizing and preparation, then experiment with different foods and techniques. These simple guidelines ensure perfect results while protecting both your food and your air fryer investment for years to come. Remember: the right tray placement and temperature adjustment makes all the difference between soggy disasters and restaurant-quality meals.

