
Your kitchen renovation dream starts with one critical step: removing those outdated cabinets. Whether you’re upgrading to modern shaker styles or creating an open-concept layout, learning how to disassemble kitchen cabinets properly prevents costly wall repairs and saves you hundreds in professional removal fees. Most homeowners don’t realize that 25 linear feet of kitchen cabinets costs $645-$1,370 to remove professionally—a task you can handle yourself in just 2-4 hours with basic tools. This guide delivers the exact process contractors use, stripped of industry jargon and adapted for DIY success. You’ll discover how to systematically dismantle every cabinet component while protecting your walls, avoiding common pitfalls that turn simple removal into drywall disaster zones.
Upper Wall Cabinet Removal Without Wall Damage
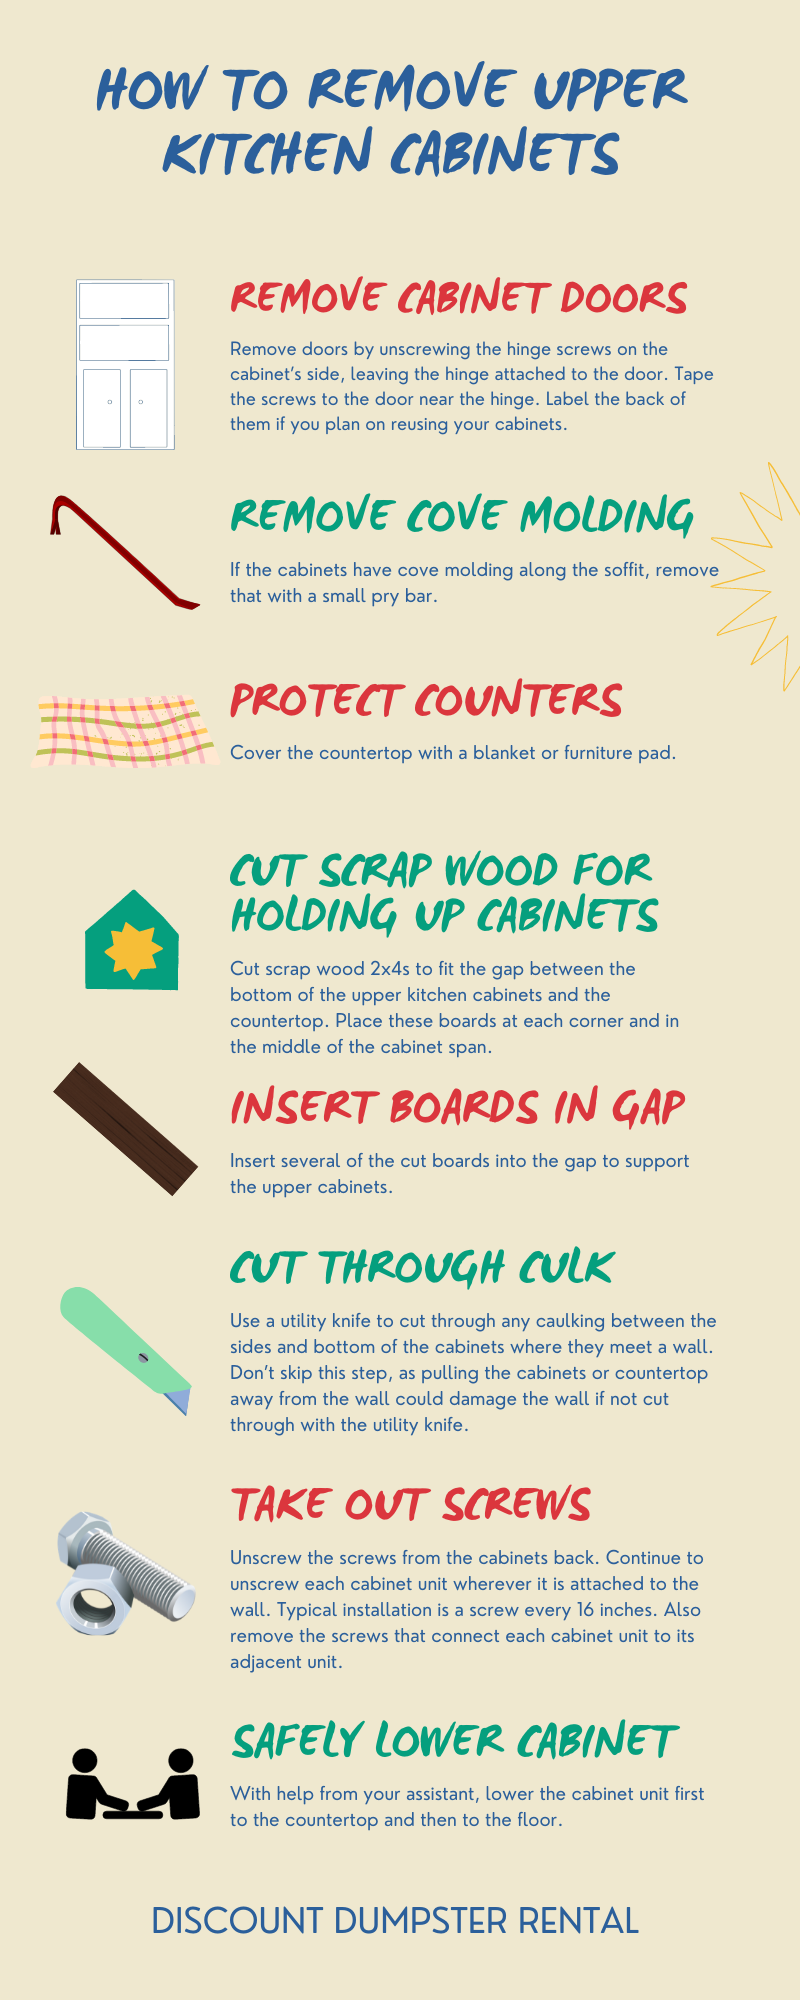
Start with Door and Shelf Disassembly
Remove cabinet doors first while keeping hinges attached to prevent losing tiny hardware pieces—unscrew bracket screws from the cabinet frame, not the door itself. For most standard cabinets, you’ll find two screws per hinge bracket. Place doors face down on moving blankets to prevent scratches. Next, remove all shelves: adjustable shelves lift straight off support pegs, while fixed shelves require unscrewing brackets from inside cabinet walls. Label each door and shelf with painter’s tape indicating its original location—this saves hours during reinstallation if you’re keeping cabinets.
Break Caulk Seals Before Removal
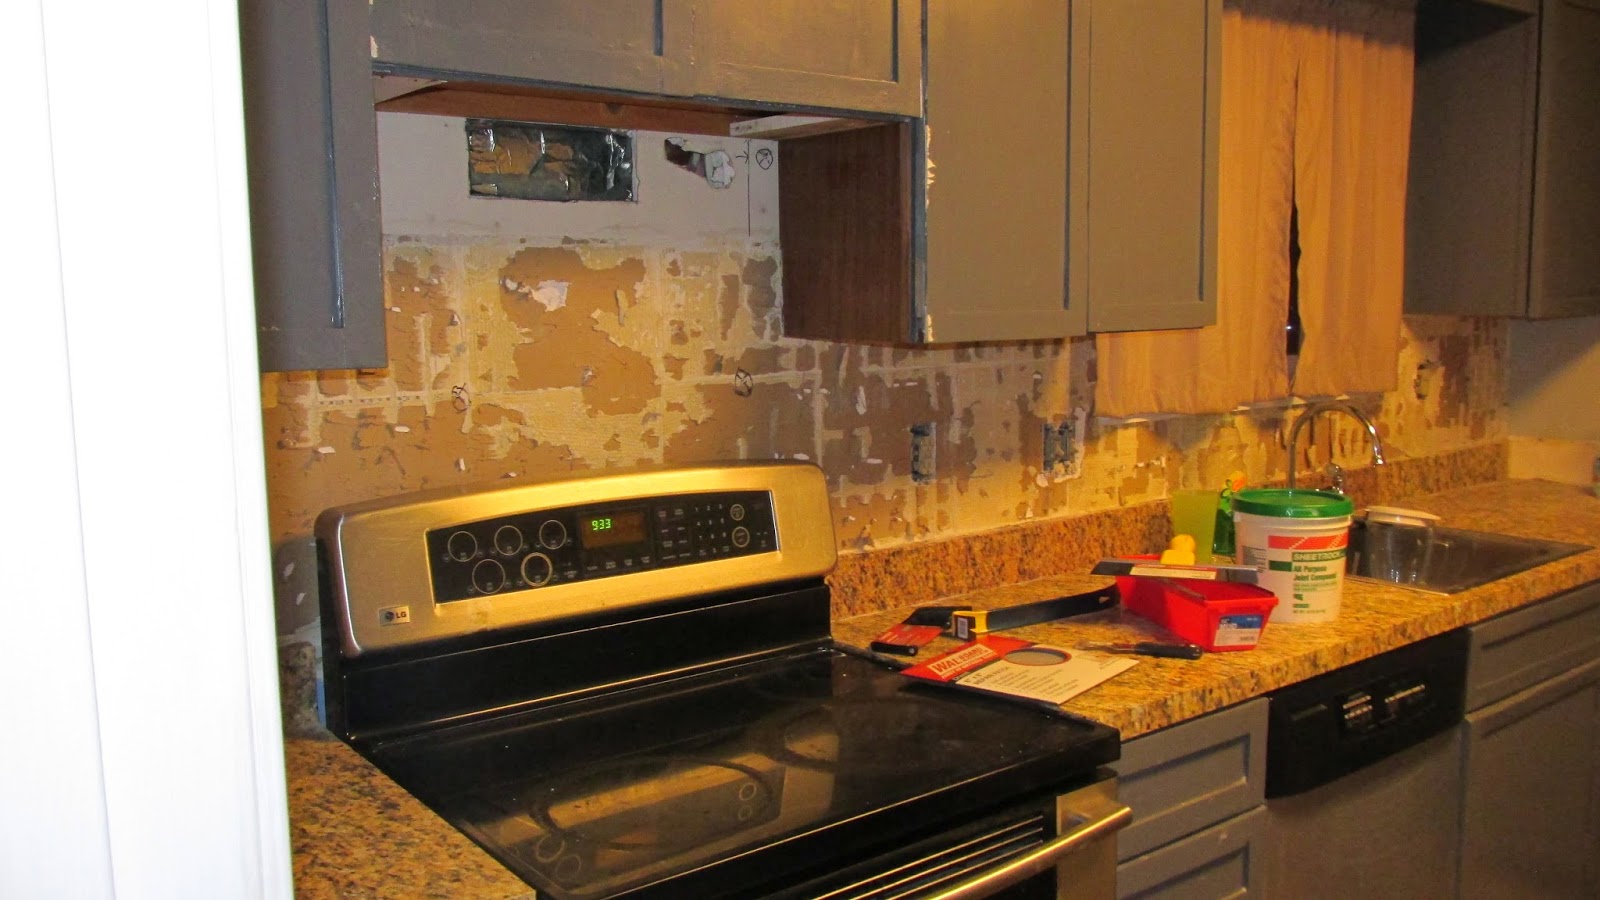
Run a sharp utility knife along all cabinet edges where they meet walls, ceilings, and adjacent cabinets. This step is non-negotiable—old paint and caulk create powerful adhesion that causes drywall tears when cabinets pull away. Score both vertical and horizontal seams thoroughly, inserting the blade at 45-degree angles to slice through hidden caulk layers. For stubborn connections, make multiple passes with the knife before attempting removal. This simple technique prevents 90% of wall damage during cabinet disassembly.
Locate Hidden Fasteners in Seconds
Look for subtle circular discolorations on cabinet walls—these indicate hidden screw heads covered by decorative stickers or touch-up paint. Most upper cabinets attach with four critical screws: two at the top rail connecting to wall studs and two along the bottom rail. Check inside cabinets for side-to-side connection screws between neighboring units—typically located at top and bottom corners. Before removing any screws, position 2×4 supports cut to countertop height under each cabinet corner. Your assistant should maintain constant upward pressure while you remove screws from bottom to top, preventing sudden cabinet drops.
Base Cabinet Disassembly Around Plumbing Obstructions
Disconnect Dishwasher Without Flooding
Turn off the circuit breaker controlling kitchen outlets before touching any appliance. Locate mounting brackets underneath your countertop near the dishwasher—these secure it to cabinet frames. Unscrew these brackets using a 1/4-inch nut driver, then shut off water supply valves under the sink. Place a bucket under connections before detaching supply lines with adjustable pliers. If flooring was installed after cabinets, you may need to remove a section of flooring around the dishwasher to slide it forward—use a pry bar to lift planks carefully, numbering each piece for reinstallation.
Remove Countertops Without Breaking Sinks
Sever caulk between countertop and backsplash using your utility knife, making multiple passes to ensure complete separation. Check underneath for screws connecting the countertop to cabinet frames—common with laminate tops but rare with solid surface materials. Remove these screws systematically from one end to the other. For integrated sinks, lift the countertop straight up while supporting the sink basin from below; have your assistant position sawhorses nearby to set the unit down safely. Never twist or tilt countertops during removal—this causes cracks around sink cutouts.
Pry Off Toe Kicks Without Splintering
Start at the center of each base cabinet’s toe kick and work outward with a thin pry bar. Insert a scrap wood block between the pry bar and cabinet front to distribute force and prevent dents. Apply steady, even pressure while tapping the pry bar handle with a hammer—sudden impacts cause splintering. If toe kicks resist removal, check for hidden screws along the top edge inside the cabinet. Once removed, store toe kicks vertically against walls to prevent warping. This preservation technique allows you to reinstall original toe kicks with new cabinets for seamless transitions.
Handle Glue-Attached Cabinets Like a Pro
Identify and Release Adhesive Bonds
No visible screws indicate your cabinets are glued directly to wall studs—a common technique in budget installations. Confirm this by tapping the cabinet back; a dull thud versus hollow sound reveals solid attachment. Insert a 2-inch putty knife between cabinet back and wall, working it horizontally to break the initial bond. Switch to a pry bar at stud locations identified with a stud finder—always pry against solid wood to minimize drywall damage. Apply heat from a hair dryer to stubborn adhesive spots, softening the bond before prying. Work systematically around the perimeter, inserting wooden shims as you go to maintain separation.
Cut Through Cabinet Sides for Pipe Access
When water lines run through cabinet walls between sink and dishwasher, you have two options: cut access channels or disconnect pipes completely. For permanent removal, use a jigsaw with a fine-tooth blade to cut precise openings around pipes—measure pipe locations first and mark cutting lines with a pencil. For cabinet reuse, disconnect pipes at isolation valves and cap them temporarily. Wrap pipe ends with electrical tape to prevent debris entry during removal. This strategic approach prevents accidental pipe damage that could flood your kitchen during disassembly.
Avoid These 3 Costly Disassembly Mistakes
Mistake #1: Removing Final Screws Without Support
Cabinets weighing 40-80 pounds can fall forward with dangerous force when the last screw releases. Always maintain upward support with 2x4s under cabinet corners until fully detached. Have your assistant position themselves behind the cabinet, ready to catch it if support shifts. This single precaution prevents most injuries and cabinet damage during removal.
Mistake #2: Ignoring Hidden Fasteners Behind Trim
Decorative crown molding often conceals critical attachment points. Remove trim first using a thin pry bar and hammer, working from corner to corner. Check behind removed trim for screws—many installations anchor cabinets through crown molding into wall studs. Skipping this step causes trim damage and leaves hidden screws that resist cabinet removal.
Mistake #3: Forcing Stuck Cabinets Without Diagnosis
When cabinets resist removal, don’t increase force—identify the cause first. Common culprits include:
– Undetected plumbing connections
– Flooring installed over cabinet bases
– Adhesive along cabinet bottoms
– Electrical boxes screwed to cabinet backs
Spend five minutes diagnosing resistance before applying additional force—this saves hours of wall repair later.
Post-Removal Wall Inspection Checklist
Immediately after cabinet removal, inspect walls for these critical issues:
- Screw hole damage: Fill minor holes with spackle; patch larger voids with mesh tape
- Water damage: Look for soft spots near sink areas indicating past leaks
- Electrical adjustments: Note outlet positions relative to new cabinet plans
- Wall irregularities: Check for bowed sections needing shimming during reinstallation
Clean wall surfaces thoroughly with TSP solution to remove old caulk residue and grease buildup—this creates a smooth surface for new cabinet installation. Address major repairs now before they complicate your renovation timeline.
Bottom line: Mastering how to disassemble kitchen cabinets transforms what seems like a demolition task into a strategic preparation phase for your dream kitchen. By following these precise steps, you’ll avoid the #1 renovation regret—unexpected wall repairs that derail timelines and budgets. The $600+ you save on professional removal pays for premium cabinet hardware or that wine fridge you’ve been eyeing. Now that your walls are bare, measure twice and photograph every angle before moving forward—these reference points ensure your new cabinets align perfectly with plumbing and electrical requirements. Your kitchen transformation has officially begun, one carefully removed cabinet at a time.

