
Tired of cracked, dated kitchen tiles that make your cooking space feel stuck in the past? Changing kitchen tiles transforms your kitchen’s entire vibe without requiring a full remodel. Whether you’re battling stubborn grout stains, mismatched backsplash patterns, or simply craving a modern refresh, this guide gives you actionable strategies to tackle the job right. You’ll discover exactly when to rip out old tiles versus using clever overlay solutions, avoid costly mistakes during demolition, and achieve professional-looking results on a weekend budget. Let’s turn your tile frustrations into a stunning kitchen upgrade you’ll love for years.
When to Remove Versus Overlay Kitchen Tiles
Your tile replacement strategy hinges entirely on three critical factors: existing tile condition, appliance placement, and your renovation goals. Full removal becomes essential when tiles show cracks, looseness, or hollow spots (tap with a coin—hollow sounds signal underlying problems). You must also remove tiles if subfloor damage exists beneath, if you’re installing underfloor heating, or if appliances like dishwashers were installed directly over the original tile layer.
Overlay solutions shine when your existing tiles are structurally sound with solid coin-tap responses. They’re perfect for quick pre-sale refreshes, tight budgets (saving 60-80% versus full replacement), or situations where moving heavy appliances isn’t feasible. Renters particularly benefit from overlays since most methods like vinyl planks or tile stickers remove cleanly later. Always test a corner tile first—if it lifts easily, full removal awaits; if firmly bonded, overlays become your time-saving ally.
Essential Safety Gear and Tools for Tile Replacement

Skipping proper safety gear risks serious injury during tile removal. Ceramic shards fly unpredictably, silica dust causes permanent lung damage, and demolition tools generate deafening noise. Non-negotiable equipment includes N95 respirators (for dust), safety goggles (flying debris protection), cut-resistant gloves, knee pads, and ear protection. Rent a HEPA vacuum simultaneously—continuous dust control prevents scratches on new tiles and protects your health.
Tool selection depends on your project size. For small areas under 50 sq ft, a manual 2-lb hammer and cold chisel suffice. Medium jobs (50-150 sq ft) demand a rotary hammer with chisel bit for efficiency. Large kitchens over 150 sq ft justify renting a walk-behind tile stripper ($75/day). Never use standard hammers for large jobs—they damage subfloors through excessive pounding. Always keep long-handled floor scrapers and grinders ready for adhesive removal during subfloor prep.
Full Tile Removal: Step-by-Step Process
Prepare Your Kitchen Space Thoroughly
Begin by creating a dust containment zone. Remove all movable items—appliances, rugs, even pet bowls—and disconnect under-cabinet lighting circuits at the breaker. Seal doorways with plastic sheeting and painter’s tape, while completely covering HVAC vents to prevent dust infiltration. Protect countertops with moving blankets or thick cardboard, and gently remove baseboards using a flat pry bar (they’ll reinstall after new tiles). For appliances, slide refrigerators onto furniture sliders and disconnect dishwasher water lines first. Most have adjustable legs—lower them completely before sliding appliances out to avoid tile damage.
Remove Old Tiles Without Subfloor Damage
Start at the room’s edge by identifying loose or cracked tiles. If none exist, lightly tap a corner tile’s edge with a hammer to create a fracture point. Hold your chisel at a 30-degree angle under the tile edge and apply steady upward pressure—never violent prying. Work in 2×2 foot sections for manageable debris collection into contractor bags. When using power tools, keep the rotary hammer moving constantly; lingering in one spot splinters plywood subfloors. Stop immediately if you hear splintering sounds—subfloor repairs add days and hundreds to your project. Vacuum continuously during removal to maintain visibility and prevent scratches.
Perfect Subfloor Preparation for Lasting Results
After tile removal, your subfloor must be immaculately clean, flat, and dry. Scrape residual thin-set with a long-handled floor scraper, then chisel stubborn patches carefully. Grind remaining ridges with an angle grinder (wearing your respirator), vacuuming dust continuously. Inspect for delamination (separating plywood layers), loose screws, or water damage near sinks. Fill screw holes and seams with floor patch compound, feathering edges with a 12-inch drywall knife. Sand high spots after the 4-hour cure time. Crucially, your subfloor must be flat within 1/8 inch variance over 10 feet—any more causes future tile cracks.
New Tile Installation: Professional Techniques
Choose Materials and Layout Strategically
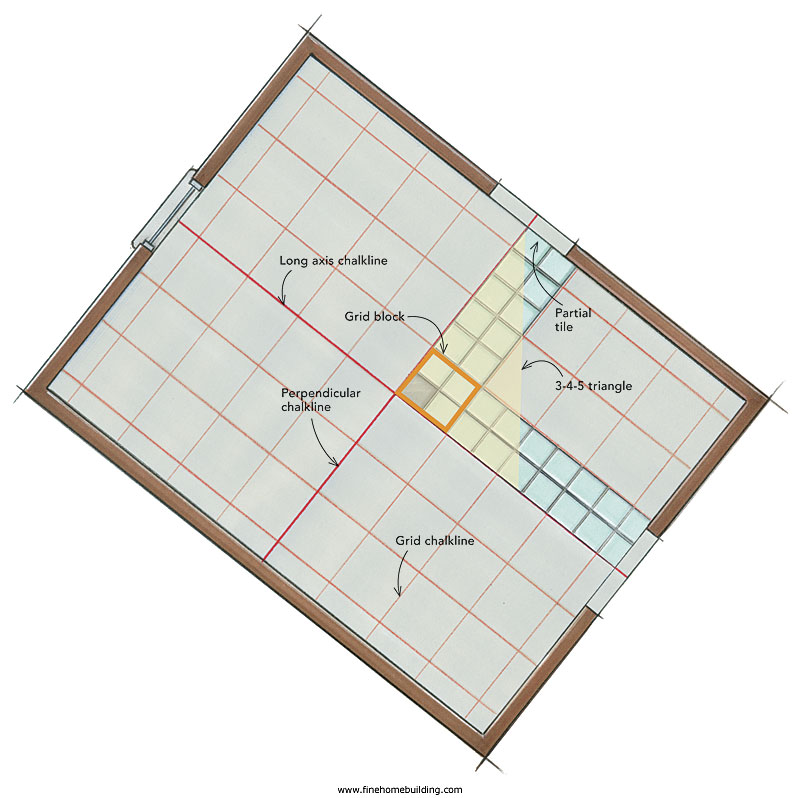
Kitchen floors demand durable porcelain tiles over ceramic for superior chip resistance. Natural stone requires annual sealing but offers luxury appeal. Select thin-set mortar wisely: white for light tiles (prevents shadowing), gray for dark tiles (hides bleed-through), always polymer-modified for plywood subfloors. For layout, measure from the room’s center to establish a 3×3 foot grid, then dry-lay tiles to minimize cuts less than half-width at walls. Shift your entire layout if it eliminates tiny edge pieces—a 2-inch sliver against the wall instantly looks amateurish. Mark permanent reference chalk lines that resist washing during installation.
Set Tiles with Precision and Confidence
Hold your trowel at a consistent 45-degree angle to create uniform ridges—curved patterns trap air causing hollow tiles later. Comb thin-set in straight lines across the floor. Back-butter any tile larger than 12 inches by applying thin-set directly to the tile back for 100% coverage. Set tiles in 2×2 foot sections: press firmly, twist slightly for adhesion, then tap with a rubber mallet. Check level every 3-4 tiles using a 4-foot level. Clean thin-set from tile faces immediately with a damp sponge to avoid haze. For cuts, use a wet saw for straight lines (face-up for cleaner edges) and an angle grinder with diamond blade for pipes.
Grouting and Finishing Touches
Grout Selection and Application Mastery
Choose sanded grout for joints 1/8 inch or wider (typical for floors) and unsanded for narrower joints. Epoxy grout offers maximum stain resistance for busy kitchens but requires careful mixing. Aim for toothpaste-thick consistency—too runny causes shrinkage cracks, too stiff becomes unworkable. Hold your grout float at 45 degrees and pack joints diagonally across tile lines. Sponge off excess after 15-30 minutes when grout feels firm to the touch (finger test). Perform a second sponge pass with clean water to remove final haze. Avoid over-wetting, which weakens grout.
Sealing for Long-Term Protection
Wait at least 24 hours after grouting before sealing (epoxy grouts may not require sealing—check labels). Apply penetrating sealer only to grout lines using a small foam brush, immediately wiping excess from tile faces. Allow 2-hour cure time before light foot traffic. In high-use kitchens, reseal grout lines every 12-18 months—water beading indicates adequate protection. Annual maintenance prevents stains and extends tile life dramatically.
No-Removal Overlay Solutions for Quick Refreshes
When demolition isn’t practical, overlays deliver stunning results in hours. Peel-and-stick vinyl planks transform floors after thorough degreasing—stagger seams like hardwood and use a 100-pound roller for adhesion. Epoxy coatings create seamless surfaces: etch glazed tiles with phosphoric acid, fill grout lines flush, apply bonding primer, then roll epoxy within its 30-45 minute pot life. Tile stickers work perfectly for renters—clean with rubbing alcohol, measure each tile face (subtracting 1mm), apply with felt squeegee, and seal edges with polyurethane. Rigid laminate click-lock floors float over existing tiles after filling deep grout joints and installing foam underlayment.
Budget and Timeline Planning Made Simple
A DIY full tile replacement for 100 sq ft costs $400-$800 over 3-5 days (tools: $150-$250, materials: $250-$550). Professionals charge $1,200-$2,000 but complete it in 1-2 days. Overlay options slash both time and cost: vinyl planks ($250-$500 in 4-6 hours), epoxy coatings ($150-$350 in 2 days including cure), or tile stickers ($50-$120 in 2-3 hours). Weekend warriors should dedicate Saturday to demolition and prep, Sunday to tile setting (leave Monday for grouting). For overlays, clean existing tiles in the morning, install vinyl planks by afternoon, and reinstall appliances by evening—enjoy your new kitchen by tomorrow night.
Daily Maintenance for Lasting Beauty
Extend your tile’s life with smart daily habits: sweep or vacuum (no beater bars) every day and use pH-neutral cleaners weekly. Avoid vinegar on natural stone overlays and inspect edges monthly for lifting. Protect high-traffic zones with nylon rugs at sinks and stoves, and apply felt pads under table legs. Keep vinyl or epoxy surfaces at least 6 inches from range bases—use metal heat shields if needed. Most overlays remove cleanly later: vinyl planks un-click easily, stickers peel with heat guns, and contact paper leaves minimal residue. Remember that epoxy coatings require mechanical sanding for future removal—factor this into long-term plans.
Ready to transform your kitchen? Start by testing one loose tile in an inconspicuous corner. If it pops up easily, commit to full removal for a flawless foundation. If it’s solid as bedrock, grab those peel-and-stick planks and enjoy your refreshed space by tomorrow evening. With the right approach, changing kitchen tiles becomes the most rewarding upgrade in your home.

