

That sinking feeling when you hit the switch and hear nothing but silence—or worse, that ominous hum—is all too familiar. When your kitchen sink food disposal not working properly, you’re left with a sink full of water and decomposing food scraps that can turn your cleanup routine into a smelly disaster within hours. The good news? Over 80% of disposal failures have simple DIY fixes you can complete in under 30 minutes without professional help. Whether your unit won’t turn on, hums but won’t grind, or leaks underneath, this guide delivers precise troubleshooting steps verified by plumbing experts. Stop wasting money on unnecessary replacements—let’s get your disposal back to peak performance today.
Immediate Fixes for Silent Disposal Units
Reset the Thermal Protector Button First
Don’t waste time on complex diagnostics before checking the reset button—it solves nearly one-third of “dead” disposal issues. Locate the red rubber button on the unit’s bottom or side (not the wall switch), press it firmly until you feel it click and stay recessed. If it immediately pops back out, the motor’s thermal protector has tripped due to overheating. Wait 10 minutes for the motor to cool completely before pressing again. This critical safety feature prevents burnout during jams or overloads, so never force it to reset repeatedly. If the button won’t stay in after cooling, move to power supply checks.
Trace the Entire Power Path
When resetting fails, systematically verify power flow from source to disposal:
- GFCI outlets: Press the “reset” button on all kitchen counter outlets—they often control disposal circuits
- Circuit breakers: Check for tripped “kitchen” or “appliance” breakers; flip fully OFF before resetting
- Wall switch integrity: Test with a non-contact voltage tester while flipping the switch—or plug a lamp into the disposal’s outlet
Use your voltage tester on the disposal’s power cord. No reading means the fault lies upstream—likely a faulty switch or loose wiring connection. If power reaches the unit but it remains silent, the motor has likely burned out (indicated by burning smells or visible smoke), making replacement the only viable solution for units over 5 years old.
Diagnose Motor Burnout Symptoms
A disposal with confirmed power that still won’t activate shows classic motor failure signs:
– Distinct electrical burning odor after attempted startup
– Visible smoke escaping the unit’s seams
– Reset button that refuses to stay engaged despite cooling periods
These indicate internal winding damage or thermal fuse failure. While rewinding motors is possible for professionals, the labor cost typically exceeds 70% of a new unit’s price. For disposals under warranty, contact the manufacturer before attempting repairs to avoid voiding coverage.
Break Jams in Humming Disposals Without Calling a Plumber
Manual Unjamming Through Hex Wrench Port

That persistent hum means your motor’s running but the grinding mechanism is seized. Always disconnect power at the breaker first—never skip this safety step. Find the hex-shaped port centered under the unit and insert the included ¼-inch or 5/16-inch Allen wrench. Work it back-and-forth with firm pressure while rotating clockwise and counterclockwise. You’ll feel resistance decrease as the jam breaks, until the turntable spins freely through a full 360°. This process typically takes 30-90 seconds of steady effort for common jams like fruit pits or small bones.
Extract Obstructions Safely After Unjamming
Once the mechanism rotates freely, use tongs or long-nose pliers—not your hands—to remove debris. Common jam culprits include:
– Hard objects: Peach pits, chicken bones, avocado seeds
– Metal items: Bottle caps, silverware, or twist ties
– Fibrous materials: Celery strings or corn husks wrapped around impellers
Run cold water for 10 seconds to flush loosened particles before testing. If jams recur frequently, your disposal may have worn grinding components—consider replacement if metallic shavings appear in sink water.
Broom Handle Technique When Wrench Is Missing
Lost your disposal wrench? Insert a short broom handle through the sink opening and wedge it against an impeller lug. Apply downward pressure while rotating the handle to manually turn the grinding mechanism. This requires more force than the hex wrench method but achieves the same result. Work slowly to avoid damaging the impellers, and stop immediately if you feel excessive resistance that could indicate severe internal damage.
Eliminate Slow Drains Without Damaging Your Disposal
Proper P-Trap Disassembly for Clog Removal
Slow drainage usually means a clog downstream of the disposal. Place a bucket under the P-trap, then loosen slip nuts by hand (use channel-lock pliers only if necessary). Remove the curved pipe section and inspect for sludge buildup—this trap catches 90% of clogs before they reach main lines. Clean thoroughly with a bottle brush, then reassemble with fresh slip washers. Never use chemical drain cleaners; they corrode disposal seals, void warranties, and create hazardous splash risks during disassembly.
Effective Branch Drain Clearing With Auger
If the P-trap is clear but drainage remains slow, insert a hand-crank sink auger into the horizontal pipe entering the wall. Advance 10-15 feet while rotating clockwise to break up stubborn blockages. You’ll feel the resistance drop when the clog clears. For persistent issues, check the dishwasher connection hose—it often kinks behind the appliance, restricting flow. Straighten the hose gently without disconnecting it.
Leak-Proof Reassembly Protocol
Reinstall the P-trap by hand-tightening slip nuts first, then giving a final ¼-turn with pliers. Over-tightening cracks plastic threads, causing leaks. Test for drips by running cold water for 30 seconds. If leaks persist, disassemble and verify the slip washers are seated correctly—these inexpensive rubber rings deform easily during installation.
Stop Disposal Leaks at Their Exact Source
Pinpoint Leak Origins With Water Test
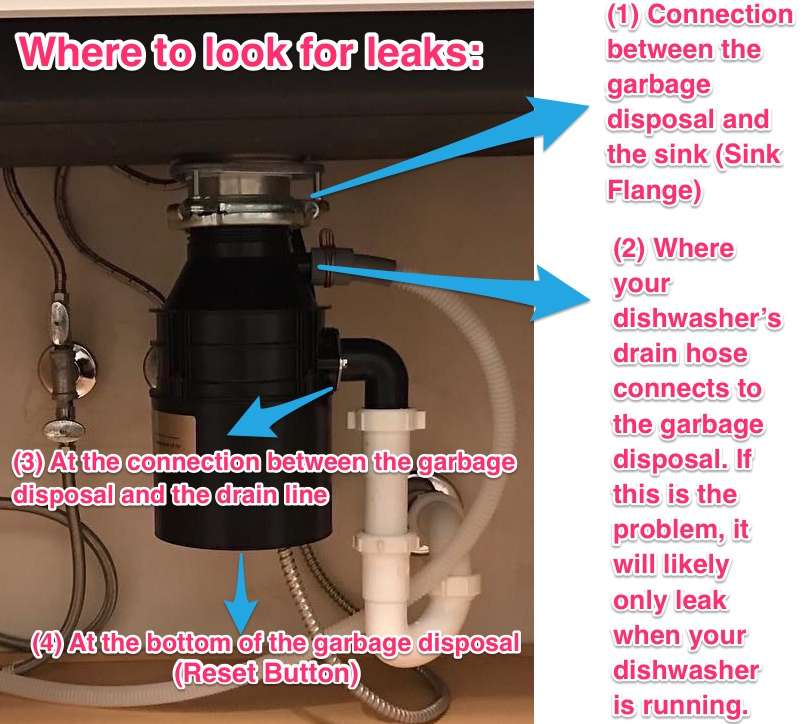
Different leak locations require specific fixes. Fill the sink with 3 inches of water, then release it rapidly while the disposal is OFF. Shine a flashlight under the sink to trace the exact drip origin:
– Top leaks: Water dripping from the sink flange seam
– Side leaks: Moisture around dishwasher hose clamps
– Bottom leaks: Drips from the motor housing
Critical: Bottom leaks indicate failed internal seals—replacement is mandatory as repairs are temporary at best.
Sink Flange Seal Replacement Steps
Water seeping around the sink rim means the plumber’s putty seal has failed. Remove the disposal by loosening the mounting ring bolts, then scrape away all old putty residue. Apply a fresh ½-inch bead of plumber’s putty around the flange’s underside perimeter. Re-seat the flange, tighten mounting bolts evenly in a star pattern until putty oozes out, then wipe excess after 24 hours. This creates a waterproof barrier that lasts 5+ years.
Gasket Replacement for Discharge Ports
Leaks at the disposal’s side outlets require gasket replacement. Disconnect the discharge tube by loosening the flange bolts, then remove the flat rubber gasket. Clean both mating surfaces thoroughly before installing the new 1.5-inch I.D. gasket. Reattach the tube with even bolt tension—overtightening cracks the plastic housing. For dishwasher inlet leaks, replace the entire hose assembly if clamps won’t stop seepage.
Essential Tools for Every Disposal Repair
| Tool | Critical Purpose | Pro Tip |
|---|---|---|
| Allen wrench | Manual unjamming | Tape it under the sink after use |
| Long-nose pliers | Safe debris removal | Keep dedicated for disposal use only |
| Bucket | Catch drain water | Use a shallow container to avoid splashes |
| Channel-lock pliers | Trap disassembly | Wrap jaws with tape to prevent scratches |
| Plumber’s putty | Flange sealing | Store tube upside-down to prevent drying |
When Replacement Beats Repair
Motor Lifespan Failure Indicators
Replace your disposal immediately if you notice:
– Metallic shavings in sink water (indicates grinding component erosion)
– Rust developing inside the grinding chamber
– Burning smells during normal operation
– Frequent thermal tripping despite light use
Units over 8 years old rarely justify major repairs—new models offer quieter operation and better grinding efficiency for under $150. If repair costs exceed 50% of a replacement unit’s price, opt for the new installation.
Prevent Future Disposal Disasters
Cold Water Protocol for Grease Management
Always run cold water before, during, and 15 seconds after grinding. Cold water solidifies fats and grease so the disposal chops them into flushable particles, while hot water melts grease that later solidifies in pipes causing clogs. This single habit prevents 60% of slow-drain issues.
Safe Food Waste Feeding Practices
Prevent jams by:
– Introducing waste gradually while the unit runs
– Avoiding fibrous vegetables (celery, corn husks)
– Never grinding expandable starches (rice, pasta)
– Skipping hard objects larger than ½ inch
Monthly maintenance with citrus peels and ice cubes scours the grinding chamber while sharpening impellers. For odors, grind lemon peels followed by a baking soda and vinegar flush—never chemical cleaners.
A kitchen sink food disposal not working properly rarely requires immediate replacement when you know the right troubleshooting steps. By methodically checking the reset button, manually freeing jams, and addressing downstream clogs, you’ll resolve most issues in under an hour. Remember the critical safety rule: always disconnect power at the breaker before any inspection. Implement the cold water protocol and avoid prohibited items to extend your unit’s lifespan significantly. Keep this guide under your sink—you’ll thank yourself the next time dinner cleanup turns into a disposal emergency. For persistent electrical faults or main sewer backups, call a licensed plumber, but 9 out of 10 disposal problems are firmly within your DIY capabilities.

