
Nothing beats the silky texture and vibrant flavor of fresh pasta made in your own kitchen. With your KitchenAid pasta attachment, transforming simple flour and eggs into restaurant-quality fettuccine or lasagna sheets takes just 30 minutes—no arm fatigue from hand-cranking required. This guide cuts through the confusion by revealing exactly how to use KitchenAid pasta attachment components to create flawless noodles every time. You’ll master dough consistency secrets, avoid common tearing pitfalls, and unlock pro techniques for spaghetti that cooks in 3 minutes. Whether you’re making bolognese for date night or Sunday lasagna for the family, these step-by-step methods turn your stand mixer into a professional pasta machine.
Critical Safety Steps Before Using Your KitchenAid Pasta Attachment
Skipping safety prep risks hair or clothing getting caught in the power hub—a frightening scenario that derails your pasta night. Before connecting any attachment, secure loose items: tie hair tightly, remove scarves and necklaces, and roll up long sleeves. The pasta roller draws dough in with significant force at speed 1-2, so maintain a clear 6-inch workspace around the mixer. Always disconnect the power hub when switching attachments to prevent accidental starts. These 30-second precautions protect you while ensuring smooth operation throughout your pasta-making session.
Must-Have Tools for KitchenAid Pasta Attachment Success
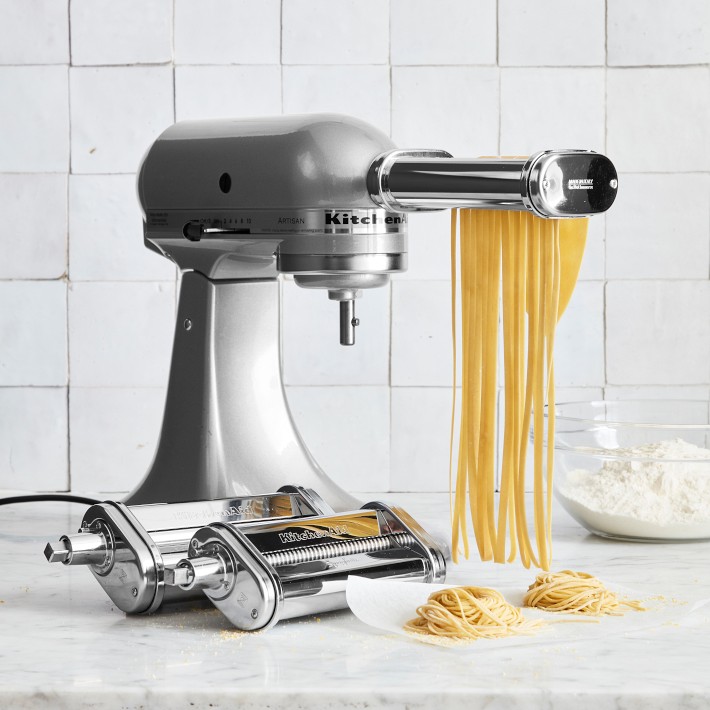
Your KitchenAid pasta system requires only three core components, but missing one sabotages the entire process. You’ll need the adjustable sheet roller (with thickness settings 1-8), your preferred cutter (spaghetti/fettuccine), and the power hub connector—all compatible with any KitchenAid stand mixer model. Don’t forget essential handheld tools: a bench scraper for portioning dough, parchment paper for sheet storage, and a fine-mesh sieve for dusting flour. Crucially, keep your mixer’s flat beater and dough hook accessible for initial mixing—these attachments create the gluten structure that prevents tearing during rolling. Having everything prepped saves 15+ minutes of frantic searching mid-process.
Why Your Mixer Bowl Choice Matters
Use the standard 5-quart bowl for optimal dough mixing; smaller bowls cause flour spillage, while larger ones won’t engage ingredients properly. The bowl’s curved sides guide flour toward the beater, ensuring even hydration. If your dough sticks during mixing, switch to the dough hook immediately—this prevents overworking the gluten that causes brittle sheets later.
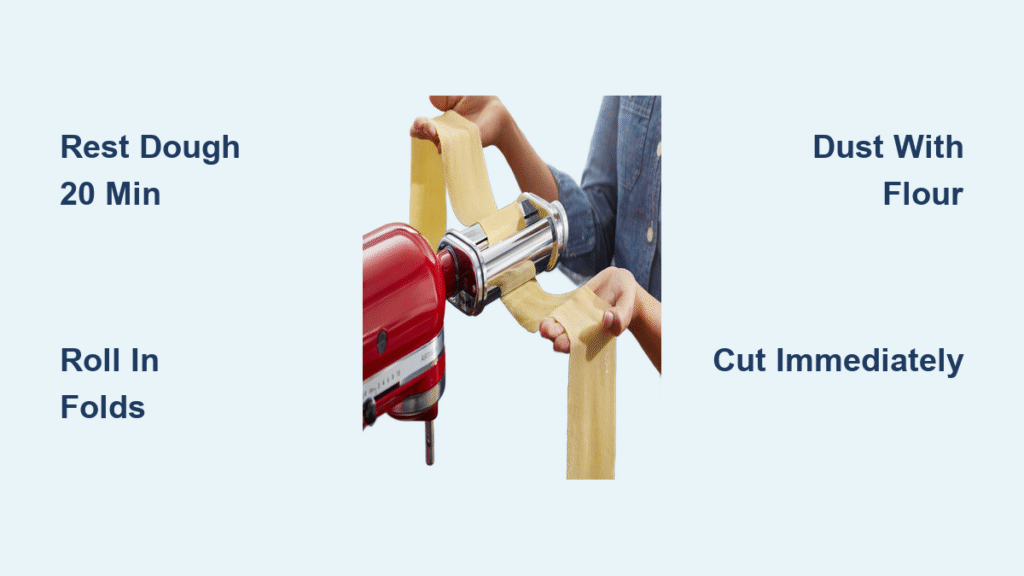
Create Restaurant-Quality Pasta Dough in 20 Minutes
Perfect dough consistency separates chewy failures from silky success—this 4-ingredient formula works every time. For 1¼ pounds (serving 8), combine 3½ cups sifted all-purpose flour, ½ teaspoon salt, 4 beaten eggs, and 2 tablespoons water in your mixer bowl. Start with the flat beater at speed 2 for 30-60 seconds. If crumbly, add water ½ tablespoon at a time; if sticky, add flour sparingly. Then switch to the dough hook for 2 minutes of machine kneading followed by 1-2 minutes of hand kneading—this non-negotiable step develops the elastic gluten structure that survives thin rolling.
Spot Perfect Dough in Seconds
Your dough ball should feel like your earlobe: smooth with zero dry flour residue. When tapped firmly, it makes a hollow “smack” sound. Under-kneaded dough cracks during rolling; over-hydrated dough sticks to rollers. If holes appear while rolling, stop immediately—add 1 tablespoon flour and knead 2 more minutes before resting. Always wrap portions in plastic and rest 20-30 minutes; this relaxes gluten for tear-free thinning.
Connect Your Pasta Roller to the Power Hub Correctly
A loose connection causes dangerous vibrations and uneven rolling—this 10-second setup prevents disaster. First, ensure your mixer is unplugged. Align the roller’s metal tabs with the power hub’s slots, then push firmly until it clicks into place (you’ll hear a distinct “clunk”). Test by turning the hand crank: both rollers must rotate simultaneously. If one stays stationary, disconnect and reseat—it’s defective. Set the thickness dial to “1” and mixer speed to 1 for initial passes; higher speeds curl dough edges. This precise attachment method ensures smooth dough feeding without jams.
Master the Rolling Technique: From Thick Dough to Thin Sheets
Rolling isn’t just thinning—it’s a two-phase process where skipping steps guarantees tears. After resting, cut dough into 4 portions (keep unused pieces covered). Flatten one piece into a ¼-inch rectangle, then feed through setting 1. Here’s the pro sequence: fold dough in half vertically, roll again on setting 1, then fold horizontally and repeat. Do this 6-14 times—dusting minimally with flour only if sticky—until the sheet spans the full roller width. This “kneading phase” aligns gluten fibers for elasticity. Then, without folding again, progress sequentially through settings 2-8 (pass settings 2-3 twice).
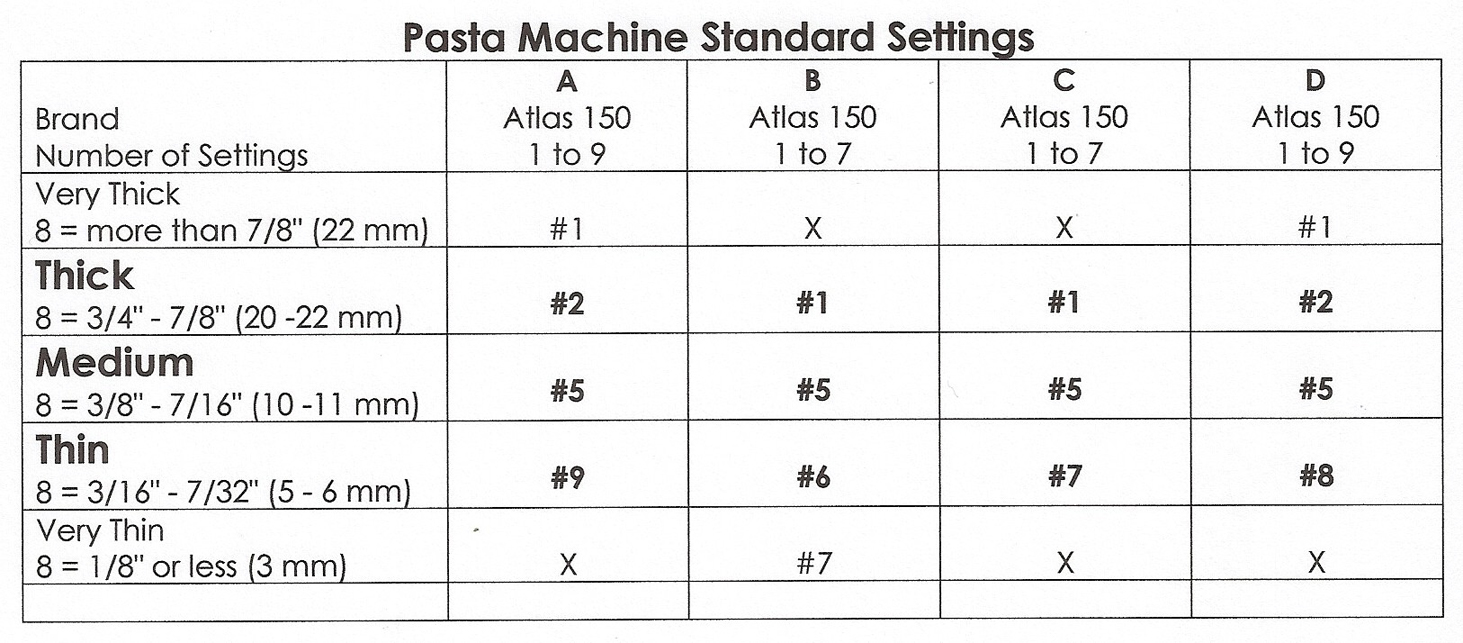
Thickness Settings Decoded
- Setting 4: Lasagna, fettuccine, ravioli (ideal for beginners)
- Setting 5: Standard spaghetti thickness (cook in 3 minutes)
- Settings 6-7: Delicate linguine or tortellini
- Setting 8: Ultra-thin pappardelle (requires perfect dough)
Stop adding flour after setting 3—dough should be dry enough to handle. If edges curl inward, reduce to speed 1; this indicates dough is fighting the roller tension.
Cut Spaghetti, Fettuccine, and Lasagna Sheets Without Tears
Switching from roller to cutter requires precision to avoid dough waste. After unplugging the mixer, remove the sheet roller and attach your cutter (spaghetti/fettuccine) with the same click confirmation. Set mixer to speed 2 and feed sheets through the center of the cutter rollers. For spaghetti: cut sheets into 4-inch strips before feeding to prevent tangling. Immediately dust cut noodles with flour using a sieve—this 5-second step prevents clumping. For lasagna: cut setting 4 sheets into 6×8-inch pieces, boil 3 minutes until al dente, then rinse with cold water before layering between parchment.
Fix Curling Noodle Ends Instantly
If spaghetti curls into tight spirals, your dough was too dry during cutting. Spritz lightly with water before the final pass through the cutter. For fettuccine that sticks together, increase flour dusting by 25% during cutting—use “00” flour for finer coating that won’t alter texture.
Fix Dough Feeding Problems and Tearing Issues in Seconds
When dough piles up instead of feeding through, 90% of cases stem from improper flattening. Flatten portions to ¼-inch thick rectangles—not balls or triangles—which engage both rollers simultaneously. If dough tears at setting 3, add 1 tablespoon water and knead 3 minutes by hand; insufficient hydration causes brittle sheets. For persistent sticking, chill dough 10 minutes—warm dough loses structure. Crucially, if one roller stays stationary while the other spins, stop immediately; this defect requires contacting KitchenAid support before continuing.
Emergency Tear Repair
Mid-roll tears? Sprinkle the rip with flour, press edges together firmly, and roll backward through the current setting once before proceeding. This “patch” works 80% of the time for small tears under 2 inches.
Store Fresh Pasta for 24 Hours or Freeze for 8 Months
Fresh pasta spoils fast if stored wrong—follow this timeline for perfect texture. For immediate cooking: dry cut noodles 5 minutes on a rack, dust with flour, and cook in boiling salted water for 3-4 minutes. To refrigerate: dry 10 minutes, form nests, and store in airtight containers for up to 24 hours. For freezing: dry 20 minutes, lay flat on parchment, and freeze 1 hour before transferring to bags—this prevents clumping. Properly frozen pasta lasts 8 months; thaw overnight in the fridge before cooking. Discard dried pasta that bends instead of snapping—it’s absorbed moisture and will turn mushy.
Boost Flavor with Herb-Infused Pasta and 00 Flour
Elevate basic pasta with these tested upgrades from the resource guide. Add 1-2 teaspoons dried herbs (rosemary, parsley) or garlic powder directly to flour before mixing—this distributes flavor evenly without weakening dough. For silkier texture, substitute “00” flour for half the all-purpose flour (add 1 tablespoon extra water per cup substituted). Room-temperature eggs incorporate faster, but cold eggs work fine with 30 extra seconds of mixing. Avoid liquid flavorings like spinach puree—they disrupt hydration; instead, use dehydrated vegetable powders at 1 teaspoon per batch.
Pro Tips for Faster, Smoother Pasta Making Every Time
Your third batch will outperform the first—these shortcuts accelerate mastery. Always cut rested dough into quarters; larger portions overwhelm rollers causing tears. For spaghetti, cut sheets into 4-inch strips before feeding to prevent tangling. When rolling, alternate fold directions (vertical/horizontal) during the kneading phase to create uniform texture. Most importantly: never skip the hand-kneading step after machine mixing—this develops the supple gluten that survives setting 8 thinning. Pair your fresh fettuccine with simple sauces like Alfredo or tomato-basil; complex ragus mask the delicate flavor you worked so hard to create.
Your KitchenAid pasta attachment transforms $3 of flour and eggs into a memorable meal in under an hour. By mastering dough consistency checks, progressive rolling techniques, and instant troubleshooting, you’ll consistently create noodles that rival Italian trattorias. Remember to rest dough properly, connect attachments with a firm “clunk,” and dust cut pasta immediately—these small actions prevent 95% of failures. Start with fettuccine at setting 4 before attempting capricci (setting 8), and within three batches, you’ll intuitively recognize perfect dough texture. Now fire up your stand mixer: that perfect plate of homemade spaghetti awaits.

