

That frustrating gap between your kitchen cabinet doors? The one that collects crumbs and ruins your kitchen’s sleek look? It likely started with a single measurement error. Getting new kitchen doors to fit flawlessly hinges entirely on precision measurements taken before you place an order. One 1/16-inch miscalculation can transform your dream renovation into a costly nightmare of returns and delays. Whether you’re refreshing worn hinges or installing custom Shaker fronts, this guide reveals the exact professional techniques to measure any kitchen door configuration—standard, double, inset, or drawer front—with surgical accuracy. You’ll master three proven methods, avoid the top pitfalls that derail 70% of DIY projects, and learn to calculate overlays like a cabinetmaker.
Skip this critical step, and you’ll face doors that won’t close, uneven reveals, or worse—custom pieces you can’t return. But get it right, and you’ll achieve that seamless, built-in look professionals charge thousands to deliver. Let’s transform measurement anxiety into confidence with actionable steps that guarantee doors fitting within 1/16-inch tolerance every time.
Essential Tools for Kitchen Door Measurement
Required Measurement Tools
Grab these four non-negotiable items before starting: A tape measure calibrated to 1/16-inch increments (standard hardware store models often lack this precision), a dedicated notepad with a pre-drawn cabinet diagram, masking tape for marking overlay lines, and a pencil. Skip digital laser measures—they fail inside cabinet cavities where shadows and angles distort readings. Your tape measure must physically touch the stiles (vertical frame pieces) and rails (horizontal pieces) to capture true dimensions.
Pro tip: Photograph your kitchen layout first. Number each cabinet on your diagram matching sticky notes on actual cabinets—this prevents “left upper corner” confusion when ordering 20+ doors.
Workspace Preparation Steps
Remove every door and drawer using the hinge release mechanism—typically a small lever or clip near the mounting plate. Never measure hanging doors; their slight sag from daily use guarantees false readings. Clear countertops of appliances and utensils that block tape measure extension. For drawers, pull them fully out to expose slide mechanisms that affect front height. If hinges resist release, place a towel over the cabinet face to avoid marring surfaces while prying gently with a flathead screwdriver.
Critical warning: Measure during the day when kitchen humidity stabilizes. Wood expands in morning moisture, shrinking measurements by up to 1/8 inch by afternoon.
Kitchen Door Types and Their Impact on Measurements
Cabinet Door Configurations
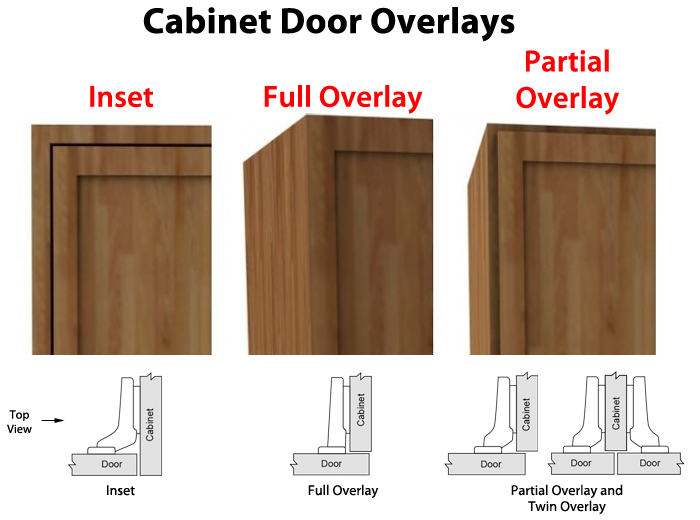
Your measurement method changes completely based on door type. Single doors covering one opening (like pantry cabinets) require straightforward width/height math. Double doors (common on base cabinets) demand reveal gap calculations—always maintain a minimum 1/8-inch space between doors to prevent binding. Inset doors sit flush within the frame, needing precise gap allowances, while overlay doors extend past the frame edge. Mistaking one type for another causes catastrophic sizing errors; for example, measuring an inset door like an overlay yields doors 3/4 inch too small.
Key Terms That Affect Size Calculations
Overlay—the distance your door extends beyond the cabinet opening—is the linchpin of accurate sizing. Standard options include:
– 1/2-inch partial overlay: Shows 1 inch of frame (common on older cabinets)
– 1-1/4-inch full overlay: Shows just 1/4 inch of frame (modern standard)
– 0-inch inset: Door sits entirely inside the opening (requires perfect squareness)
Reveal refers to the intentional gap between double doors. Never reduce it below 1/8 inch—kitchen humidity causes wood swelling that jams tighter gaps.
Method 1: Measuring Cabinet Openings (Most Accurate)
Measure the Opening Width
Insert your tape measure inside the cabinet, pressing the hook against the left stile. Extend it to the right stile, ensuring the tape runs perfectly horizontal. Read the measurement where the tape meets the stile’s inner edge—not the outer frame. Record this to the nearest 1/16 inch (e.g., 14-7/8″, not 15″). Repeat at top, middle, and bottom of the opening; use the smallest measurement to accommodate cabinet warping.
Measure the Opening Height
Position the tape vertically from the bottom rail to the top rail inside the cabinet. Check both left and right sides, noting any discrepancies. If measurements differ by more than 1/8 inch, your cabinet isn’t square—order doors to the shorter height and shim during installation.
Calculate Your Door Size
Single door formula:
– Width = Opening width + (2 × overlay)
– Height = Opening height + (2 × overlay)
Double door formula:
– Each door width = [Opening width + (2 × overlay) – 1/8″] ÷ 2
– Door height = Opening height + (2 × overlay)
Real-world example: For a 15″ × 27″ opening with 1/2″ overlay:
– Single door: 16″ × 28″
– Double doors: Each door = 15-7/16″ × 28″
Method 2: Measuring Existing Doors (Use With Caution)
When This Method Works
Only attempt this if reusing original hinges and doors currently close perfectly without gaps. Warped or poorly fitted doors (e.g., those requiring shims) transmit sizing errors to replacements. This method fails 90% of the time when upgrading hinge types—like switching from European to Blum—because hinge cup depths differ.
Measurement Process
Lay the removed door flat on a table. Measure the backside (unpainted surface) width and height at three points. If measurements vary, use the smallest dimension. Round only to 1/16 inch—never to the nearest 1/8 or 1/4 inch. Critical mistake: Measuring the front edge where paint buildup adds thickness. Always measure the raw substrate.
Method 3: Determining Existing Overlay
Quick Overlay Detection
Close the door completely. Stick a 2-inch masking tape strip vertically along the door’s edge where it meets the frame. Open the door slowly and measure from the frame’s outer edge to the tape’s edge. This distance equals your current overlay. For double doors, repeat on both sides.
Why Overlay Matters
Changing overlay types requires new hinge holes and possibly frame modifications. If your current setup uses 1/2-inch overlay but you order 1-1/4-inch full overlay doors, hinges won’t mount properly. Stick with existing overlay unless remodeling entirely—this avoids $200+ cabinet repairs.
Inset and Specialty Door Measurements
Inset Door Calculations
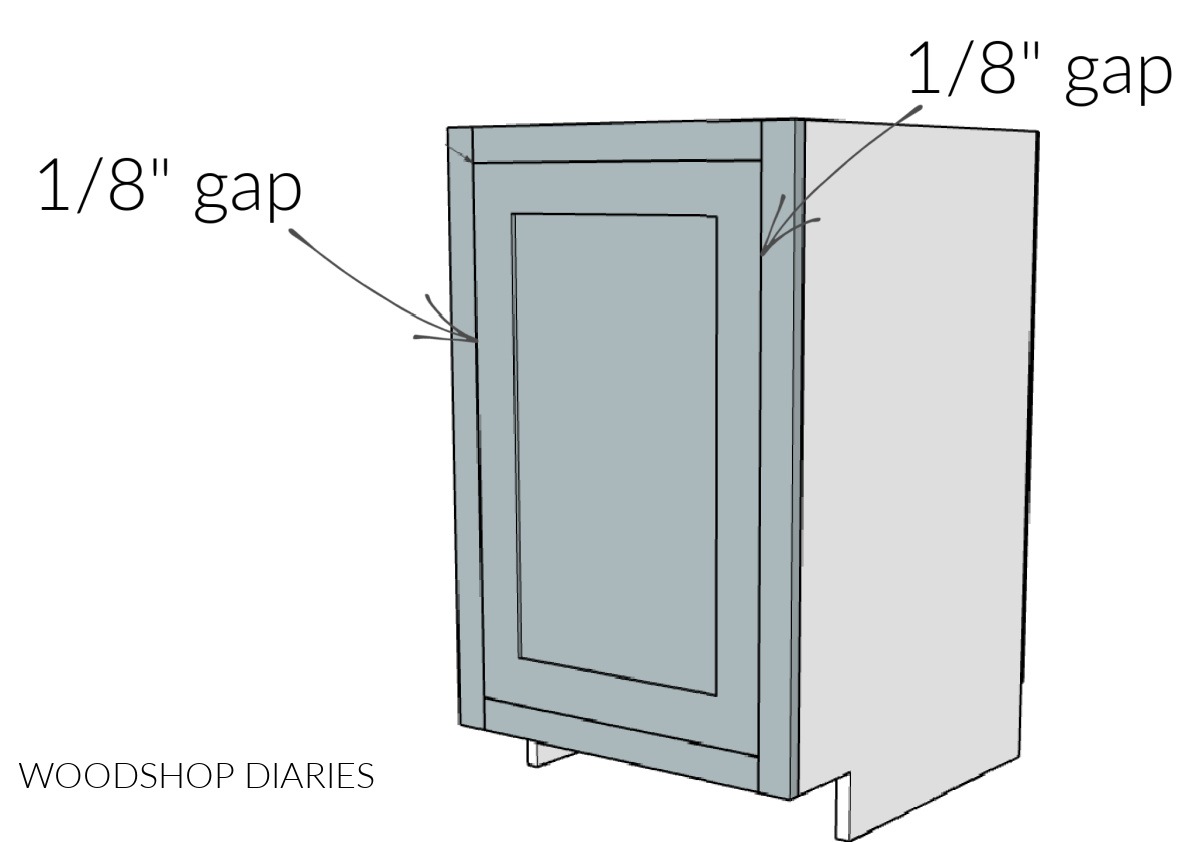
These doors demand exact gap allowances. For single inset doors:
– Width = Opening width – 1/4″ (1/8″ gap each side)
– Height = Opening height – 1/4″ (1/8″ gap top/bottom)
For double inset doors:
– Each door width = [(Opening width – 1/4″) ÷ 2] – 1/16″ (center gap)
– Height = Opening height – 1/4″
Example: 16″ × 34″ opening → 15-3/4″ × 33-3/4″ single door.
Frameless vs. Framed Cabinets
Frameless cabinets (common in IKEA kitchens) only accept full overlay doors—their hinges mount directly into side panels. Framed cabinets offer flexibility but require matching your new overlay to existing hinge positions. Modern renovations increasingly use 1-1/4″ overlay for maximum storage space.
Measuring Drawer Fronts Correctly
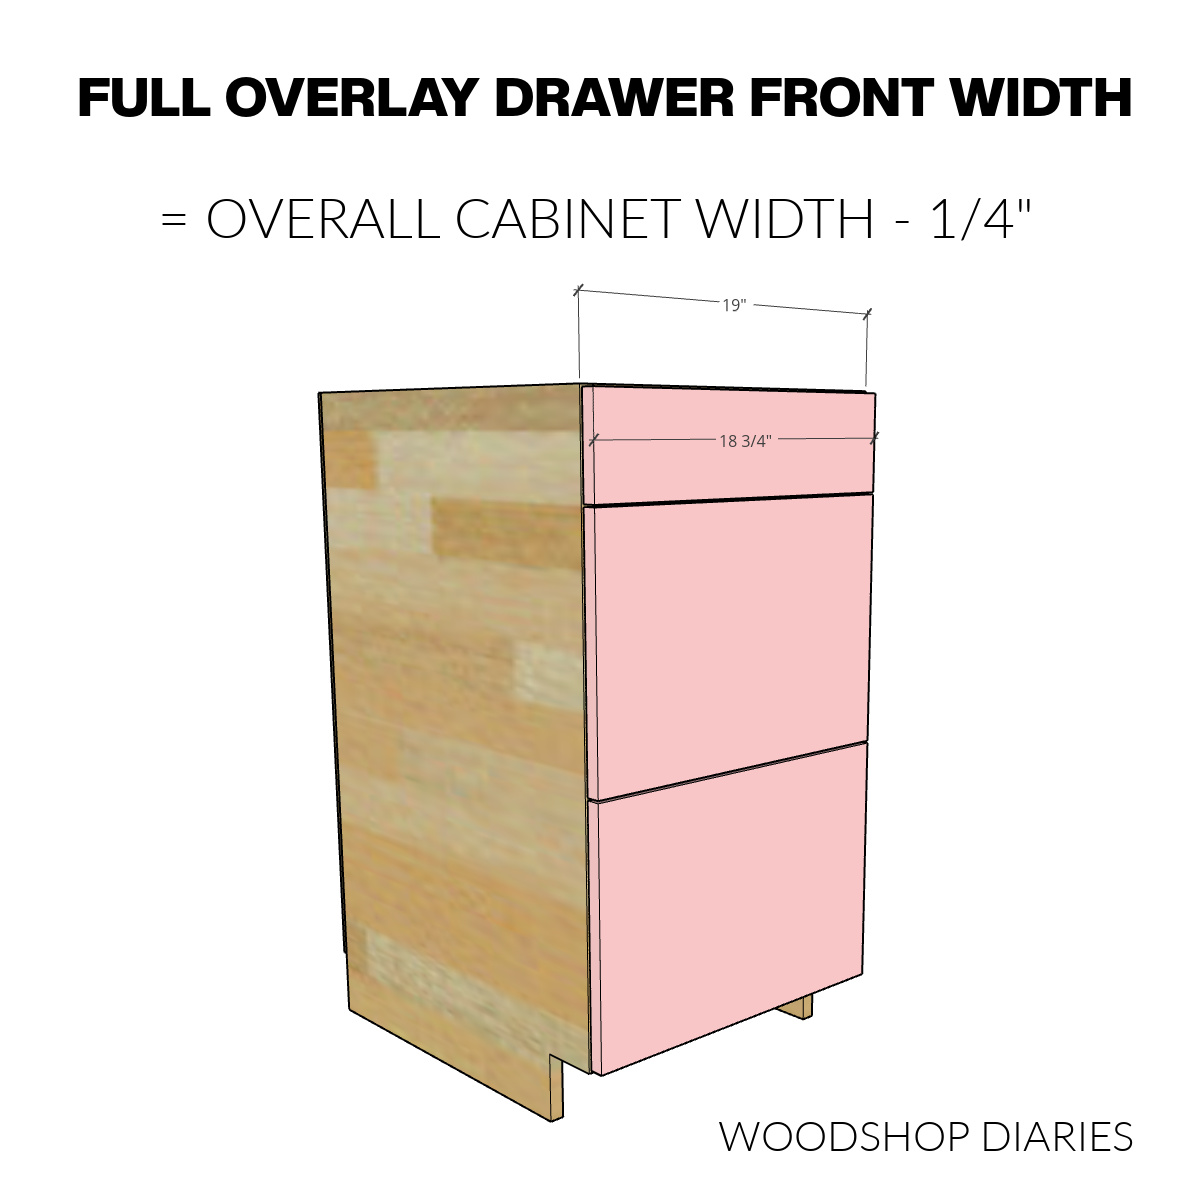
Standard Drawer Front Process
Measure the drawer opening width and height—not the drawer box. Add twice your overlay to each dimension. Crucially, verify clearance above/below adjacent doors: maintain at least 1/8 inch between drawer fronts and cabinet doors. Account for countertop overhang—if it extends 1.5 inches past cabinets, reduce drawer front height by that amount to avoid collisions.
Common Drawer Mistakes
- Ignoring slide clearance: Drawer slides need 1/2 inch of space; measure opening height with slides extended
- Adjacent spacing errors: Drawer fronts must align perfectly with door reveals
- Overhang miscalculation: Countertop edges often curve inward, requiring height adjustments
Advanced Measurement Considerations
Hinge Boring Specifications
Specify these hinge details when ordering:
– Placement: Holes centered 3 inches from top/bottom edges
– Diameter: Standard 1-3/8-inch cup
– Hinge count: 2 hinges for doors under 42 inches, 3 for 42–72 inches, 4 for taller
Critical note: Arched or cathedral doors require left/right swing specification—order “right swing” if hinges mount on the right. Square doors work either way.
Quality and Material Factors
Solid wood doors expand 1/4 inch seasonally in humid kitchens—order MDF or thermofoil for stability. Always confirm moisture resistance (MR) ratings; standard MDF swells in steam. Match material thickness to existing doors (typically ¾ inch) to maintain reveal consistency.
Recording Your Measurements
Simple Documentation System
Use this template for every cabinet:
Location | Type | Opening W | Opening H | Overlay | Door W | Door H | Hinge Side

Upper L | Single | 14-7/8" | 28-1/4" | 1/2" | 15-7/8" | 29-1/4" | Right
Record measurements immediately after taking them—memory fails under kitchen project stress.
Double-Check Process
Measure every opening twice: once with the tape starting at 0 inches, once starting at 1 inch (to avoid hook slippage errors). If readings differ, use the smaller dimension. Verify calculations using online overlay calculators before ordering.
Final Verification Checklist
Before hitting “submit” on your order:
– [ ] All measurements documented to 1/16-inch precision
– [ ] Overlay type matched to hinge specifications
– [ ] 1/8-inch minimum gaps confirmed between all doors/drawers
– [ ] Hinge swing direction specified for arched doors
– [ ] Material moisture resistance verified for kitchen use
– [ ] Total count matches cabinet diagram
Remember: 95% of custom door returns stem from measurement errors—not manufacturing defects. Spending 10 minutes verifying each cabinet saves $300 in replacement costs and 3 weeks of delays. With these precise measurements in hand, you’re ready to order doors that transform your kitchen with professional-grade fit. The confidence from perfect measurements means installation takes hours, not days, delivering that seamless, high-end look without the contractor markup. Your dream kitchen starts with one perfectly recorded number—make it count.

