
Your kitchen floor feels cold underfoot during morning coffee prep, doesn’t it? Those hard surfaces might look sleek, but standing on them while cooking dinner leaves your feet aching after just 20 minutes. Smart kitchen rug placement solves this comfort crisis while protecting your floors from spills and scratches. This guide shows you exactly how to place rugs in kitchen spaces for maximum safety, style, and functionality—no interior design degree required.
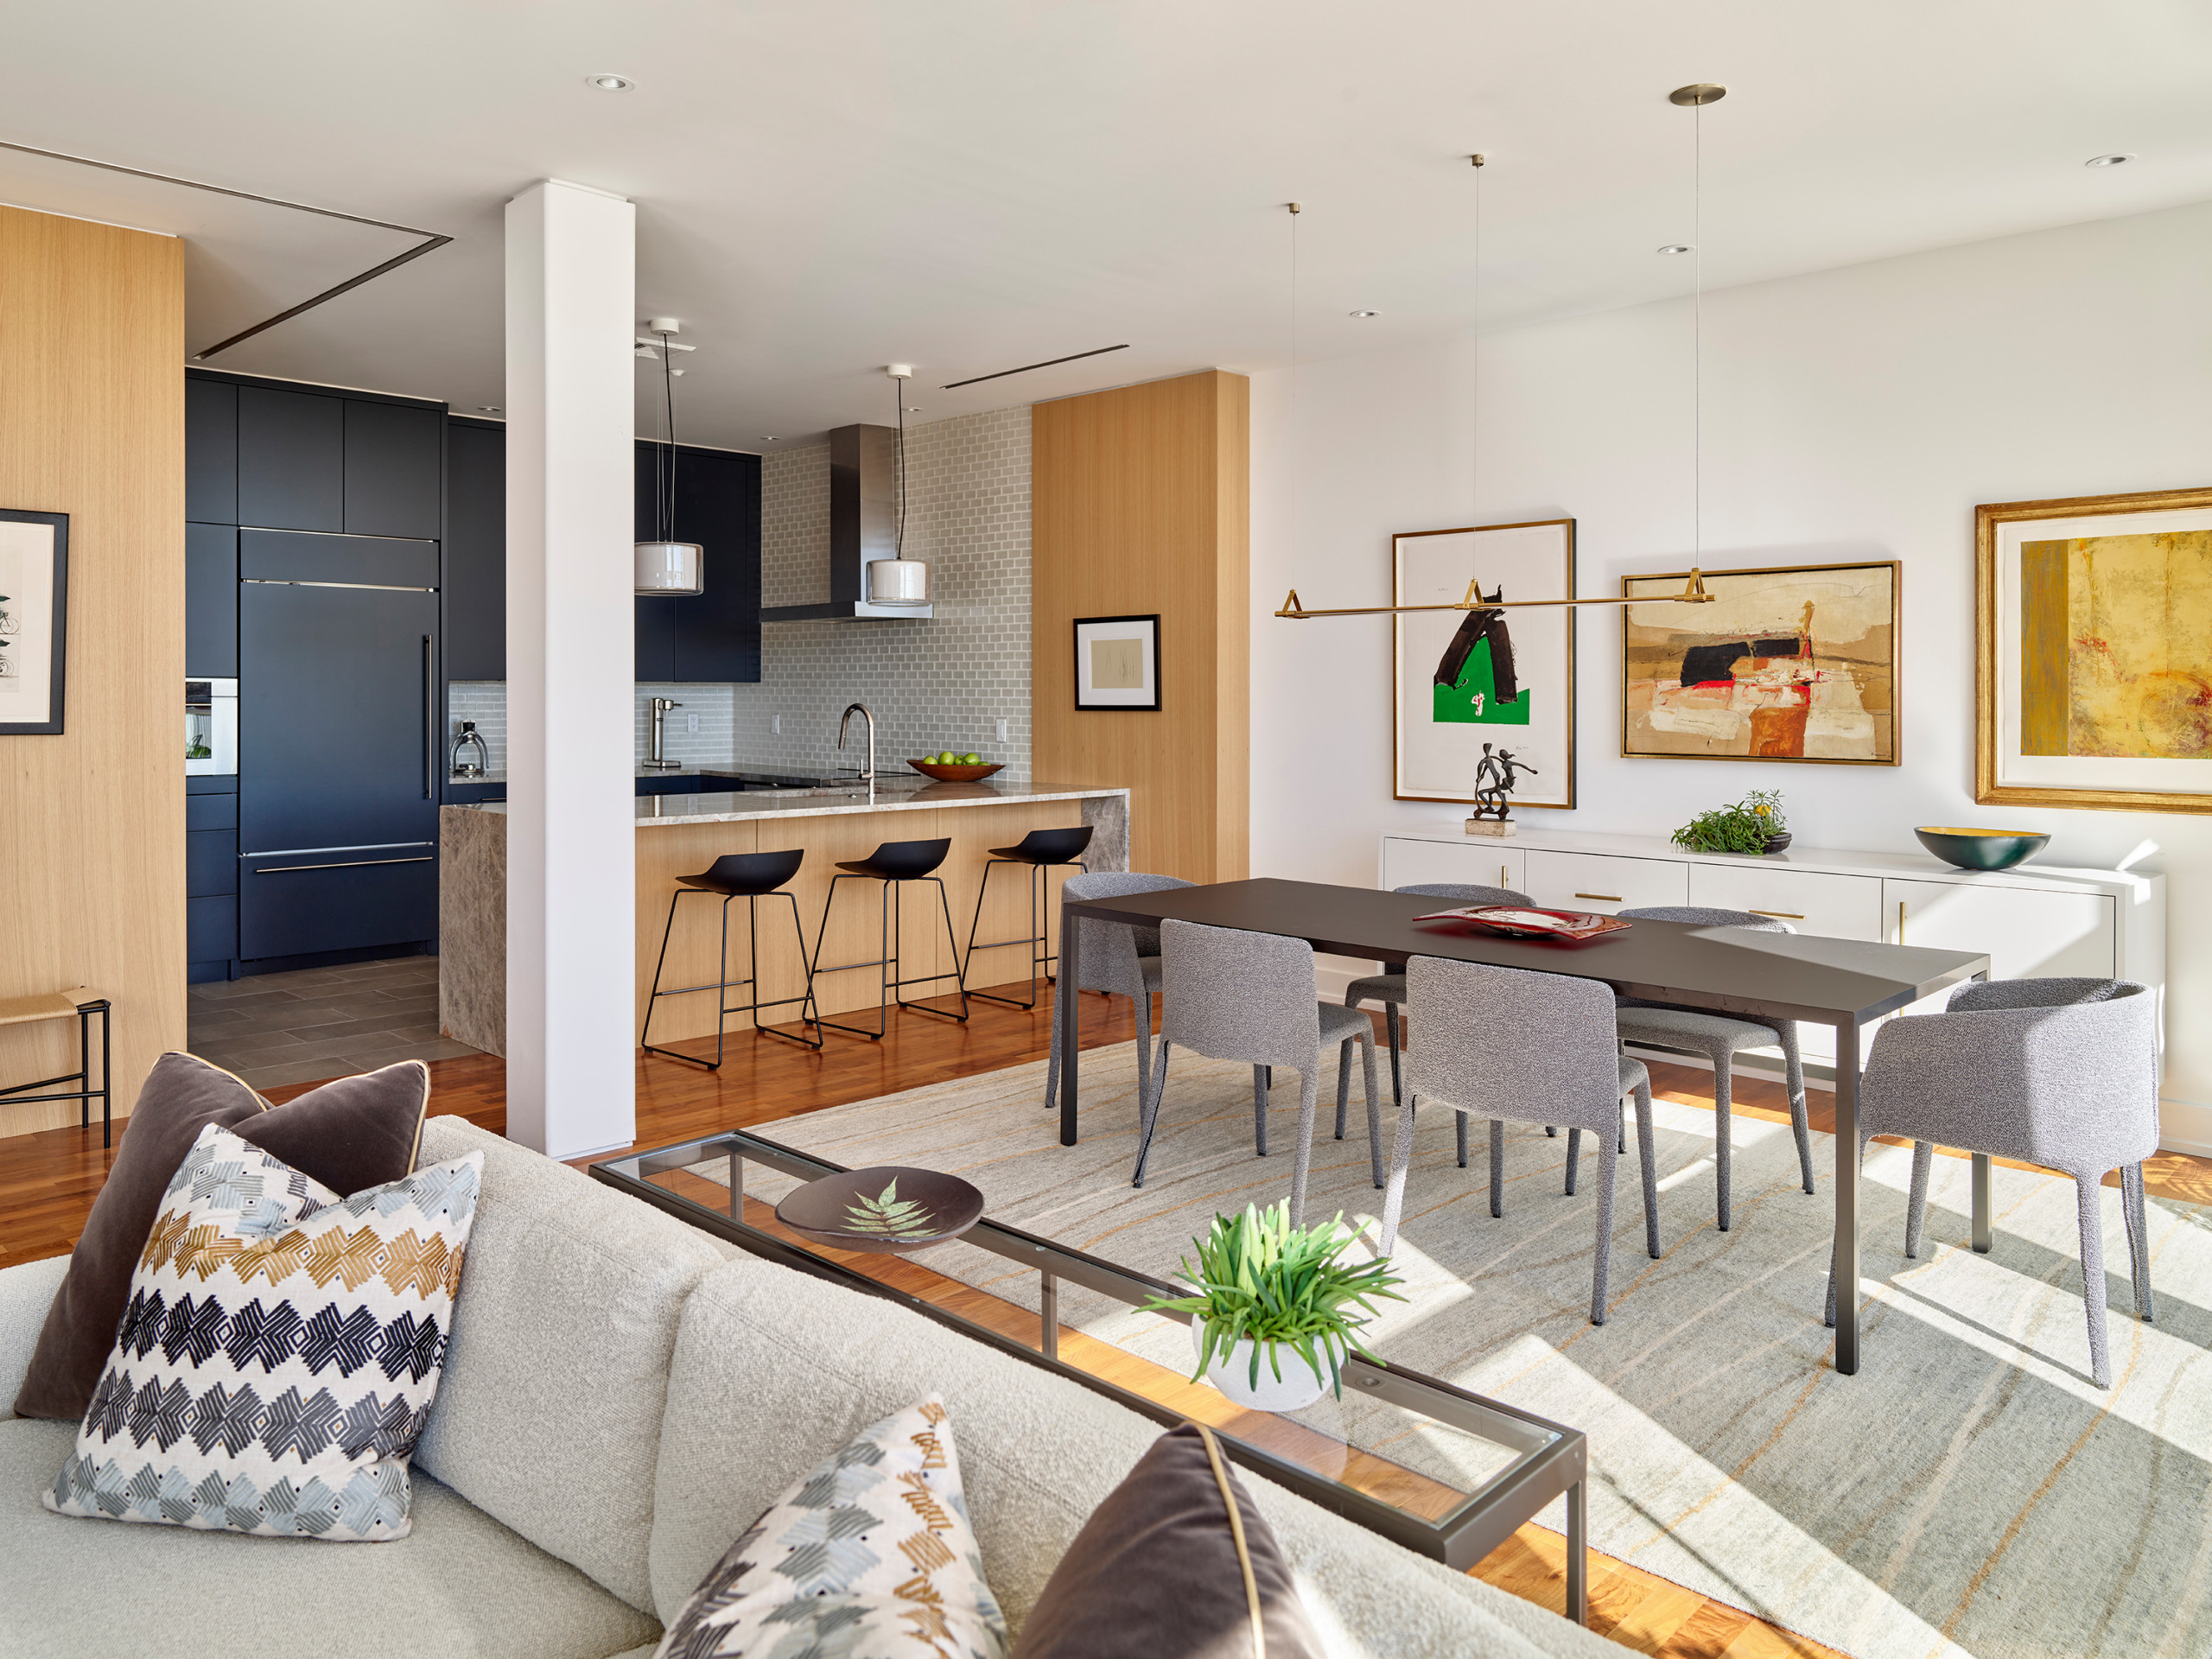
Dining Table Rug Positioning That Prevents Chair Snags
Perfect Sizing for Your Table Shape
Position your dining rug so chairs stay firmly on the fabric even when pulled out for seating. Measure your table first, then add 36-48 inches total (18-24 inches on each side) to determine ideal rug size. For rectangular tables, choose matching rectangular rugs—never force a round rug under a square table. Round tables deserve circular rugs that create visual harmony rather than awkward gaps.
Sizing shortcuts:
– Large tables seating 6+: 8′ x 10′ or 9′ x 12′ rugs
– Medium tables seating 4: 6′ x 9′ rugs
– Small breakfast nooks: 5′ x 7′ rugs
Critical mistake to avoid: A rug that’s too small catches chair legs, creating tripping hazards and that frustrating “almost off” feeling when you scoot back.
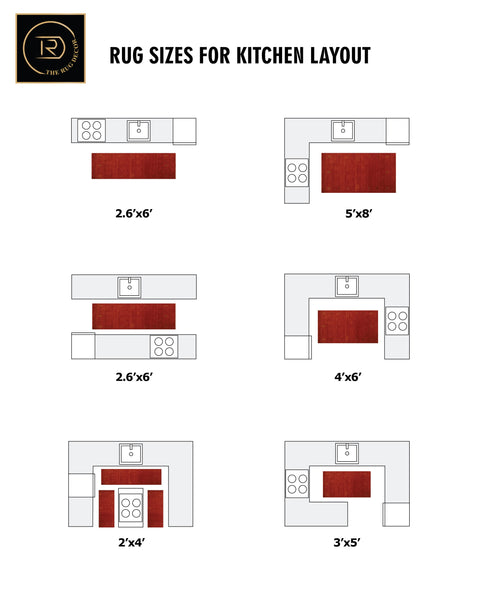
Fire-Safe Cooking Zone Rug Placement
Place 2′ x 3′ or 3′ x 5′ durable mats precisely where you stand most—typically in front of the stove, sink, and prep areas. Keep stove-area rugs at least 6 inches from burner edges to prevent grease buildup and fire risks. For sink zones, choose anti-fatigue mats with rubber backing that cushion your feet during dishwashing marathons.
Zone-specific material recommendations:
– Stove area: Low-profile nylon or outdoor rugs (oil-resistant)
– Sink zone: Polypropylene with waterproof backing (stain-fighting champion)
– Prep stations: Machine-washable cotton blends (easy cleanup after chopping)
Pro tip: Position sink mats so they catch water splashes before they reach your floors—this simple placement prevents years of water damage.
Kitchen Island Rug Layouts That Feel Intentional
For rectangular islands, use runners extending 3-4 feet beyond where stools sit—not just past the island’s edge. This creates generous visual space rather than a cramped runway effect. Round islands need oval rugs that extend 1-2 feet wider than the island base on all sides. The rug should continue beyond where stools pull out, anchoring the seating area without interfering with movement.
Visual trick: Lay painter’s tape on the floor first to test your island rug dimensions. Walk around your kitchen normally—if you step off the taped area during routine tasks, make it larger.
Galley Kitchen Rug Strategies That Beat the Tunnel Effect
:max_bytes(150000):strip_icc()/galley-kitchen-ideas-1822133-hero-3bda4fce74e544b8a251308e9079bf9b.jpg)
Ending the Skinny Runway Problem
In narrow galley kitchens, avoid the “long hallway” look by filling 2/3 to 4/5 of your available floor space with a 2.5-3.5 foot wide runner. Center it between cabinets with at least 6 inches clearance on each side. Better yet, place two smaller rugs—one by the sink, one by the stove—to break up the narrow space and create distinct functional zones.
Space-expanding technique: Position rugs perpendicular to cabinet runs to interrupt sightlines. This optical illusion tricks the eye into seeing a wider kitchen.
Open-Concept Kitchen Zoning With Rugs
Creating Visual Boundaries Without Walls
Use rug placement to define invisible boundaries in open-plan kitchens. Position darker, durable rugs in cooking zones where spills happen, while dining areas can feature lighter patterned rugs that complement your overall design. For island seating, ensure rugs extend beyond where stools pull out to create a comfortable landing zone.
Color strategy: Stick with darker rugs in high-spill cooking areas (they hide stains better) while dining zones can showcase lighter colors or intricate patterns.
Entry Point Rug Placement That Stops Dirt at the Door
Install rubber-backed microfiber or coir mats at all kitchen entry points, especially doors leading outside. These transition rugs should sit completely flat without catching on door swings. For interior doorways, choose low-profile styles that won’t trip household members while effectively trapping tracked-in dirt.
| Kitchen Size | Primary Rug Size | Runner Width |
|---|---|---|
| Small (under 8′ x 10′) | 5′ x 7′ or 6′ x 9′ | 2-2.5′ |
| Medium (8′ x 10′ – 12′ x 14′) | 8′ x 10′ | 2.5-3′ |
| Large (12′ x 14’+) | 9′ x 12′ or larger | 3-3.5′ |
Quick sizing tip: Always leave 6+ inches between rug edges and cabinets for a clean, intentional look—cramped rugs scream “afterthought.”
Non-Slip Rug Placement Safety Essentials
Critical Installation Rules You Can’t Skip
Every kitchen rug must have non-slip backing or sit on a quality rug pad—no exceptions. Choose low-pile or flat-weave styles that lie completely flat without curled edges. This isn’t just about aesthetics; tripping over a raised rug edge while carrying hot soup could mean serious injury.
Zone-specific safety checks:
– Stove area: Verify 6+ inch clearance from burners
– Traffic paths: Ensure rugs don’t create stepping obstacles
– Appliance zones: Maintain 6-inch gaps around fridge/dishwasher doors
Material Selection by Kitchen Work Zone
Match rug materials to specific kitchen functions for maximum practicality. In high-spill sink areas, polypropylene’s stain resistance outperforms natural fibers. For island seating where you stand longer, choose anti-fatigue foam core rugs that cushion feet during meal prep. Cooking zones demand dark-patterned nylon that hides grease splatters while resisting oil damage.
Family-friendly shortcut: Select machine-washable rugs for households with kids—toddler juice spills won’t become permanent stains.
Modern Kitchen Rug Pairing Techniques

Contemporary Placement Formulas
Modern kitchens shine with neutral grays, bold navy, or terracotta statement rugs in geometric patterns. Pair low-pile synthetics with sleek cabinetry, ensuring rug edges align with tile joints for that custom-built look. Avoid busy patterns that clash with minimalist aesthetics—subtle texture variations create interest without visual noise.
Farmhouse Rug Positioning Principles
Earth-toned olive, rust, or cream rugs in natural jute or vintage patterns enhance farmhouse charm. Place woven sisal runners parallel to your island, extending generously beyond seating areas. For authenticity, position smaller cotton blend rugs specifically in high-use spots rather than covering the entire floor.
Two-Rug Strategy for Maximum Flexibility
Instead of one large rug, place two smaller rugs—one by the sink, one by the island. This approach offers easier cleaning, greater flexibility when rearranging, and often costs less. Coordinate colors while varying patterns for visual interest—like a neutral jute runner under the island paired with a patterned polypropylene mat at the sink.
Time-saving trick: Choose identical rugs for symmetry, making rotation and cleaning simpler while maintaining design cohesion.
Daily Rug Maintenance Routines That Extend Lifespan
Immediate Spill Response Protocol
Address kitchen spills within 60 seconds using the blotting technique—press firmly with a dry towel, then follow with a damp cloth. Never rub spills, which pushes liquids deeper into fibers. For oily messes near the stove, sprinkle baking soda first to absorb grease before cleaning.
Pro tip: Keep a designated “rug rescue kit” under your sink with microfiber towels, mild detergent, and a small brush for quick cleanups.
Deep Cleaning Schedule by Material Type
Machine-wash synthetic rugs monthly using cold water and mild detergent. Air-dry completely before repositioning—never reinstall damp rugs, which can warp flooring underneath. For wool or delicate rugs, schedule professional cleaning every 6-12 months. Rotate all rugs every six months to ensure even wear, especially in sun-exposed kitchens.
Family hack: Choose machine-washable options if you cook frequently—the convenience outweighs minor style compromises.
Final Rug Placement Verification Checklist
Before committing to your kitchen rug layout, walk through this verification process:
– [ ] Taped outline test: Use painter’s tape to mark rug dimensions and move through your normal kitchen routine
– [ ] Chair clearance check: Pull out dining chairs fully—rug must extend beyond their maximum position
– [ ] Stove safety verification: Cooking zone rugs sit at least 6 inches from burner edges
– [ ] Traffic flow assessment: No awkward stepping on/off rugs during routine tasks
– [ ] Gap measurement: Minimum 6 inches between all rug edges and cabinets/appliances
Golden rule: When uncertain about sizing, choose a larger rug. A generously-sized rug always looks intentional and luxurious, while an undersized one appears like an afterthought you’re trying to hide.
Strategic kitchen rug placement transforms cold, hard floors into warm, functional zones that protect your investment while reducing fatigue. Start with your highest-traffic area—likely the sink—then expand to other zones using the safety-first principles outlined here. Remember: the perfect kitchen rug layout balances beauty with brutal practicality, making your space both inviting and accident-proof.

