
That moment when you open your glass-front cabinets only to see chaotic stacks of mismatched dishes and dusty knick-knacks staring back? You’re not alone. Glass kitchen cabinets transform storage into a visual focal point, but styling them correctly separates magazine-worthy kitchens from cluttered eyesores. The transparency that should showcase your beautiful dishware often highlights disorganization instead. This guide delivers actionable solutions from top designers who turn glass cabinet struggles into stunning displays—without requiring professional help or breaking your budget. You’ll discover exactly how to choose forgiving glass types, create intentional vignettes that survive daily life, and maintain displays that look curated instead of chaotic. Let’s unlock the secrets to making your glass kitchen cabinets work for you.
Select the Right Glass Type for Your Lifestyle
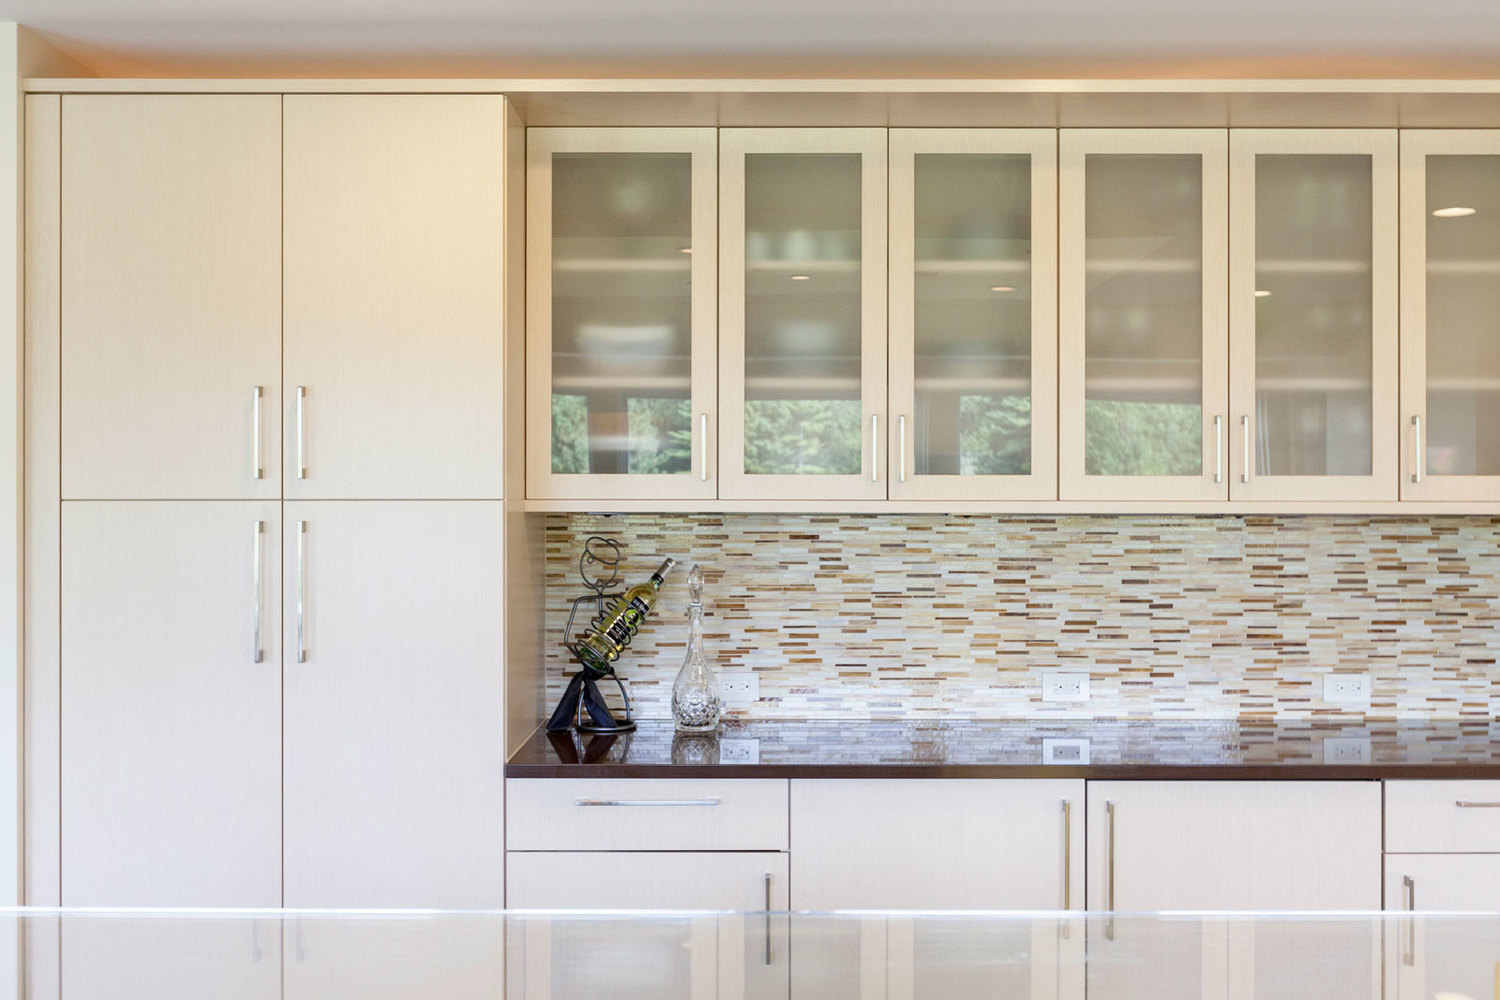
Your glass choice dictates maintenance effort and styling flexibility. Skip this step, and you’ll battle fingerprints or visible clutter daily. Clear glass delivers maximum sparkle for special-occasion china but demands military-grade organization—every crooked plate and smudge becomes glaringly obvious. Reserve it for upper cabinets displaying rarely used heirlooms. Fluted or reeded glass offers the ideal compromise: vertical ridges blur minor imperfections while adding vintage texture. Designers like Charlie Tilbury call it “relaxed and easy to live with,” making it perfect for households with kids or busy schedules. Seeded glass provides old-world charm through tiny bubbles that naturally camouflage slight clutter—ideal for coastal or farmhouse kitchens. If you crave zero maintenance, frosted or tinted glass hides everyday items while letting colored glassware create subtle pops against neutral backgrounds. Pro tip: Test samples against your dishware—hold each type 12 inches from your shelves to see how much “forgiveness” you actually get.
Build Your Cabinet’s Foundation First

Before styling a single plate, optimize your cabinet’s interior architecture. Paint the back panel in a bold hue like deep navy or emerald to make white dishware pop dramatically. Scandinavian schemes benefit from natural wood backs that maintain warmth without visual noise. Install warm LED strips under shelves—battery-powered versions work for renters, while hardwired systems provide maintenance-free brilliance for years. Position lights to cast layered shadows through reeded glass after dark. Add functional inserts like plate racks and stemware holders to prevent the “everything slides around” problem. Davonport’s Parisian kitchen units prove this: each cabinet is pre-engineered for specific roles (wine storage, crockery), keeping daily items orderly while adding architectural interest. Critical mistake to avoid: Skipping lighting. Unlit glass cabinets become shadowy voids at night—budget at least $20 for plug-in LED strips to transform your display after sunset.
Diagnose Your Lighting Needs in 3 Steps
- Assess usage: Hardwired LEDs suit frequently accessed cabinets; battery strips work for display-only zones
- Check power sources: Measure distance to nearest outlet—if over 6 feet, opt for battery systems
- Test color temperature: Choose 2700K-3000K LEDs for warm, inviting glow (never cool white)
Implement the Two-Color Rule Immediately
:strip_icc()/20220831_sip_069v1_EEqhTqoAaOU8UBzYOZvgz1-7d5c8c0d650b47f4bfc84129407dba00.jpg)
Overwhelming color variety causes instant visual chaos in glass cabinets. Restrict your palette to one dominant color plus one accent—white/cream paired with soft gray creates timeless elegance, while copper or natural wood accents transition seamlessly between seasons. Spring and summer demand crisp whites and subtle pastels; swap in earthy tones and metallics for autumn warmth. Rotate items quarterly: store seasonal pieces in labeled bins under the sink for 10-minute refreshes. Warning: Avoid matching every dish to your cabinets—this creates a sterile, museum-like feel. Instead, let one accent color (like sage green glasses) repeat subtly across shelves for cohesion. Williams Sonoma’s consistent color collections make seasonal swaps effortless, but thrift stores yield unique vintage pieces that add character while maintaining harmony.
Create Balanced Vignettes That Survive Daily Use
Professional displays rely on intentional spatial relationships, not random placement. When mullion bars divide your glass into columns, treat each section as an independent vignette—this prevents the “everything pushed together” amateur look. Apply diagonal opposition: place a large pitcher upper-left and mirror it with a similar item lower-right, filling the center with clustered groupings. Build triangular arrangements using 3-5 objects: tallest items at the back, medium-height in the center, smallest at the front. This pyramid structure creates depth even in shallow cabinets. Key visual cue: If you can’t see the back wall between objects, remove something immediately. Aim for 25-40% negative space—Paul Staden of Pilgrim House insists this “interplay between emptiness and objects” prevents cluttered displays.
Style by Shelf Height Like a Pro
- Bottom shelves (waist-to-chest): Store everyday plates and water glasses with minimal styling—color-block by type only
- Middle shelves (chest-to-eye): Blend utility and beauty with coffee mugs, canisters, and cookbooks; use canisters for height variation
- Top shelves (above eye-level): Create pure display zones for special-occasion china with dramatic lighting
Source Budget-Friendly Styling Elements Strategically
Designer looks don’t require designer budgets. Mix any white dishware styles together—vintage porcelain from thrift stores pairs perfectly with modern pieces for “collected-over-time” sophistication. Incorporate natural elements like small potted herbs or vertically leaned cutting boards to soften formal displays. Stack cookbooks horizontally to create instant risers for varying heights, or stand vintage spines vertically between bookends for color blocking. Pro tip: Thrift stores overflow with white restaurant-grade porcelain that photographs beautifully—look for “hotel china” with chip-resistant glazes. For cohesive glassware, target single-color collections (all amber or all cobalt), but avoid perfect uniformity; slight variations in texture add depth.
Maintain Your Display Without Daily Effort
Glass cabinets demand a realistic maintenance plan. Wipe exteriors weekly with a microfiber cloth and mild glass cleaner to prevent hazy film buildup—skip vinegar-based solutions that streak on textured glass. Schedule quarterly deep cleans: remove everything, wipe shelves, and restyle for seasonal shifts. Critical error: Hiding plastic containers behind glass. Store unsightly items in solid lower cabinets—glass zones should only showcase intentional, beautiful objects. For lighting upkeep, recharge battery LED strips monthly (they typically last 30-50 hours), while hardwired systems need professional installation but zero maintenance for years. If fingerprints plague clear glass, swap to fluted panels in high-traffic zones—this single change cuts cleaning time by 70%.
Execute This 7-Step Styling Checklist
Before adding a single item, run through this designer-approved checklist:
– [ ] Choose glass type based on your tolerance for visible organization (fluted for busy homes)
– [ ] Paint or wallpaper cabinet backs before installation (dark hues spotlight light dishware)
– [ ] Install lighting—battery strips for renters, hardwired for permanent displays
– [ ] Map contents by shelf height using the function/frequency guide
– [ ] Restrict palette to two colors plus neutrals (no more!)
– [ ] Source risers like books or cake stands for height variation
– [ ] Schedule quarterly rotations for seasonal refreshes and deep cleaning
Glass kitchen cabinets succeed when beauty meets practicality. Start with your least-used upper cabinets to practice techniques before tackling daily zones. Remember: the best displays evolve with your life—what looks perfect today may need adjustment as your collection grows. By implementing these proven strategies, you’ll transform transparent doors from anxiety triggers into your kitchen’s most captivating feature. Your glass cabinets should tell your story while serving real needs—creating a space that’s both effortlessly functional and deeply personal. The transparency that once felt intimidating becomes your greatest design asset.

