
That frustrating gap between your cabinet doors isn’t just an eyesore—it’s your cabinet screaming for help. When your kitchen cabinet starts sagging, it’s a clear sign that structural failure is underway. Whether it’s a slight bow in your shelves or doors that won’t close properly, ignoring this problem will only lead to complete cabinet collapse. How to fix a sagging kitchen cabinet isn’t just about aesthetics; it’s about preserving your kitchen’s functionality and value.
Most cabinet sagging happens silently over time, often starting with barely noticeable gaps that worsen with everyday use. The good news? You can diagnose and repair 90% of sagging cabinets yourself with basic tools and the right approach. This guide delivers specific, actionable solutions based on actual sagging severity—not generic advice that wastes your time.
Diagnose Your Cabinet Sagging Severity in 5 Minutes
Quick Visual Inspection Protocol
Start by emptying your cabinet completely—every dish, pot, and pantry item must go. Grab a 4-foot level and place it across the cabinet top. If the bubble isn’t centered, make a mental note of which direction the cabinet leans.
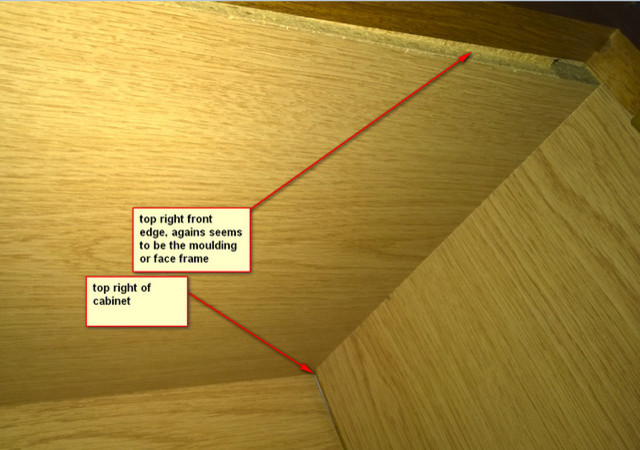
Examine your cabinet doors when closed. Consistent 1/8-inch gaps around all edges indicate normal alignment. But if you notice wider gaps at the top or bottom of doors, sagging is definitely occurring. Check where the cabinet back meets the wall—increasing gaps from top to bottom signal the entire unit is pulling away from the wall.
Measure Deflection Accurately for Targeted Repair
Place a straight edge across each shelf surface. Any gap between the straight edge and shelf reveals bowing. Measure this gap precisely:
- Under 1/4 inch: Level 1 (minor sagging – simple fix)
- 1/4 to 1/2 inch: Level 2 (moderate sagging – needs structural reinforcement)
- Over 1/2 inch: Level 3 (severe sagging – requires reconstruction)
This measurement determines your repair approach. Don’t guess—measure at multiple points across each shelf to identify problem areas.
Level 1 Repair: Fix Minor Sagging (Under 1/4 Inch) Without Full Disassembly
Steel Bracket Reinforcement Technique
For slight sagging, steel angle brackets provide instant support. Install L-shaped brackets inside corner joints where shelves meet cabinet sides using #8 wood screws—longer than original fasteners but not so long they pierce through cabinet walls.
Position brackets every 12 inches along failing joints. Critical tip: Pre-drill pilot holes to prevent particleboard from splitting. Tighten screws firmly but avoid over-torquing, which strips the soft material.
Shelf Support System Upgrade
Replace basic shelf pins with heavy-duty versions rated for 100+ pounds. If your cabinet uses adjustable shelves, add fixed support cleats underneath sagging areas. Cut 1×2 hardwood strips to fit between side panels, securing them with wood glue and 1-1/4″ screws.
For permanent shelves showing slight bowing, install a 1/4″ plywood back panel. Secure with 1-1/4″ screws every 6 inches along all edges—this distributes weight across the entire cabinet structure rather than concentrating it on individual joints.
Level 2 Solution: Correct Moderate Sagging (1/4-1/2 Inch) With French Cleat Support
Install Wall-Supported French Cleat System
Moderate sagging requires transferring weight directly to your home’s structural framing. A French cleat—a 3/4″ x 4″ hardwood strip cut at 45 degrees—does this perfectly.
First, locate wall studs using a stud finder and mark all positions across the cabinet width. Cut your hardwood cleat slightly shorter than cabinet width. Secure it to studs with 3″ lag screws and washers, ensuring it’s perfectly level.
Rest the cabinet on this cleat while reinstalling permanent mounting screws. This simple addition shifts the load from failing cabinet joints to your wall studs—solving 80% of moderate sagging issues permanently.
Face Frame Bracing for Additional Stability
Add vertical 1×2 hardwood strips between shelves to transfer loads to stronger cabinet areas. Position these braces at failed joint locations, securing with wood glue and pocket screws.
For bowed shelves, install mid-span support posts using 1×4 hardwood cut to exact height between shelf and cabinet bottom. Secure with construction adhesive and screws through side panels—this provides immediate deflection correction.
Water Damage Emergency: Salvage Your Cabinet After Leaks or Flooding

Remove All Damaged Material Completely
Cut away swollen particleboard until you reach solid, dry material. Water-damaged areas will continue deteriorating even after surface repairs. Use a circular saw set to exact thickness to remove damaged sections cleanly.
Dry remaining structure thoroughly with fans and dehumidifiers for 48-72 hours. Warning: Any remaining moisture will cause new materials to swell and fail within weeks.
Rebuild With Moisture-Resistant Materials
Replace damaged sections with exterior-grade plywood or PVC board—these materials resist moisture damage while providing superior structural strength. Apply waterproof sealant to all replacement materials before installation.
If plumbing leaks caused the damage, install a moisture barrier behind the cabinet using 6-mil plastic sheeting sealed with waterproof tape. This prevents future water intrusion from minor leaks.
Essential Tools and Materials Checklist for Cabinet Repair Success
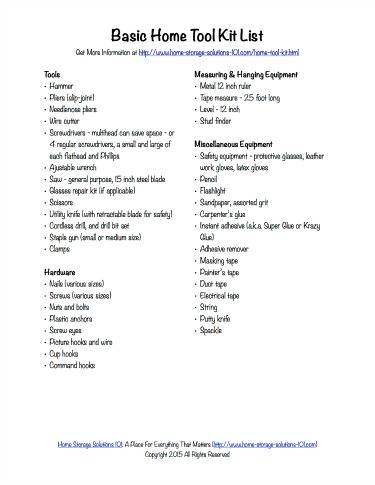
Must-Have Tool Kit
- 4-foot level for precise alignment verification
- Stud finder for accurate wall support location
- Drill with 1/8″, 3/16″, and 1/4″ bits plus Phillips driver
- Impact driver for lag screw installation without stripping
- Clamps (minimum 4) with 6″ capacity for joint reinforcement
- Circular saw for clean plywood cutting
Critical Materials for Permanent Fixes
- 3/4″ birch plywood (A-grade) for structural replacement
- 1×4 hardwood boards (oak or maple) for reinforcement
- 2-1/2″ pocket screws for strong, hidden connections
- 3″ lag screws with washers for wall mounting
- Steel angle brackets for corner joint support
Prevent Future Sagging With These Proven Maintenance Strategies
Monthly Cabinet Health Check
Inspect your cabinet monthly for new gaps developing around doors. Check that all visible screws remain tight—loose screws are early indicators of joint stress. Look for fresh water damage or material swelling, especially under sinks where leaks commonly occur.
Quarterly Deep Inspection Protocol
Remove all contents quarterly to test shelf deflection under normal load. Tighten all visible screws and check wall mounting points for movement. Replace any worn shelf supports or brackets before they fail completely—preventative maintenance costs pennies compared to full repairs.
Annual Cabinet Overhaul
Once yearly, empty the cabinet completely for deep cleaning and structural inspection. Re-apply wood finish to exposed surfaces to maintain moisture resistance. Update your load calculations based on changing storage needs—modern kitchens often exceed original cabinet weight limits with heavy cookware collections.
DIY vs Professional Repair: Cost Comparison and When to Call an Expert
Realistic Cost Analysis
DIY Investment:
– Level 1 repairs: $15-50 (brackets, screws, glue)
– Level 2 repairs: $50-150 (plywood, hardwood, hardware)
– Level 3 reconstruction: $200-500 (complete rebuild materials)
Professional Service:
– Handyman repair: $300-600 for typical fixes
– Cabinet specialist: $500-1,200 for complex reconstruction
– Complete replacement: $800-2,500 including removal
DIY saves 60-80% compared to professional service. Quality repairs extend cabinet life 10-15 years, making the investment worthwhile for most homeowners.
Don’t wait until your cabinet hits the floor—address sagging immediately using the right solution for your severity level. Start with the least invasive approach that matches your measurements, and remember that proper cabinet repair isn’t just about fixing current problems—it’s about preventing future failures through smart reinforcement and maintenance. Your kitchen cabinets carry thousands of pounds of weight over their lifetime; give them the structural support they need to keep serving you well for years to come.

