

That persistent drip pooling around your Moen faucet handle isn’t just annoying—it’s silently wasting hundreds of gallons of water monthly while threatening to rot your cabinet base. When water escapes between the spout and handle during normal operation, you’re dealing with compromised internal seals, not a simple loose connection. The good news? This specific leak type has a straightforward solution that most homeowners complete in under an hour with basic tools. Skip this repair, and you’ll face escalating water damage and higher utility bills.
Identifying your exact Moen model is non-negotiable before starting. These faucets use proprietary parts where even 1mm o-ring differences cause immediate re-leaking. Pull-down models skip o-ring replacement entirely, while traditional designs require meticulous seal replacement. Guessing parts based on appearance guarantees failure—Moen’s system demands precision. This guide cuts through the confusion with model-specific steps that stop the drip for good.
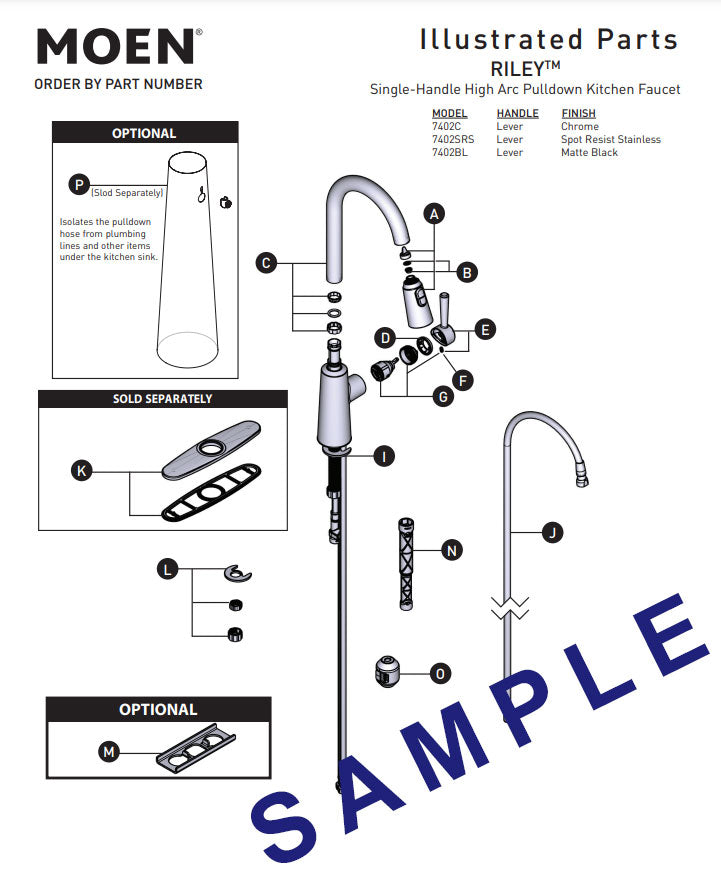
Pinpoint Your Exact Moen Faucet Model
Using incorrect parts is the #1 reason DIY repairs fail. Moen’s internal components vary drastically between seemingly identical models, making accurate identification the critical first step.
Locate Model Number in 60 Seconds
Check the metal base of your faucet for etched model numbers—often hidden under grime near the sink mounting surface. Can’t find it? Visit Moen’s Find Your Product tool and upload a side-view photo. Their visual database matches subtle design cues like handle shape or spout curvature when numbers fade. Write down the full alphanumeric code (e.g., “7594ESRS”) before shopping—it determines every part you’ll need.
Critical alert: Never assume compatibility. A Moen 1225 cartridge won’t fit a 1255 series, and mismatched o-rings guarantee leaks. This single step prevents 90% of repair failures.
Instant Pull-Down vs. Traditional Identification
Stand directly in front of your sink. If you can pull the spray head down toward the sink basin (common on modern faucets), you have a pull-down model requiring cartridge replacement only. If the spout is fixed in position with no pull-out capability, you’re working with a traditional faucet needing both o-rings and cartridge replacement. This distinction dictates your entire repair approach—get it wrong, and you’ll redo the job twice.
Gather Model-Specific Tools and Parts
Buying generic kits wastes time and money. Your Moen’s unique design demands exact components—no substitutions allowed.
Essential Kit for Your Model:
– Moen service kit (e.g., “142198 for 7500 series”) containing model-matched o-rings/cartridge
– Cartridge puller tool (Moen #104421 prevents damage during extraction)
– Adjustable wrench (8-inch for tight spaces)
– Allen wrench set (for handle set screws)
– Moen silicone grease #99915 (included in kits—never use alternatives)
– Small container (for organizing tiny parts)
Danger zone: Plumber’s grease or silicone sprays react with rubber seals, causing stiff operation and premature failure. Only Moen #99915 grease maintains seal flexibility without chemical degradation.
Shut Off Water Supply Correctly
Locate shutoff valves under the sink—right valve controls hot water, left controls cold. Turn both clockwise until fully closed. Then open the faucet handles to release pressure and drain residual water. Skip this step, and you’ll flood your cabinet during disassembly.
Pro tip: Place towels in the sink basin to catch dropped screws. Those minuscule parts vanish instantly down drains, turning a 30-minute job into a 2-hour frustration.
Remove Handle Without Damage
Forcing stuck handles cracks internal components. Most Moen handles conceal a set screw under the temperature indicator cap.
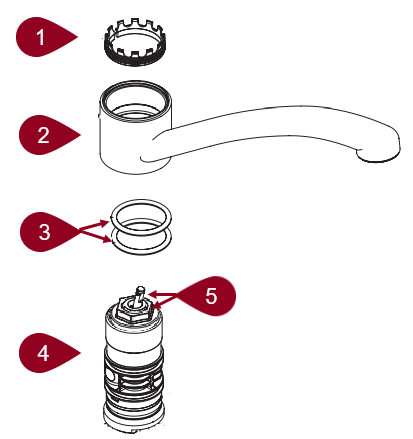
Handle Removal Protocol
- Pry off the red/blue temperature cap with a flathead screwdriver (wrap blade in tape to avoid scratches)
- Loosen the hex set screw counterclockwise using the correct Allen wrench size
- Lift straight upward—no twisting or wiggling
- Remove the decorative handle dome cover
Stuck handle fix: If the handle resists, apply 3 drops of penetrating oil around the base. Wait 5 minutes, then try again. Never hammer or pry—this cracks the valve body.
Replace Cartridge in All Moen Faucets
The cartridge controls water flow direction. A damaged cartridge causes leaks between spout and handle regardless of faucet type.
Cartridge Replacement Steps
- Remove the retaining nut with an adjustable wrench (turn counterclockwise)
- Extract the old cartridge using Moen #104421 puller—never pliers (they crush the stem)
- Note hot/cold orientation markings on the old cartridge
- Insert the new cartridge in the exact same position
- Hand-tighten the retaining nut—overtightening cracks plastic components
Visual checkpoint: Hot water indicators must face the same direction as the original. A reversed cartridge delivers scalding water when you expect cold.
Traditional Faucets: Replace Spout O-Rings
Fixed-spout models require o-ring replacement—this step stops the leak in traditional designs. Pull-down faucets skip this section entirely.
Spout Seal Replacement Process
- Unscrew the spout base counterclockwise (may require firm grip)
- Lift off the entire spout assembly
- Remove old o-rings with a dental pick—don’t cut (prevents groove damage)
- Clean spout interior and valve body with vinegar-soaked cloth
- Apply Moen #99915 grease to all new o-rings
- Seat o-rings into their original grooves (check kit diagram)
- Reinstall spout, aligning with cartridge guide
Size precision: Using even slightly oversized o-rings creates gaps where water escapes. Your model-specific kit provides the exact dimensions—no guessing.
Pull-Down Faucets: Skip O-Ring Replacement
If your spray head pulls down toward the sink, do not replace o-rings. These models use a different sealing system inside the pull-down mechanism. After cartridge replacement, immediately reassemble and test—adding unnecessary o-rings causes binding and new leaks.
Verification shortcut: If you removed the spout during disassembly and found no o-rings inside, you have a pull-down model. Stop after cartridge replacement.
Reassemble and Test for Zero Leaks
Rushing reassembly guarantees rework. Follow this sequence to prevent new leaks.
Leak-Proof Testing Protocol
- Turn on water supplies slowly (prevents pipe shock)
- Dry all surfaces with paper towel
- Run water for 30 seconds while checking handle base
- Test temperature control through full range
- Inspect for moisture after 2 minutes of operation
Leak diagnosis: New moisture at the handle base means either o-rings are pinched (traditional models) or the cartridge is misaligned. Disassemble immediately—don’t let water pool.
Prevent Recurring Leaks Long-Term
Extend your repair’s lifespan with these model-specific habits. Proper maintenance prevents 80% of repeat leaks.
Monthly maintenance:
– Wipe handle base after each use to prevent mineral buildup
– Avoid abrasive cleaners that degrade rubber seals
– Check for stiffness in handle movement (indicates drying seals)
Annual service:
– Remove handle and flush valve body with white vinegar
– Reapply Moen #99915 grease to cartridge stem
– Inspect spout base for early moisture signs
When to Call a Professional Immediately
Stop work if you encounter these irreversible issues:
– Rusted valve body threads that won’t accept new parts
– Stripped retaining nut that won’t tighten securely
– Leaks at the faucet base (requires sink disassembly)
A licensed plumber handles corroded components without damaging $200 Moen assemblies. For spout-handle leaks, however, 95% of homeowners succeed with model-specific parts and this guide.
Fixing your leaking Moen kitchen faucet handle stops water waste and prevents cabinet destruction in under an hour. The critical success factor? Using exact model-specific parts—never generic kits. By identifying your faucet type first and following these precise steps, you’ll achieve a permanent fix with no drips. Remember: pull-down models only need cartridge replacement, while traditional faucets require meticulous o-ring installation with Moen-approved grease. Your repaired faucet should deliver smooth operation and zero leaks for 5+ years with basic maintenance. Now that your handle leak is solved, check your faucet’s aerator monthly to maintain optimal water pressure and prevent future issues.

