
Your range hood sputters to life during dinner prep only to die completely, leaving smoke billowing toward the ceiling. Or maybe it hums weakly while grease fumes cling to your curtains. A malfunctioning kitchen exhaust fan isn’t just annoying—it’s a serious hazard. Without proper ventilation, gas ranges can produce dangerous carbon monoxide, while lingering heat and humidity invite mold growth. The good news? Over 80% of kitchen exhaust fan not working issues stem from three fixable culprits: power failures, clogged components, or worn motors. This guide delivers exact troubleshooting steps to restore your kitchen’s critical defense system using basic tools you likely own.
Most homeowners waste hours replacing parts blindly without testing root causes. Stop guessing—start diagnosing. Within an hour, you’ll pinpoint whether your problem lives in the circuit breaker, behind a grease-caked filter, or inside a faulty motor. We skip electrical jargon and focus only on actionable checks proven to resolve real-world failures. Your kitchen deserves fresh air tonight, not next week.
Tripped Breaker or Faulty Wiring Causing Total Power Loss

When your exhaust fan refuses to turn on—no lights, no fan, complete silence—power supply issues account for most cases. Ignoring these first risks wasting time on unnecessary part replacements.
Reset Tripped Breaker Before Touching Tools
Head straight to your electrical panel. Locate the 15- or 20-amp breaker labeled “kitchen hood” (often grouped with other kitchen circuits). If the switch sits between ON and OFF positions, it’s tripped. Flip it fully OFF until you hear a click, then back ON. If it trips again immediately, stop all work—this indicates a dangerous short circuit requiring an electrician. Never force a breaker into the ON position.
Test GFCI Outlets Near Your Stove
Plug-in range hoods often share circuits with nearby countertop outlets. Check for GFCI outlets (with TEST/RESET buttons) within 6 feet of your sink. Press RESET firmly until it clicks. Still dead? Plug a phone charger into the same outlet—if it doesn’t power on, the circuit is dead. For hardwired units, inspect the junction box behind the hood’s control panel for loose wire nuts or charred wires only after confirming the breaker is OFF.
Verify Voltage at Hood Connection Point
Use a multimeter to test for 120V power. Set it to AC voltage mode, then touch probes to the black (hot) and white (neutral) wires in the junction box. No reading? The problem lies upstream—recheck breakers, GFCIs, or consult an electrician. 120V present but fan dead? Power reaches the unit, so move to motor-specific diagnostics.
Fan Motor Won’t Start Despite Working Lights
If your hood’s lights function but the fan stays silent, you’ve isolated the failure to the fan circuit. Three components fail most often here: switches, motors, or capacitors.
Diagnose Faulty Fan Switch with Multimeter
With power OFF at the breaker, remove the fan switch (usually two mounting screws). Set your multimeter to continuity mode. Touch probes to the switch terminals while toggling it ON. You should hear a beep or see near-zero resistance. No signal means the switch is dead—common after years of grease exposure. Replacement switches cost $8-$15 and match your hood’s voltage (125V) and amperage (5-10A).
Test Motor Windings for Burnout
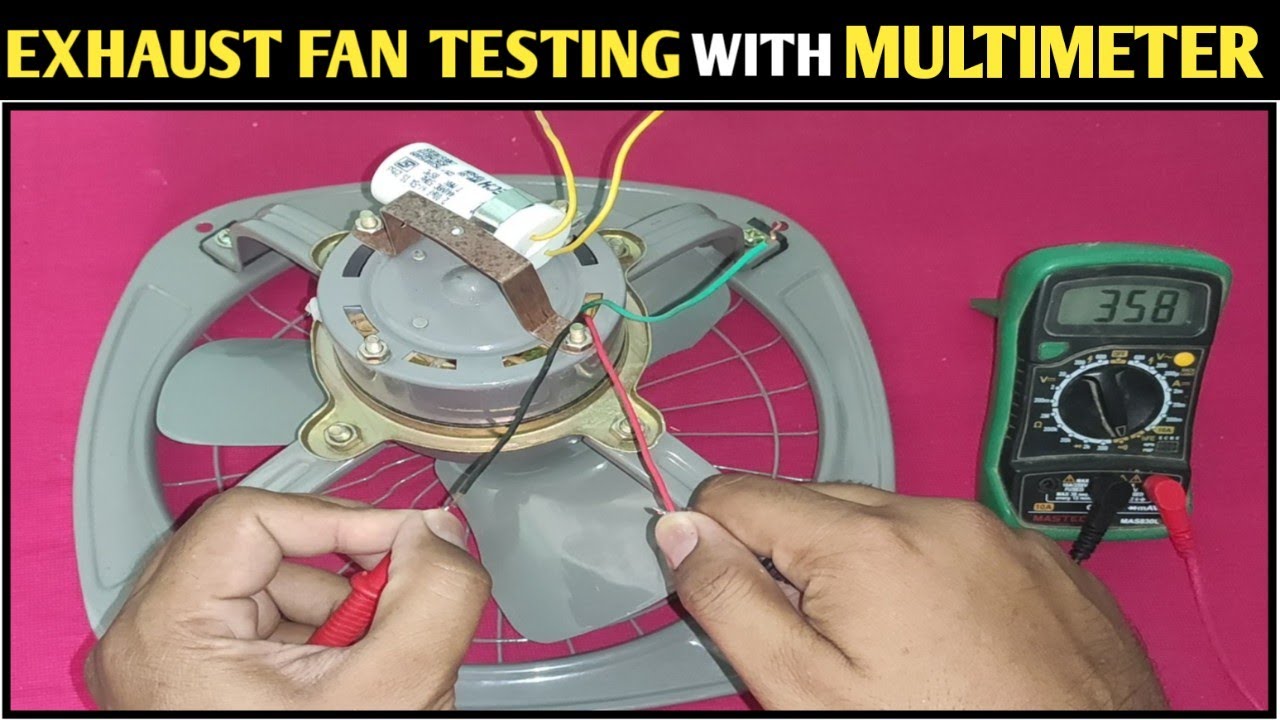
Disconnect the motor’s wiring harness. Measure resistance across the terminal pairs. Normal readings fall between 8-30 ohms (check the motor nameplate for exact specs). Infinite resistance? The winding is burned out—replace the motor. Resistance under 1 ohm? Indicates an internal short, also requiring motor replacement. Never attempt to repair windings yourself.
Check Start Capacitor on PSC Motors
Some motors use a cylindrical capacitor (about 1-2 inches long) to generate starting torque. Disconnect it and test with a capacitor meter. Replace if the reading deviates over 10% from its labeled microfarad value. These cost $10-$15 and restore weak starting power instantly. If your motor lacks a capacitor, it’s likely a shaded-pole type requiring full motor replacement when faulty.
Weak or Rattling Airflow From Clogged Components
Poor suction or loud humming after startup points to mechanical obstructions—not electrical faults. Grease buildup silently chokes performance over months until your hood struggles like a clogged vacuum.
Remove Grease Blockage from Filters in 20 Minutes
Slide out metal mesh filters using release clips. Soak them in hot water with grease-cutting dish soap (like Dawn) for 15 minutes. Scrub gently with a soft brush—never steel wool—to avoid damaging the mesh. Rinse until water runs clear, then air-dry completely before reinstalling. Critical tip: Hold filters to light after cleaning—you should see distinct shadows through the mesh. If not, repeat the process. Heavy fryers need this monthly; others every 3 months.
Degrease Fan Blades Without Removing the Motor
Power OFF completely, then inspect blades with a flashlight. Thick, black grease clumps reduce airflow by up to 70%. Remove the blower wheel (loosen the set-screw on the motor shaft), then soak it in a degreaser solution. Never immerse the motor housing—wipe it with a damp cloth only. After cleaning, spin the wheel by hand—it must rotate smoothly without wobble. Any vibration means residual grease or imbalance requiring re-cleaning.
Clear Ductwork Blockages in Under 30 Minutes
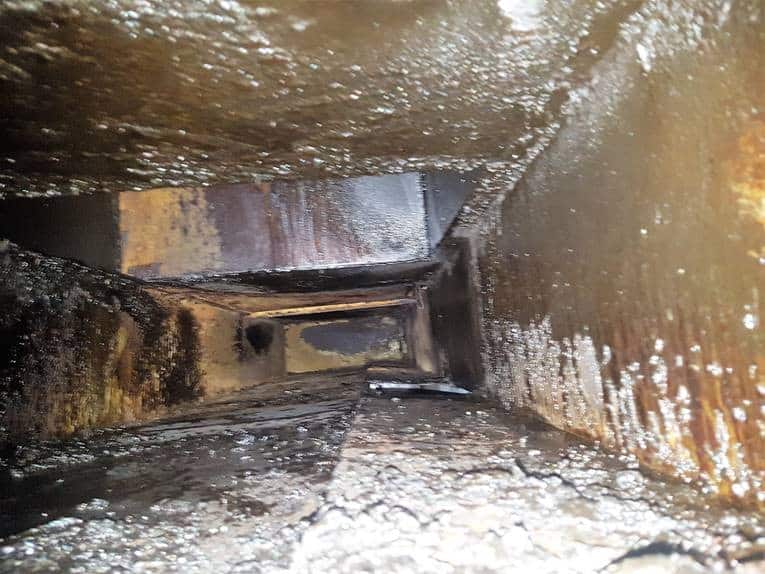
Disconnect the duct from the hood’s exhaust outlet using sheet-metal screws. Shine a flashlight through the duct length. Look for:
– Grease buildup thicker than 1/8 inch
– Collapsed flexible duct sections
– Bird nests or debris near roof vents
Clean rigid metal ducts with a long-handled brush and degreaser. Replace damaged flex duct with UL-listed rigid metal duct—flex ducts kink easily, restricting airflow. Never vent indoors—this traps moisture and fumes inside your attic.
When to Call a Professional Immediately
Stop troubleshooting if you encounter these red flags:
– Aluminum wiring (silver-colored, brittle wires) or cloth-insulated wiring—fire hazard requiring expert rewiring
– Breaker trips repeatedly after resetting—indicates dangerous short circuit
– Motor windings shorted to ground (continuity between motor terminals and metal housing)
– Duct routing through firewalls or exceeding manufacturer’s maximum length (usually 35 feet)
Licensed technicians also handle complex control board repairs, firmware updates, or gas line safety verifications near gas ranges. Your safety outweighs DIY pride.
Prevent Future Failures With 10-Minute Monthly Maintenance
Extend your hood’s life from 5 to 15 years with consistent care:
– After every deep-fry session: Wipe hood surfaces with degreaser to prevent baked-on buildup
– Monthly: Hand-wash metal filters (dishwashers warp them) and check duct connections for looseness
– Every 6 months: Remove and degrease the blower wheel; tighten all mounting screws
– Annually: Inspect duct interior for grease accumulation and replace charcoal filters
Pro tip: Place a reminder in your phone calendar for “Hood Maintenance Day” on the 1st of each quarter. Set a 10-minute timer—most critical tasks fit within this window.
Restore Your Kitchen’s Fresh Air Tonight
A functioning kitchen exhaust fan isn’t a luxury—it’s your first defense against carbon monoxide, mold, and lingering smoke. Most “kitchen exhaust fan not working” emergencies resolve with simple power checks, filter cleaning, or switch replacements. Start with the circuit breaker, then methodically test components using the diagnostics in this guide. Always cut power at the breaker before touching wires, and never force parts that resist removal.
Your reward? A kitchen that stays cool during summer stir-fries, odor-free after bacon breakfasts, and safe around gas flames. Within an hour, you can eliminate that sinking feeling when the fan won’t start. Grab your multimeter and filters—your first breath of fresh air is closer than you think. Check your breaker now, and reclaim your kitchen tonight.

