

Nothing kills kitchen joy faster than a dim workspace. Learning how to install kitchen window properly transforms cooking from a chore into a sunlit pleasure while preventing water damage that costs homeowners thousands. Whether replacing a foggy pane or creating a brand-new opening over your sink, skipping critical steps like proper flashing guarantees leaks within months. This guide cuts through the guesswork with field-tested techniques that keep rain outside where it belongs. You’ll discover exactly how to measure for a perfect fit, seal like a pro, and finish trim that looks factory-installed—all without calling an overpriced contractor.
Choose the Right Installation Method for Your Kitchen
Full-Frame vs. Insert: Which Saves You Time and Money?
Full-frame replacement means stripping everything down to the studs—essential for rotted jambs, out-of-square openings, or when enlarging the window. It takes 6–10 hours and demands moderate carpentry skills to rebuild framing and flashing. Insert (pocket) installation slides the new sash into your existing frame. It’s ideal if your current frame is solid and square, taking just 3–5 hours with basic tools. Critical check: Measure diagonals across your old frame—if they differ by more than ¼”, you need full-frame work.
Kitchen-Specific Window Styles That Actually Work
Double-hung windows tilt inward for easy sink-area cleaning but restrict airflow when partially open. Casement styles crank outward fully—perfect for cross-breezes—but verify the handle clears your faucet. Sliders maximize counter space but block views when open. Pro Tip: For standard 25″ countertops, specify fold-down casement hardware to avoid crank-handle collisions with your backsplash.
Gather Kitchen-Window-Specific Tools and Materials
Non-Negotiable Tools for Leak-Proof Installation
Skip the basic toolkit—kitchen windows demand precision. You’ll need an oscillating multi-tool to cut through stubborn nails without damaging studs, a 4-ft level (not 2-ft) to spot subtle framing flaws, and a shop vac to contain lead dust in pre-1978 homes. Warning: Using a reciprocating saw risks splitting jambs—oscillating tools give surgical control near plumbing vents.
Materials That Prevent $5,000 Water Damage
Vinyl windows cost $300–$600, but skimping on flashing causes disasters. Invest in self-adhering waterproof membrane (6–9″ roll), ASTM C920 exterior silicone, and low-expansion foam labeled “window & door.” Kitchen-specific must-haves: Drill two ¼” weep holes in the vinyl sill adapter 2″ from each jamb—caulk here traps moisture inside your wall cavity. For trim, use PVC or fiber-cement; painted pine swells when splashed near sinks.
Measure Like a Pro to Avoid $200 Custom-Order Mistakes
Rough Opening Measurements That Guarantee Fit
For new openings: Measure width between jack studs at top, middle, bottom—use the smallest number. Measure height from sill plate to header at three points—again take the smallest. Diagonals must differ by ≤¼”. Order your window ½”–¾” smaller than these measurements. Critical: Snap phone photos of each measurement—suppliers rarely accept returns on custom units.
Insert Replacement Measurements That Prevent Binding
Measure inside your existing frame at top, middle, bottom—smallest width wins. Do the same for height from head jamb to sill. Subtract ¼” from both measurements. Kitchen trap: Standard 24″x36″ windows won’t fit if your sink plumbing reduces wall depth—measure frame depth at multiple points.
Remove Old Kitchen Window Without Damaging Walls
Interior Demolition That Protects Drywall
Score paint along trim edges with a utility knife—this prevents drywall tears when prying. Gently remove interior casing with a 5-in-1 tool, labeling pieces for reuse. Critical step: For double-hung windows, cut sash cords first—letting weights drop inside avoids frame damage.
Frame Removal That Prevents Structural Gaps
Use an oscillating tool to cut nails between jambs and studs—reciprocating saws often split framing. Vacuum debris immediately; lead dust from pre-1978 paint requires EPA RRP compliance. Pro Tip: If the sill shows rot, replace it with pressure-treated lumber coated in 100% silicone caulk before proceeding—this blocks moisture at the source.
Flash the Rough Opening Like a Weatherproofing Pro
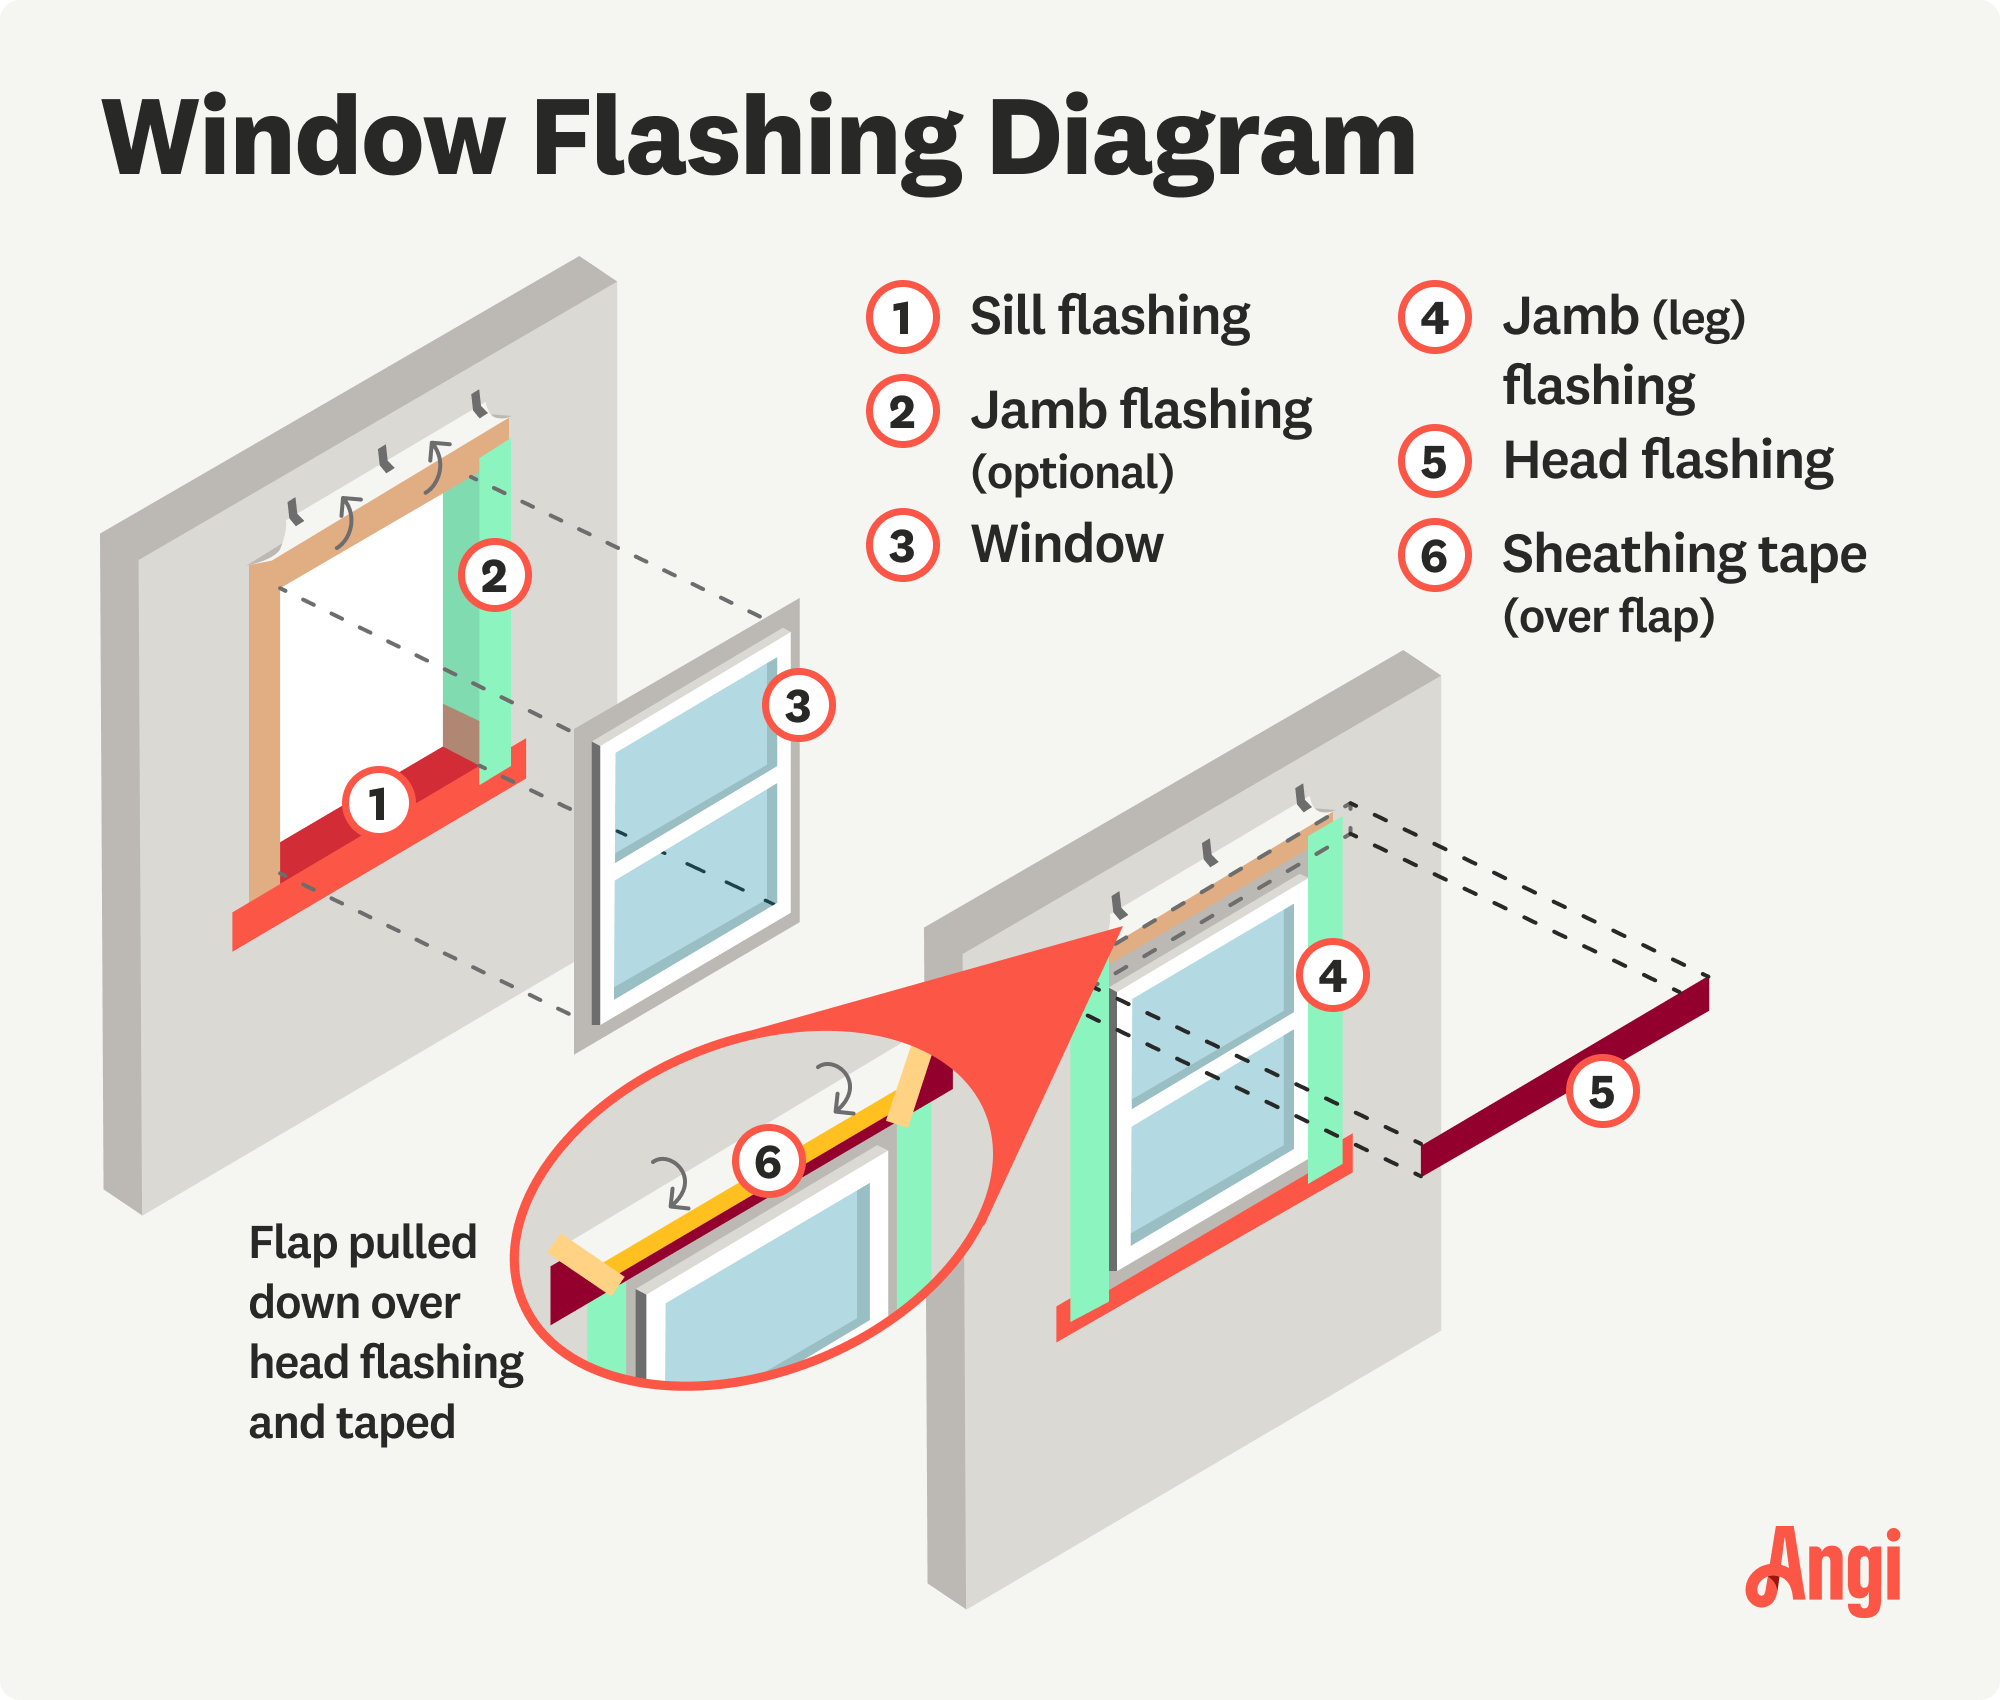
Step-by-Step Waterproofing Sequence (No Skipping!)
- Sill flashing: Center membrane strip on the sill, press from middle outward to eliminate bubbles. Fold up ½” at the back to create a dam.
- Jamb strips: Run upward from the sill, overlapping by ≥4″ in shingle fashion.
- Head flashing: Extend 6″ past jamb strips with downward slope.
Level and Square Verification That Stops Leaks
Shim low spots on the sill until perfectly level using composite shims (wood swells). Measure diagonals—if they differ by more than ⅛”, adjust framing. Visual cue: Your window should sit with a consistent ¼” reveal gap around all edges before anchoring.
Install the Window to Prevent Binding and Drafts
Dry Fit and Caulk for a Permanent Seal
With a helper, set the window in the opening to check the reveal gap. Remove it and apply a continuous ⅜” bead of silicone along the sill, jambs, and head—extend 2″ past corners. Critical: Never use standard foam initially; it pushes frames out of square.
Shim and Anchor Without Distorting the Frame
Place shim pairs at pre-drilled screw locations—bottom first for level, then sides for plumb. Drive galvanized screws every 12″–16″, tightening just until shims compress. Pro Tip: Cycle sashes 10 times during installation—if they bind, slightly loosen screws and re-tighten evenly.
Seal Gaps and Finish Trim for a Kitchen-Ready Look

Insulation Technique That Blocks Drafts Without Bowing
Fill gaps in three passes: bottom first, then sides, then top using low-expansion foam. Trim flush after 1 hour. For gaps >½”, insert closed-cell backer rod ⅜” below the surface before caulking. Kitchen-specific fix: Apply acrylic-latex caulk between the frame and drywall inside—silicone stains grout near sinks.
Exterior Trim That Handles Splashes and Steam
Install brick mould or flat casing with stainless screws (pre-drill PVC to prevent splits). Integrate with siding: Use J-channel for vinyl, 1×4 boards for fiber-cement. Critical: Tool exterior caulk with a concave joint—this sheds water away from the seam. Ensure weep holes stay clear of caulk.
Test for Leaks and Maintain Your Kitchen Window
5-Minute Water Test That Catches Problems Early
Spray the perimeter with a garden hose for 5 minutes while someone checks inside. Warning signs: Damp drywall near the sill means missing sill pan; leaks at the top indicate failed head flashing. Address immediately before drywall repairs become necessary.
Monthly Maintenance That Extends Window Life
Clean tracks and glass monthly—dirt grinds seals. Lubricate hinges with silicone spray (never oil—it attracts dust). Annual must-do: Inspect exterior caulk for cracks; reseal any gaps wider than 1/16″. For vinyl windows, verify weep holes stay unclogged—use a wire hanger snippet.
Troubleshoot Kitchen Window Failures Fast
| Symptom | Immediate Fix |
|---|---|
| Sash binds when opening over sink | Re-shim diagonals; slightly loosen screws and re-tighten evenly |
| Drafts near faucet area | Remove interior trim; inject low-expansion foam behind casing |
| Water pooling on counter after rain | Remove exterior trim; install proper sill pan and head flashing |
| Condensation between panes | File warranty claim—sealed unit failed |
Kitchen-Specific Installation Shortcuts
Skip the guesswork for sink clearance: Hold your faucet in place while installing casement windows—ensure 2″ of clearance for the crank handle. Code hack: An operable window over the sink meets kitchen ventilation requirements, eliminating costly range hood ducting. For standard 25″ counters, order windows with push-out hardware to avoid handle interference.
Final Note: A DIY insert replacement takes 3–5 hours and saves $250–$400, but proper flashing separates a lasting installation from a $5,000 water damage disaster. By drilling weep holes, using low-expansion foam, and verifying diagonal measurements at every step, you’ll create a kitchen window that brightens meal prep for decades—not weeks. Your next move? Measure your rough opening tonight—this single step prevents 80% of installation headaches.

