
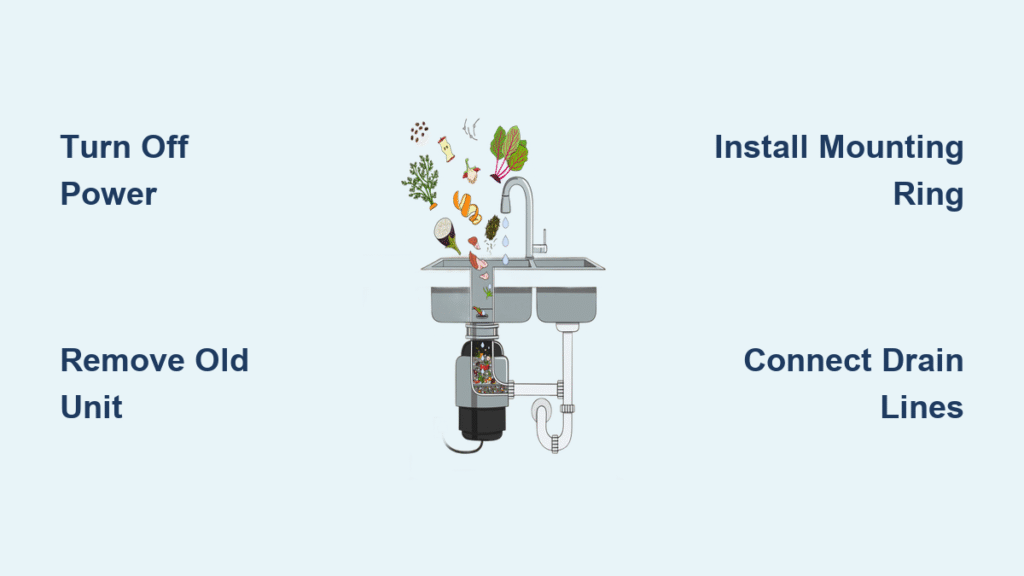
Your kitchen sink backs up again, forcing you to cancel dinner plans while you deal with food scraps clogging the drain. That foul odor creeping up from the pipes signals it’s time for a solution. Installing a kitchen garbage disposal solves these problems while reducing household waste by up to 20%. This comprehensive guide walks you through complete installation—from removing your old unit to testing your new disposal—in just one hour with moderate DIY skills.
A properly installed garbage disposal grinds food waste into tiny particles that flow effortlessly through your plumbing system. You’ll eliminate the frustration of frequent clogs and costly plumber visits while keeping your kitchen smelling fresh. Whether you’re replacing a broken unit or installing your first disposal, this guide ensures you’ll have a leak-free, fully functional system that lasts for years. Let’s transform your kitchen workflow with this essential appliance.
Before You Begin: Safety and Tools
Turn off power at your electrical panel before touching anything under the sink. This single step prevents electrocution and protects your dishwasher if connected. Verify power is off by flipping the disposal switch—nothing should happen. Skipping this could lead to serious injury or electrical damage to your new unit.
Essential Tools Required
- Plumber’s putty (½-inch thick band for sealant)
- Adjustable wrench for secure drain connections
- Flathead and Phillips screwdrivers for mounting hardware
- Mini hacksaw (for P-trap adjustments if needed)
- Bucket to catch water and debris during removal
- Flashlight or phone light for better visibility under sink
Cost and Time Breakdown
- Total project cost: $200-$500 (including disposal unit)
- Installation time: 60 minutes for experienced DIYers
- Skill level: Moderate (3/5) – requires plumbing and basic electrical knowledge
- Success rate: Over 90% when following proper steps and safety precautions
Remove Existing Garbage Disposal
Cut Power Safely
Flip the dedicated circuit breaker for your disposal and verify it’s off by testing the switch. This protects both you and your dishwasher during removal. Many homeowners skip this critical step, risking severe electrical shock. If you’re unsure which breaker controls the disposal, turn off the main power to be absolutely safe.
Disconnect Drain Lines
Place your bucket beneath the disposal to catch water. Use your wrench to loosen the drain line where it connects to the disposal’s discharge tube. Water will drain—this is normal. Have rags ready for any spills, as old connections often leak more than expected during disassembly.
Release Mounting Hardware
Locate the 3-tab ring connecting disposal to sink drain. Support the unit’s weight with your free hand or prop it on a sturdy box. Rotate the ring counterclockwise until the disposal drops free. If it’s stuck, tap gently with a hammer and screwdriver to break the seal before rotating.
Remove Dishwasher Hose
If your dishwasher connects to the disposal, loosen the clamp securing the discharge hose. Pull the hose free and let any remaining water drain into your bucket. Keep the hose elevated during this process to prevent water from flowing back into your dishwasher.
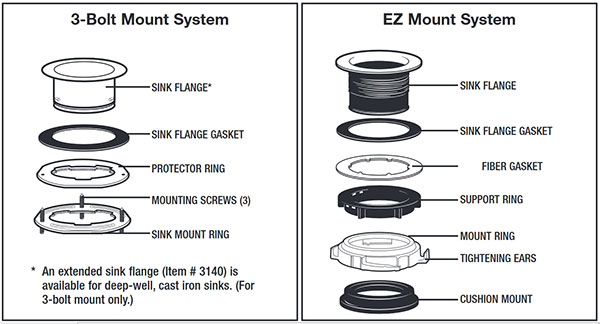
Install Mounting Assembly
Clean and Prepare Sink
Remove old plumber’s putty completely from the sink flange. Apply a fresh ½-inch band of plumber’s putty around the new drain assembly. Press firmly into place—use the disposal’s weight to compress the putty while you work. Wipe away excess putty with a damp cloth before it hardens.
Disassemble New Mounting Kit
Critical: Lay out components in order or photograph them. Install the mounting assembly under your sink in this exact sequence:
1. Fiber gasket (closest to sink surface)
2. Backup flange (flower-shaped component)
3. Mounting ring (closest to floor with three adjustment screws)
Tighten three screws evenly—avoid over-tightening to prevent cracks in the sink or mounting hardware. Rotate between screws, tightening each slightly before moving to the next.
Connect Discharge System
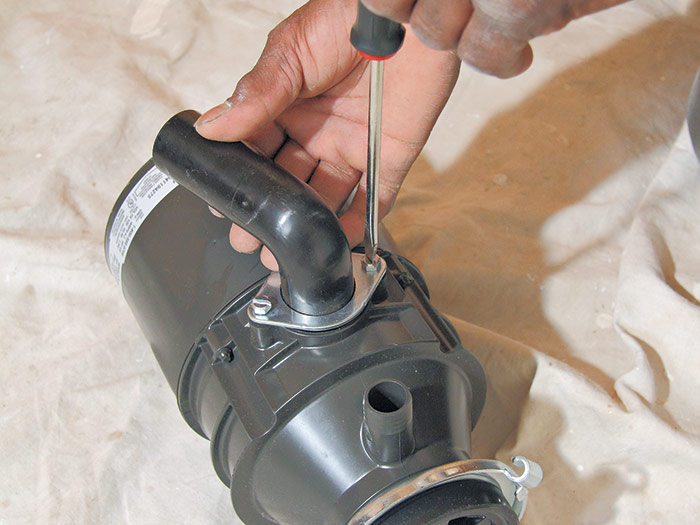
Install Discharge Elbow
Insert the new discharge elbow (included with your disposal) into the unit. Ensure the rubber gasket seats properly before tightening. Tighten side screws firmly but don’t force them, as this can warp the housing and cause leaks.
Remove Dishwasher Plug
Only if connecting dishwasher: Use a steel punch or wooden dowel to knock out the factory plug. Never use a screwdriver—it can damage the disposal’s internal components. Retrieve the metal plug with tongs and discard it safely where children and pets can’t reach.
Align and Lock Unit
Raise the disposal into the mounting ring with both hands. Align the lower ring’s 3 tabs with the ramps extending from the drain. Turn clockwise until tight. Use a screwdriver in the tabs for final locking, but don’t force it—proper alignment is key to a leak-free seal.
Final Plumbing Connections
Connect Drain Lines
Attach the discharge elbow to your existing P-trap using the provided hardware. Hand-tighten most connections—use wrench only for stubborn fittings. Ensure the P-trap retains water to block sewer gases; a properly sloped trap should hold about 2 inches of water.
Dishwasher Hose Installation
Slide the metal clamp onto the dishwasher drain hose before connecting. Connect hose to the disposal where the plug was removed. Tighten the clamp securely using your screwdriver, but don’t overtighten as this can damage the hose connection point.
Power Connection Options
Plug-In Installation
Most disposals use standard 120V plugs. Ensure your under-sink outlet has GFCI protection for safety—this prevents electrocution if water contacts the outlet. Simply plug in and you’re ready to test. This method requires no electrical expertise and is the safest option for DIYers.
Hardwired Installation
If no outlet exists, hire a licensed electrician. Local codes typically require dedicated circuits for disposals. Never attempt electrical work beyond your skill level—improper wiring can cause fires or void your home insurance. The few extra dollars for professional installation provide peace of mind and code compliance.
Test Your New Disposal
Initial Test Sequence
- Run cold water into the sink for 10 seconds
- Restore power at the circuit breaker
- Plug in disposal (if applicable)
- Flip the wall switch
- Listen for smooth operation—grinding sounds indicate problems
- Inspect all connections for leaks while running water
Leak Detection Check
Run water for 2-3 minutes while checking beneath the sink. Tighten any loose connections immediately. A properly installed disposal should remain completely dry underneath. Place paper towels under connections to spot even minor drips that might be hard to see.
Common Installation Mistakes
Avoid These Errors
- Over-tightening screws—causes cracks and leaks that appear days later
- Skipping dishwasher plug removal—floods dishwasher during next cycle
- Forgetting to remove old putty—prevents proper sealing and causes leaks
- Using hot water during testing—can damage new unit’s components
Troubleshooting Quick Fixes
- Unit won’t turn on: Check GFCI reset button on under-sink outlet
- Leaks from top: Tighten mounting ring screws evenly in a star pattern
- Dishwasher backs up: Ensure plug was fully removed and hose is elevated
Maintain Your Disposal
Daily Best Practices
- Always use cold water when grinding—solidifies grease for easier disposal
- Run water 30 seconds after use—flushes remaining particles from pipes
- Avoid fibrous foods like celery or corn husks that can tangle blades
- Grind citrus peels weekly—naturally cleans and deodorizes the unit
Monthly Deep Clean
Fill disposal with ice cubes and coarse salt. Run without water for 10 seconds, then flush with cold water. This sharpens blades and removes buildup without harsh chemicals. For stubborn odors, grind baking soda followed by vinegar for a natural cleaning reaction.
When to Call Professionals
Contact a plumber if you encounter:
– Electrical work beyond plug-in connection—safety risks are too high
– Galvanized steel pipes requiring special tools for cutting and threading
– Double-bowl sinks with complex drain configurations and shared traps
– Persistent leaks after multiple tightening attempts indicating improper fit
Your new garbage disposal is now ready for years of reliable service. Cold water, proper food waste management, and regular cleaning will keep it running smoothly. Enjoy your odor-free, clog-resistant kitchen sink and the satisfaction of a DIY project well done!

