
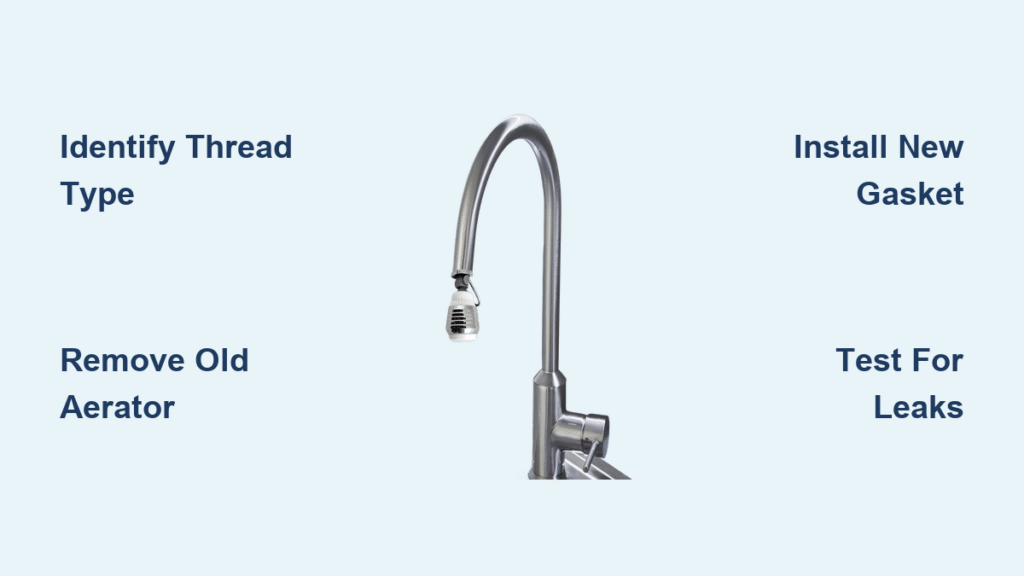
Your kitchen faucet barely dribbles water or sprays everywhere when you turn it on. Nine times out of ten, the culprit is a clogged or damaged aerator—the small screen attachment at your faucet’s tip. Replacing this $5 part takes less than 10 minutes and instantly restores proper water flow while cutting your water bill. Ignoring this simple fix wastes up to 500 gallons of water monthly in hard water areas—money literally going down the drain.
This guide walks you through the exact steps to swap out your aerator, whether it’s hand-tight or stubbornly stuck, plus how to pick the right replacement the first time. You’ll learn to identify your specific aerator type, remove even the most corroded models safely, and install a new one without damaging your faucet’s finish. No plumbing experience needed—just your hands and a few basic household items.
Identify Your Aerator Type Before Buying Replacement
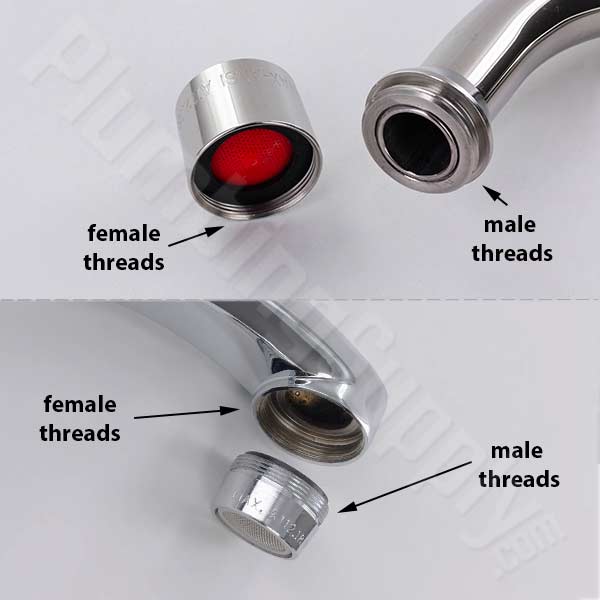
Male vs Female Thread Patterns Decoded
Examine your faucet tip closely. If you see distinct grooves on the outside surface, you need a female aerator that screws over these external threads. If you see grooves inside the faucet opening, you require a male aerator that screws into these internal threads. Confusing these types creates leaks or prevents installation. The knowledge base confirms 15/16″ male threads pair with 55/64″ female aerators, while 13/16″ male threads need 3/4″ female models.
Size Check Without Specialized Tools
Grab two coins from your pocket before heading to the hardware store. Hold a nickel over the faucet opening—if it completely covers the spout, you need a regular-size aerator. If a dime covers it, you require a junior-size model. This foolproof method prevents mismatched purchases since regular sizes fit most kitchen faucets while junior sizes typically serve bathroom fixtures. Always bring your old aerator when shopping for exact matches.
Flow Rate Selection for Your Needs
Choose your GPM (gallons per minute) rating based on household priorities. A 1.0 GPM aerator maximizes water conservation for eco-conscious households but may feel underpowered for filling pots. The 1.5 GPM model balances savings with performance—ideal for most kitchens and the industry standard. Select 2.0+ GPM only if you prioritize high pressure for large pots, though this sacrifices water-saving benefits. Note that newer faucets often ship with 1.8 GPM restrictors to comply with environmental regulations.
Gather Required Supplies for Flawless Installation
Essential toolkit for every homeowner:
– Correct replacement aerator (matched to your faucet’s thread and size)
– Fresh neoprene gasket (always included with new aerators)
– Hand towel or washcloth (for grip and workspace protection)
For problematic situations:
– Adjustable wrench (use only as last resort to avoid scratching)
– Flathead screwdriver (for aerators with internal notches)
– Specialized aerator removal tool (critical for recessed “cache” designs)
Pro-prep additions:
– Teflon tape (prevents leaks on male-threaded faucets)
– White vinegar solution (cleans mineral deposits from old parts)
– Small bowl (catches disassembled components)
Prepare Your Workspace to Avoid Costly Mistakes
Step 1: Close the sink stopper completely—this is non-negotiable. Losing a tiny aerator down the drain transforms a 10-minute fix into a $150 plumber call to dismantle pipes. Double-check by pouring water into the sink; if it doesn’t drain, you’re protected.
Step 2: Line the sink basin with a folded hand towel. This cushion prevents dropped tools from chipping porcelain and absorbs water drips during removal. Position it under the faucet spout where components will be handled.
Step 3: Ensure both hot and cold handles are fully off. Run a finger under the spout—any warmth indicates residual water that could spray during removal. Wait 30 seconds for pipes to cool completely before proceeding.
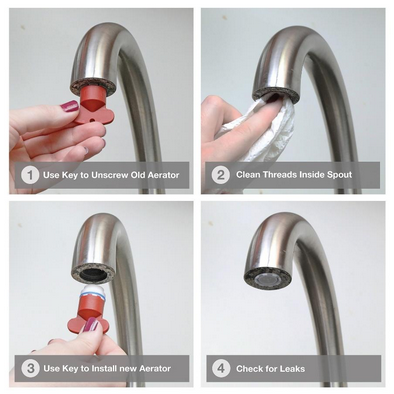
Remove Old Aerator Safely Without Damaging Faucet
Standard External Aerators: Simple Finger Removal
Step 1: Grip the aerator’s knurled collar (the ridged section) firmly between thumb and forefinger. Avoid touching the decorative finish.
Step 2: Rotate counterclockwise with steady pressure. Over 80% of aerators unscrew by hand within 3-5 full turns—no tools needed. Listen for the “click” as threads disengage.
Step 3: If resistance occurs, wrap a damp washcloth around the collar. The added friction prevents slipping while the cloth’s texture protects chrome or brushed nickel finishes from scratches.
Recessed or Hidden Aerators: Accessing Tricky Designs
Step 1: Shine a flashlight into the faucet opening. Look for two small notches (like screwdriver slots) around the inner rim—these indicate a recessed aerator.
Step 2: Insert a flathead screwdriver tip into one notch. Apply gentle upward pressure while turning counterclockwise. Never force it; slight wiggling often breaks corrosion free.
Step 3: For modern “cache” aerators hidden inside the spout, use the specialized removal tool that came with your faucet. Most universal tools have double-pronged ends that fit common notch patterns—insert and turn counterclockwise.
Stubborn Aerator Removal: Last-Resort Solutions
Step 1: Spray penetrating oil (like WD-40) around the thread junction. Wait exactly 10 minutes—longer risks oil contaminating drinking water.
Step 2: If using pliers, cover the aerator body with electrical tape first. Grip only the metal housing (never the faucet spout) and turn slowly counterclockwise in quarter-turn increments.
Step 3: Stop immediately if you feel metal grinding—this indicates stripped threads. Forced removal here requires professional repair. Most aerators yield with patient, incremental pressure.
Install New Aerator Correctly for Leak-Free Performance
Thread Preparation: Critical First Step
Step 1: Scrub faucet threads with an old toothbrush to remove mineral deposits or old Teflon tape fragments. Skip this and debris will cause immediate leaks.
Step 2: For male-threaded faucets (external grooves), wrap 2-3 layers of Teflon tape clockwise around threads. Start at the second thread from the tip—the first thread acts as a sealant stop. Female-threaded faucets skip this step entirely.
Assembly Process: Avoiding Costly Errors
Step 1: Discard the old rubber gasket immediately—reusing it guarantees leaks. New aerators always include fresh neoprene gaskets.
Step 2: Place the new gasket into the aerator collar with the flat side down. It should sit flush without wrinkles; pinched gaskets are the #1 cause of post-installation leaks.
Step 3: Insert the aerator with the mesh screen facing downward toward the sink. Reversing this creates splashing and reduced flow.
Step 4: Hand-tighten clockwise until resistance increases. Stop at “firm finger-tight”—overtightening cracks plastic housings. Never use pliers for final tightening; your palm strength is sufficient.
Step 5: Test for leaks by running water for 30 seconds. If seepage occurs, dry threads completely and tighten an additional 1/8 turn by hand only.
Test and Troubleshoot Like a Professional Plumber
:max_bytes(150000):strip_icc()/removing-a-faucet-aerator-2718836-hero-01d87b8d7dd942ce8a8eee99f555781f.jpg)
Performance Check: What Success Looks Like
After installation, verify three critical indicators: A steady, non-pulsating stream confirms proper water flow without air gaps. Water should reach the sink’s center point without splashing the basin edges. Most importantly, threads must stay completely dry after 30 seconds of running water—any moisture indicates improper sealing.
Common Issues Quick-Fix Guide
Leaking threads: Immediately turn off water, dry components, add one more Teflon tape layer, and reinstall. Never apply tape over existing tape.
Low pressure: Unscrew aerator and check for packaging debris in the screen. Rinse under running water while gently brushing with an old toothbrush.
Uneven flow: Remove and inspect the gasket—it’s likely folded or misaligned. Replace with the spare gasket if provided.
Wrong size: Compare old and new aerator diameters side-by-side. Junior sizes (dime-fit) are 1/8″ smaller than regular (nickel-fit)—return mismatches immediately.
Maintain Your New Aerator for Long-Term Performance
Monthly Quick Clean: 60-Second Refresh
Unscrew the aerator during routine sink cleaning. Rinse the screen under warm running water while rubbing with your thumb—this removes 90% of mineral buildup. Reinstall within 2 minutes to prevent losing components. Perform this after using vinegar-based cleaners that accelerate mineral deposits.
Deep Clean Schedule for Hard Water Areas
Every 6 months in hard water zones:
1. Soak disassembled parts in 50/50 white vinegar and water for exactly 2 hours (longer damages neoprene gaskets)
2. Scrub screens with a soft-bristled toothbrush—never metal brushes
3. Rinse under cold water for 30 seconds to remove vinegar residue
4. Reassemble with new gasket before reinstalling
Replacement Timeline Based on Water Quality
- Soft water households: Replace aerators every 4-5 years (mineral buildup is minimal)
- Moderate hard water: Swap every 2 years to maintain flow
- Severe hard water: Install new aerators annually—when vinegar soaks no longer restore flow, replacement is urgent
- Immediate action: If water pressure drops suddenly after cleaning, internal cracks require replacement
Pro Tips for Foolproof Aerator Replacement
Keep your old aerator in a labeled baggie with your new spares—it’s the perfect size reference for future purchases, especially with proprietary faucet brands like Moen or Delta.
Buy three replacements at once when finding the correct match. Having spares prevents multiple hardware store trips during kitchen emergencies.
Check whole-house water pressure if new aerators clog within weeks—pressure exceeding 80 PSI requires a professional pressure regulator installation.
Use the two-person method for shutoff valves: Have someone slowly turn water back on while you monitor threads for leaks—this prevents flooding during test runs.
Replacing your kitchen faucet aerator transforms frustrating dribbles into satisfying water flow while saving hundreds of gallons annually. By following these precise steps, you’ll extend your faucet’s lifespan, reduce splashing, and maintain optimal water pressure—all for less than the cost of a latte. Keep spare aerators and gaskets in your junk drawer for instant fixes when the next clog inevitably strikes. Within 10 minutes, you’ll restore peak kitchen functionality with professional results that last years.

