
Smoke billows across your kitchen every time you fry spices, and that stubborn grease film coats your cabinets despite daily wiping. When your kitchen chimney not working properly, simple cooking becomes a frustrating battle against lingering odors and airborne oil. This guide cuts through the confusion with precise troubleshooting steps to diagnose why your chimney isn’t performing and how to restore powerful suction—saving you from costly service calls and smoky cooking sessions.
Most chimney failures stem from three core issues: clogged airflow paths, electrical problems, or installation defects. You’ll learn exactly where to look first based on your specific symptoms—from dead motors to weak suction to alarming rattles. By the end of this guide, you’ll confidently tackle common repairs and know precisely when to call in a professional.
No Power or Motor Failure Signs
Complete Power Loss with Zero Response
When your kitchen chimney not working shows no signs of life—not even indicator lights—start with your home’s electrical system. Visit your circuit breaker panel immediately; chimneys often share circuits with high-draw appliances like microwaves. A tripped breaker might be the simple culprit. If your breaker appears fine, inspect the chimney’s power cord where it connects to the unit—heat damage or frayed wires commonly occur at this stress point.
Critical check: Verify voltage at the terminal block using a multimeter set to AC. You should read 220-240V between live and neutral wires. If power reaches the unit but nothing happens, your internal fuse may have blown—a common safeguard against electrical surges.
Motor Humming Without Rotation

That familiar low buzz with no fan movement signals capacitor failure in most chimneys. The capacitor provides the initial jolt needed to start the motor, and when it swells or leaks electrolyte, the motor can’t overcome inertia. Look for visible bulging on the cylindrical component near your motor housing—it should be perfectly round with no discoloration.
Pro tip: Before replacing, test capacitance with a multimeter. If the reading drops below 80% of the rated value (typically 2-6 µF for chimneys), install an exact replacement. Using the wrong specification risks damaging your motor windings.
Weak Suction Troubleshooting
Filter Clogging That Chokes Airflow
Grease buildup on filters creates an invisible barrier that strangles suction. Baffle filters develop hardened layers in their folds, while mesh filters trap fine oil particles between aluminum strands. Hold your filters up to light—if you can’t see through them clearly, they’re severely clogged and need immediate cleaning.
Cleaning shortcut: For stainless steel baffle filters, mix 2 liters hot water with 50ml dish soap and 30g baking soda. Soak for 30 minutes, then scrub with a nylon brush (never steel wool). Aluminum mesh filters respond better to a solution of boiling water, vinegar, and baking soda—the chemical reaction breaks down stubborn grease.
Ductwork Blockages You Can’t See
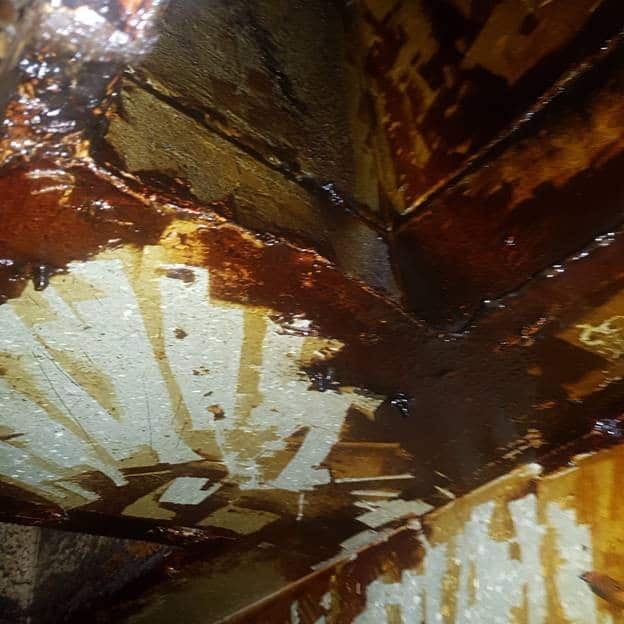
Long horizontal duct runs and sharp 90° bends become grease traps over time. Peer into your duct with your phone’s flashlight to check for shiny, brown grease films coating the interior. A simple test: crack open a kitchen window while running your chimney. If suction improves dramatically, your room lacks adequate air supply to replace what the chimney extracts.
Warning: Never reduce duct diameter—using a 4-inch duct on a 6-inch chimney outlet chokes performance by up to 60%. Maintain consistent sizing throughout your ventilation path.
Noise and Vibration Fixes
Rattling Panels from Loose Components
That annoying vibration usually comes from loose mounting screws allowing sheet-metal panels to resonate. Tighten all visible screws while the chimney runs on low speed—you’ll hear the rattle stop when you hit the right component. Pay special attention to motor mounts and damper brackets, which endure constant vibration.
Expert note: If tightening doesn’t solve it, check your fan balance. Mark one blade with tape and run the chimney briefly. If the vibration pattern shifts, that blade has uneven grease buildup. Clean thoroughly or use balancing clips designed for chimney impellers.
Grinding Noises From Worn Bearings
Metallic grinding that intensifies with runtime points to failing motor bearings. Unlike temporary rattles, this sound won’t improve with simple adjustments. Test bearing condition by trying to wiggle the fan shaft—if there’s noticeable play, the bearings have worn beyond repair. At this stage, replacement is safer than repair for most homeowners.
Smoke Leakage Solutions
Finding Hidden Duct Leaks
Smoke escaping around your chimney often traces back to disconnected duct joints or cracked flexible tubing. Perform a smoke pellet test: Light a pellet inside the hood cavity and watch for smoke seeping from duct connections, wall penetrations, or cabinet gaps. Pay special attention to joints where flexible duct meets rigid pipe—these frequently separate over time.
Sealing solution: Use aluminum foil tape rated for 150°C—regular duct tape melts under chimney operating temperatures. Apply generously over all suspect joints, smoothing out air bubbles for maximum adhesion.
Damper Malfunctions Causing Backdrafts
A stuck back-draft damper forces smoke back into your kitchen even with strong suction. Verify damper movement by running your chimney while observing the external vent. The flaps should open fully during operation and close tightly when off. If they stick, apply food-grade silicone grease to the hinges annually—never use petroleum-based lubricants that attract more grease.
Preventative Maintenance Schedule

Filter Cleaning Frequency Based on Cooking Habits
Your filter maintenance needs depend entirely on how often you cook:
– Light users (1-2 times weekly): Clean filters monthly
– Regular cooks (3-5 times weekly): Clean filters every 2 weeks
– Heavy users (daily frying/tadka): Clean filters weekly
Critical reminder: Never reinstall damp filters—moisture causes corrosion on metal components. Allow at least 24 hours drying time after cleaning.
Professional Cleaning Thresholds
While you can handle routine filter maintenance, professional duct cleaning becomes essential when:
– You notice grease dripping from the chimney
– Suction decreases despite clean filters
– You detect a persistent burning smell during operation
Cost-benefit analysis: Professional cleaning costs ₹1,500-3,000 but prevents dangerous grease buildup that could fuel a kitchen fire. For heavy Indian cooking households, schedule professional duct cleaning every 6-12 months.
When to Call Professionals
DIY-Safe Repairs vs. Expert-Only Jobs
Handle yourself: Filter cleaning, capacitor replacement, external vent inspection, screw tightening, and basic duct sealing.
Call a pro: Internal ductwork inside walls, roof vent modifications, electrical rewiring, or motor rewinding. If you smell burning insulation or see scorch marks near wiring, shut off power immediately and contact a professional.
Red flag: If your chimney worked fine after a recent power outage but now fails, the control board likely needs replacement—a job requiring precise component matching that most homeowners shouldn’t attempt.
Final Maintenance Checklist
Set recurring calendar reminders for filter cleaning based on your cooking frequency—your future self will thank you when smoke disappears instantly during cooking. The difference between a chimney lasting 15 years versus just 5 years comes down to consistent maintenance. Keep spare filters on hand so you’re never tempted to cook with clogged ones.
For Indian cooking households that regularly use deep-frying and tempering techniques, maintaining strong chimney performance isn’t just about comfort—it’s essential for protecting your kitchen surfaces from permanent grease damage. By following these targeted troubleshooting steps, you’ll keep your kitchen fresh, your walls clean, and your chimney working efficiently for years to come.

