
That acrid smoke every time you preheat? The stubborn cheese crust welded to your oven floor after last night’s lasagna? You’re not alone—most home ovens accumulate months of baked-on grease and food residue that compromise cooking performance and create fire hazards. When your oven becomes a science experiment every time you turn it on, it’s time for action. This guide cuts through the confusion with four proven methods to deep-clean your oven using pantry staples or built-in cycles. You’ll learn exactly how to tackle burnt spills, restore glass clarity, and prevent future disasters—all without harsh chemicals.
Whether you’re facing a decade of neglect or just want to maintain your appliance, these techniques work for gas, electric, and convection ovens. Forget toxic fumes from commercial sprays; we’ll leverage baking soda’s gentle abrasion, vinegar’s dissolving power, and steam’s penetrating heat. In just 15 minutes to 24 hours (depending on your mess level), you’ll eliminate odors, improve food flavor, and extend your oven’s lifespan. Most importantly, you’ll never dread preheating again.
Prep Your Oven for Deep Cleaning
Skipping prep guarantees frustration and wasted effort. Start by removing every removable item: racks, pizza stones, thermometers, and that mystery pan hiding in the warming drawer. Set racks aside for separate cleaning—baking them in your bathtub prevents cross-contamination with oven interior work. Always verify your oven is completely cool before starting; electric models need heating elements powered off, while gas ovens require confirmation that pilot lights aren’t exposed during cleaning.
Essential Safety Checklist
- Ventilate aggressively: Turn on exhaust fans and open two windows minimum—fumes from baked-on grease can trigger headaches
- Protect surfaces: Lay towels along the counter to catch runoff during paste application
- Gear up: Wear rubber gloves to prevent skin irritation from alkaline baking soda mixtures
- Clear the zone: Remove pets (especially birds) from the kitchen during steam or self-clean cycles
Tool Selection by Method
| Cleaning Approach | Must-Have Supplies | Time-Saver Tip |
|---|---|---|
| Baking soda/vinegar | Plastic scraper, vinegar spray bottle, microfiber cloths | Use old toothbrush for crevices around door seals |
| Self-cleaning cycle | None | Wipe interior with damp cloth before starting to reduce smoke |
| Steam cleaning | Oven-safe pot, lemons/vinegar | Microwave the water-lemon mix first to accelerate steam production |
Natural Baking Soda Method (12-Hour Deep Clean)

This chemical-free approach transforms stubborn carbonized spills into wipe-away residue through alkaline reaction. Baking soda’s mild abrasiveness lifts grime without scratching enamel, while vinegar neutralization prevents white film. It’s ideal for ovens with heavy buildup where scrubbing alone fails.
Paste Application That Actually Works
Mix ½ cup baking soda with 3 tablespoons water until you achieve toothpaste-like thickness—too runny, and it drips; too dry, and it won’t adhere. Apply gloved-handed in quarter-sized sections, focusing on the oven floor and door interior where drips bake hardest. Avoid heating elements entirely; paste near them can cause sparking. As it contacts grease, the paste turns brown and forms lumpy patches—that’s the reaction breaking down months of residue.
Critical Dwell Time Mistakes to Avoid
Leaving the paste for less than 12 hours guarantees incomplete results. For decade-old buildup, extend to 24 hours but never exceed 48 hours (dried paste becomes harder to remove). During this phase, the baking soda draws moisture from the air, creating a slow-acting chemical reaction that dissolves bonds between burnt food and oven surfaces. Pro tip: Place a bowl of vinegar near the oven overnight to neutralize lingering odors.
Self-Cleaning Cycle (Hands-Off Method for Modern Ovens)
This built-in feature uses extreme heat (800–1000°F) to incinerate grime into ash—perfect for those who want zero scrubbing. But it’s not foolproof: older ovens (20+ years) often trigger smoke alarms, and improper prep causes toxic fumes. Only attempt this if your manual confirms compatibility.
Avoiding the Smoke Alarm Disaster
Remove all racks first—metal warps at these temperatures, causing permanent discoloration. Sweep loose crumbs with a dry cloth; even small particles create excessive smoke. For models with bottom drawers, empty them completely. Start the cycle early in the day with exhaust fans running full blast, and keep pets (especially birds) in another room—fumes can be fatal to sensitive respiratory systems.
When to Cancel the Cycle Immediately
If smoke thickens beyond a light haze or odors become acrid (not just “burnt food” smell), cancel the cycle. This usually means large grease deposits are smoldering instead of incinerating cleanly. Never leave the house during operation—older ovens may overheat components. After completion, wait until the door unlocks automatically (typically at 200–500°F) before wiping ash with a vinegar-water solution.
Steam Cleaning with Lemons (1-Hour Quick Fix)
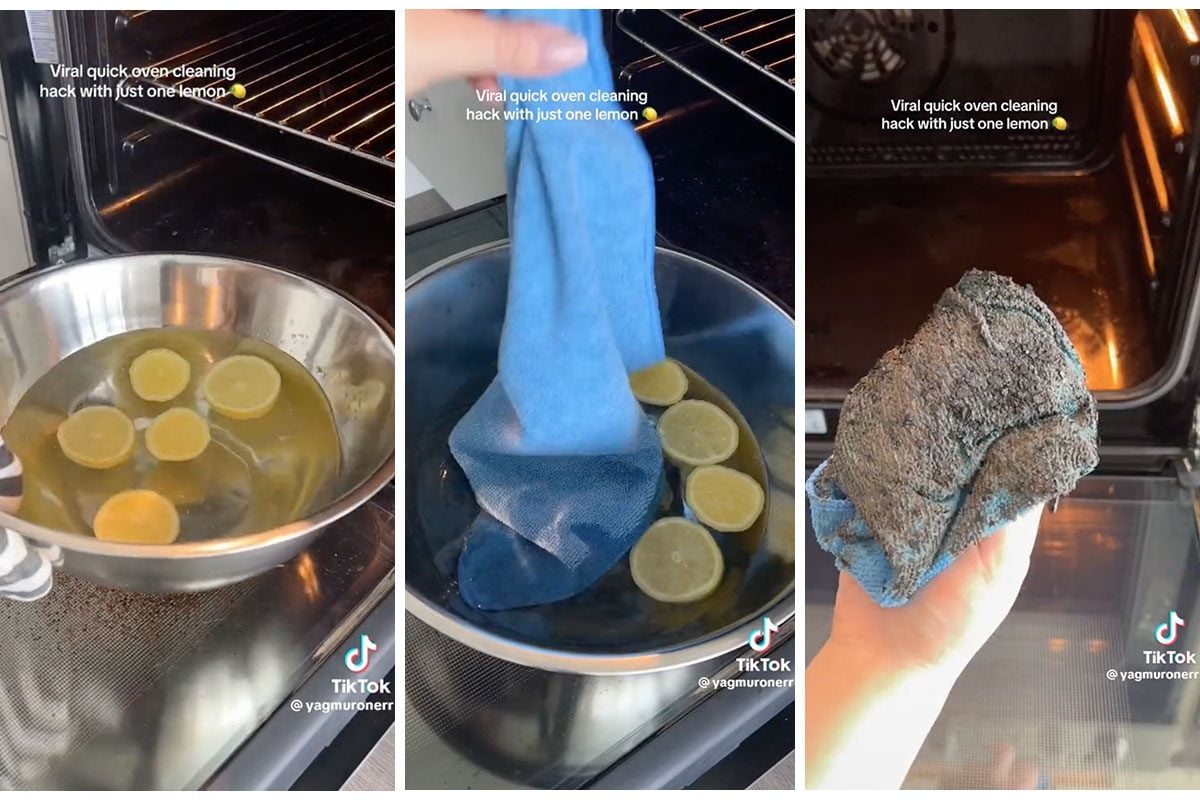
When you need results before dinner, citrus steam softens grime fast. The citric acid in lemons breaks down grease bonds, while steam penetrates microscopic pores in baked-on spills. This method won’t tackle decade-old buildup but excels for monthly maintenance.
Turbocharged Steam Technique
Simmer 3–4 quartered lemons in 1 cup water for 15 minutes until rinds soften. Transfer the pot carefully to your oven’s center rack using oven mitts. Close the door immediately and maintain heat for 60 minutes—any less and steam won’t penetrate deeply. Afterward, open the door slowly; you’ll see grime lifting like peeling wallpaper. Wipe with microfiber cloths using downward strokes to avoid redepositing residue. For stubborn spots, scrape at a 15-degree angle with a plastic razor blade.
Tackle Stubborn Spots and Problem Areas
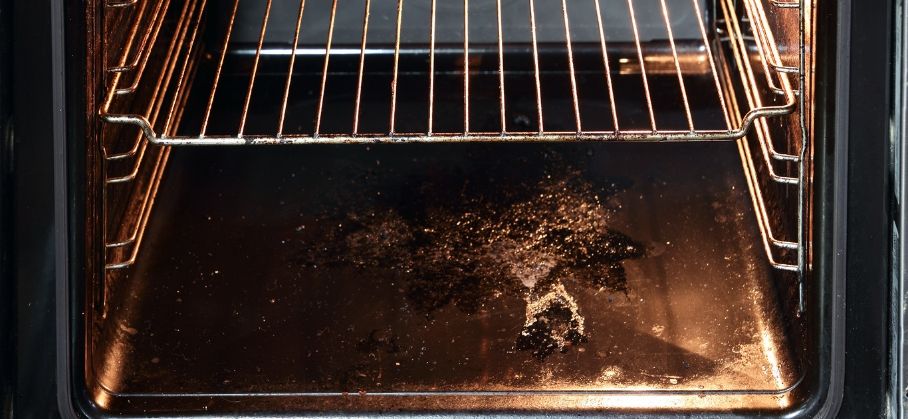
Certain zones demand targeted treatment. Oven floors collect molten cheese and oil drips that carbonize into rock-like layers, while glass doors develop cloudy films from sugar splatters.
Burnt Cheese Floor Rescue
Create a paste with ¼ cup baking soda and 1 teaspoon water (thicker than standard). Apply directly to the disaster zone, then lay a damp paper towel over it to lock in moisture. Let sit 8+ hours—the prolonged contact time dissolves even carbonized spills. Scrape with a plastic putty knife held parallel to the floor to avoid scratching.
Glass Door Clarity Restoration
Sprinkle baking soda directly onto the inner glass until opaque. Mist with water to activate, then wait 45 minutes. Scrub in small concentric circles with a non-scratch pad—never use steel wool on oven glass. Finish by wiping with 1:1 vinegar-water solution on a microfiber cloth to eliminate streaks. For tinted glass, skip vinegar (acid can etch) and use only baking soda paste.
Safety Warnings That Matter
Why Chemical Cleaners Are a Trap
Commercial oven sprays contain sodium hydroxide (lye), which releases toxic fumes when heated later. These residues absorb into food during cooking—studies show they alter taste and pose ingestion risks. Baking soda and vinegar leave zero harmful residues, making them safe for immediate post-cleaning use.
Aluminum Rack Discoloration Fix
If your racks turned gray after baking soda cleaning, they’re aluminum (common in older ovens). Soak in a solution of 1 cup cream of tartar per gallon of water for 2 hours. The mild acid reverses oxidation without damaging metal. Never use this on stainless steel racks—stick to baking soda soaks.
Prevention and Maintenance Strategy
Stop deep cleans from becoming quarterly marathons. Line your oven floor with crumpled foil (never smooth—it blocks vents) or reusable silicone liners. Place a baking sheet on the lowest rack when roasting meats to catch drips. Most crucially: wipe spills immediately after the oven cools enough to touch. Fresh grease lifts with one vinegar spray; baked-on requires hours of effort.
Your Oven Cleaning Schedule
- After every messy meal: Quick wipe with vinegar-water spray once cool
- Monthly: 15-minute steam refresh with lemon-water pot
- Quarterly: Full baking soda treatment for heavy-use households
- Biannually: Self-clean cycle (if oven model supports it)
Quick Reference Cleaning Schedule
Your oven’s condition depends entirely on usage patterns. For families roasting weekly or baking sugary desserts, deep clean every 3 months. Light users (toasting or reheating) can stretch to 6 months. Always spot-treat spills within 24 hours—delayed cleanup turns minor messes into permanent fixtures.
The moment your oven starts smoking during preheat or leaves bitter flavors in food, it’s screaming for attention. You now have the exact steps to transform that disaster zone using methods proven safe for your health and appliance. Start with the 1-hour steam method for light buildup, escalate to baking soda for moderate grime, and reserve self-cleaning for extreme cases. Within a single weekend, you’ll reclaim an oven that heats evenly, cooks cleanly, and makes you proud to open the door. The real victory? Knowing your next lasagna won’t taste like last year’s.

