

Your kitchen table handles more germ traffic than any other surface in your home. Every meal, craft project, and homework session leaves behind invisible threats—Salmonella from raw chicken, E. coli from unwashed produce, or norovirus from sick family members. Left unchecked, these pathogens can turn your dining area into a breeding ground for foodborne illness. The solution? A simple five-step disinfection protocol used by commercial kitchens worldwide. This proven method takes just minutes but creates a food-safe surface that protects your family from preventable sickness.
Most homeowners make the critical mistake of confusing cleaning with disinfecting. Wiping away crumbs and sticky spots only removes visible dirt—you need proper disinfection to eliminate dangerous microorganisms. Following the exact sequence restaurants use ensures your kitchen table becomes a true food-safe zone rather than a hidden hazard. Let’s break down the professional approach that keeps your family safe at every meal.
Skip This Step and Risk Food Poisoning
Why Soap Alone Won’t Kill Dangerous Pathogens
Many home cooks believe a quick wipe with soapy water makes their table safe—but this only creates a false sense of security. Soap removes visible grime and grease, but it doesn’t destroy harmful bacteria like Salmonella, Listeria, or E. coli. These pathogens can survive on surfaces for days or even weeks, waiting for your next sandwich to make you sick.
Critical warning: Never skip the disinfection step after handling raw meat, eggs, or unwashed produce. Just one contaminated cutting board placed on your table can spread enough bacteria to cause severe illness. The CDC estimates foodborne illnesses sicken 48 million Americans annually—many from improperly cleaned surfaces.
Execute the Professional 5-Step Disinfection Protocol
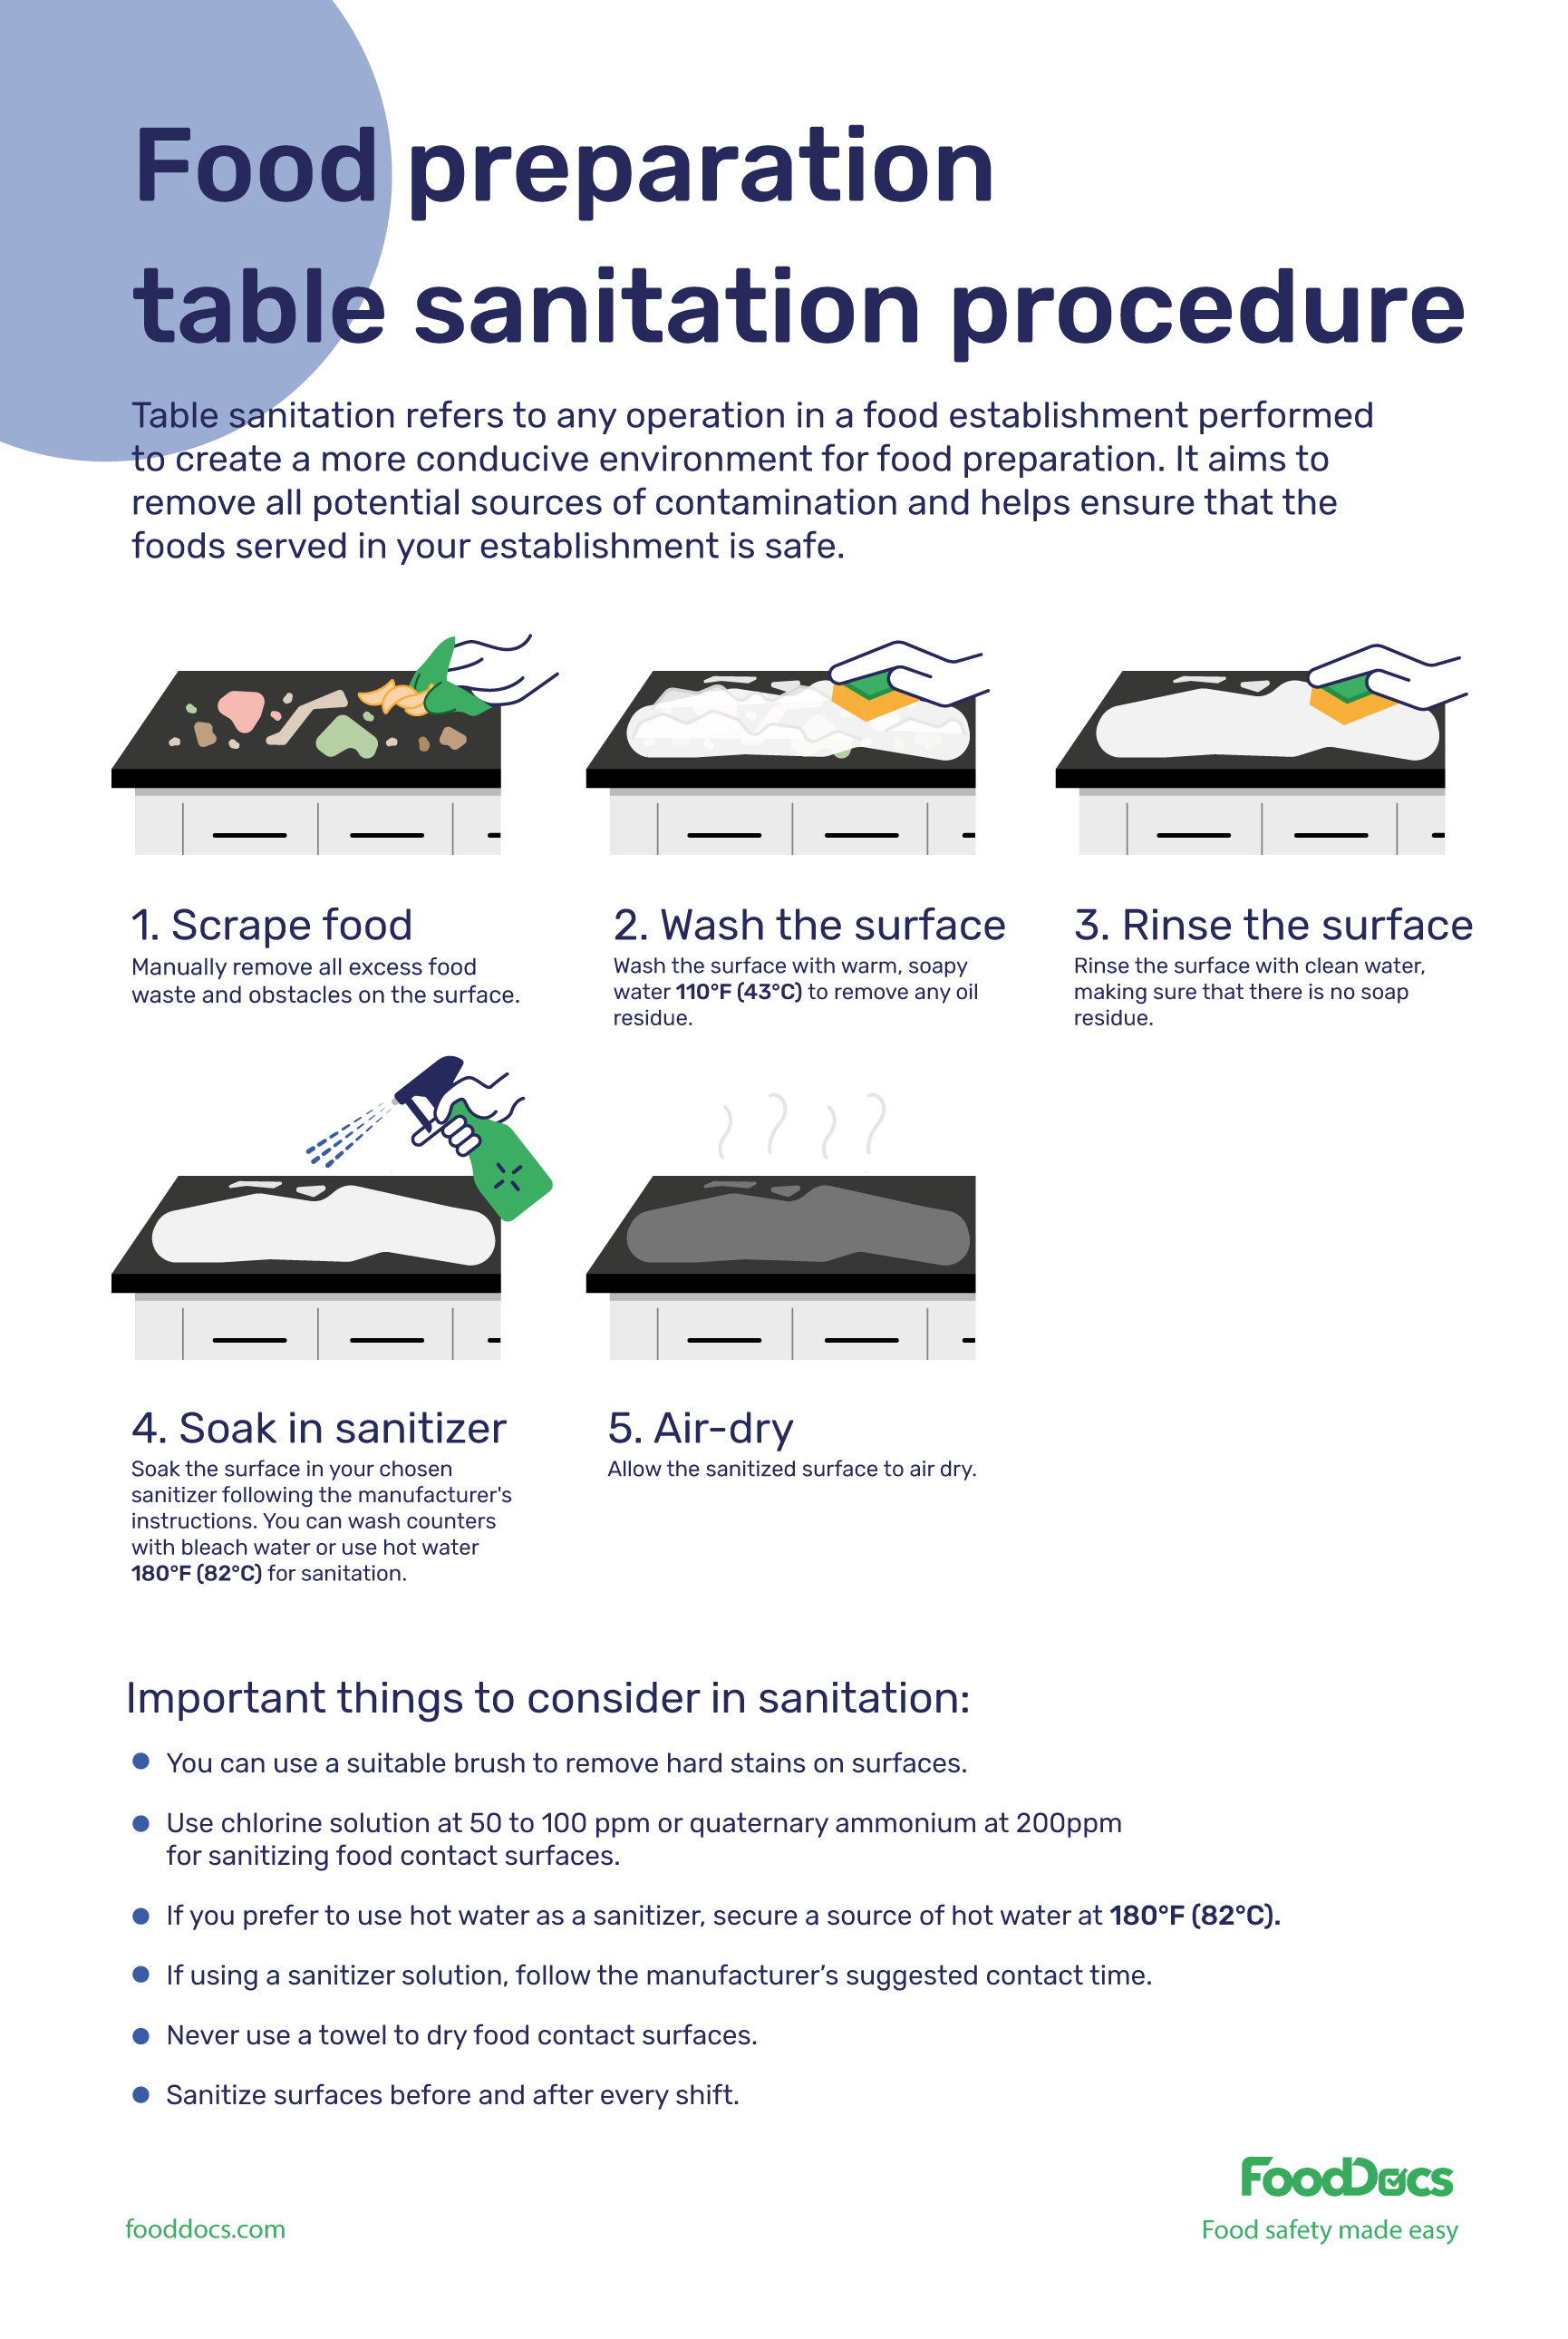
Clear Debris Without Spreading Contamination
Begin by removing all items from your table—dishes, placemats, even that stack of mail. Use a dry microfiber cloth to sweep crumbs directly into the trash. Never blow crumbs off the table—this aerosolizes bacteria into the air you breathe. For stubborn debris, use a handheld vacuum with a brush attachment to lift particles without scratching your surface.
Pro tip: Keep color-coded microfiber cloths under your sink—red for cleaning, blue for disinfecting. This prevents cross-contamination between steps.
Wash with Soap and Water Correctly
Mix warm water with a few drops of mild dish soap in a bucket. Dip your cleaning cloth, wring until damp (not dripping), and wash the entire surface using circular motions. Pay special attention to edges where sticky residues accumulate. For wood tables: Always follow the grain direction to prevent damaging the finish.
Critical mistake to avoid: Using excessive water on wood surfaces. Standing water can seep into seams and cause warping or mold growth beneath the surface.
Rinse Properly to Boost Disinfectant Effectiveness
Use a fresh cloth dampened with clean water to remove all soap residue. Change rinse water if it becomes cloudy—dirty rinse water redeposits grime. Why this matters: Soap film creates a barrier that prevents disinfectants from contacting pathogens. Incomplete rinsing reduces killing power by up to 90%.
Visual cue: Run your hand across the surface—it should feel smooth, not slippery. Any slipperiness means residual soap remains.
Apply Disinfectant with Exact Contact Time
Choose your disinfectant based on table material (see surface-specific recommendations below). Spray or wipe solution onto the surface, ensuring complete coverage including edges and legs. Here’s what most people get wrong: wiping it off too soon. Your disinfectant needs full contact time to kill pathogens—typically 30 seconds to 10 minutes depending on the product.
Critical reminder: Never spray disinfectant directly onto food or near open flames. Maintain proper ventilation during application.
Air Dry Without Recontamination
This final step is non-negotiable. Don’t use a towel to speed-dry—your disinfectant needs this contact time to work. Plan your cleaning sequence so you can let the table air-dry for at least 5-10 minutes. Sign it’s ready: The surface should look completely dry with no visible moisture.
Pro tip: Set a timer for the exact contact time required by your disinfectant. When it dings, your table is food-safe.
Match Disinfectant to Your Table Material
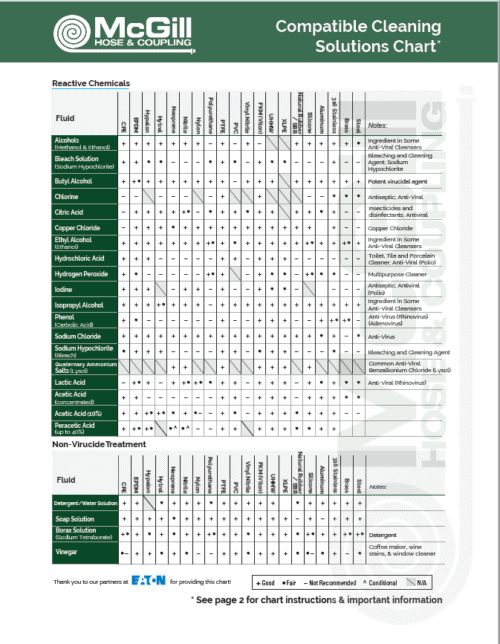
Stainless Steel Tables: Bleach Solution Done Right
For stainless steel surfaces, mix 1 tablespoon unscented household bleach per gallon of water. Apply with a spray bottle, ensuring complete coverage. Contact time: Minimum 1 minute. Warning: Never mix bleach with ammonia or vinegar—this creates toxic chlorine gas. After disinfecting, rinse with clean water if your table will contact food immediately.
Wooden Tables: Vinegar Solution That Won’t Damage Finish
Combine equal parts white vinegar and water in a spray bottle. Apply to a soft cloth (never directly on wood), then wipe following the grain. Contact time: 5-10 minutes. Critical step: Immediately dry with a clean microfiber cloth to prevent water damage. Monthly application of food-safe wood conditioner like Howard’s Feed-N-Wax maintains protection.
Never use: Undiluted bleach or excessive moisture—these strip finishes and cause warping.
Laminate Tables: Formula 409 for Tough Jobs
Laminate handles stronger cleaners. Spray Formula 409 or equivalent onto a cloth, not directly on the surface. For stubborn stains, make a paste of baking soda and water. Moisture control: Wipe dry immediately after disinfecting to prevent water damage at seams. Frequency: Can safely handle daily disinfection.
When to Disinfect: Critical Timing Guide
After Raw Food Contact: Disinfect Immediately
This single habit prevents most home foodborne illnesses. Any time raw meat, poultry, eggs, or unwashed produce touches your table, disinfect before preparing ready-to-eat foods. Time limit: Don’t wait more than 15 minutes—the longer pathogens sit, the more they multiply.
During Illness: Disinfect After Every Use
When someone in your household is sick, increase disinfection frequency. Viruses like norovirus survive on surfaces for weeks. Critical step: Disinfect table legs and chairs too—sick family members touch these repeatedly.
Weekly Deep Clean: Non-Negotiable Maintenance
Even with daily cleaning, schedule a thorough disinfection weekly. This catches pathogens missed during routine wiping. Best time: Sunday evening before the new week begins.
Fix These Common Disinfection Mistakes Now

Sticky Residue Removal That Works
That mysterious stickiness comes from dried disinfectant or soap film. Fix it by:
1. Applying warm, soapy water for 2-3 minutes
2. Gently scrubbing with a soft cloth
3. Rinsing thoroughly
4. Reapplying proper disinfectant
Warning: Never use steel wool or abrasive pads—they create microscopic scratches that harbor bacteria.
Cross-Contamination Prevention System
Implement this foolproof method:
– Color-code your cloths: Red for raw food areas, blue for ready-to-eat zones
– Separate spray bottles: Label clearly with contents and mix date
– Designate cleaning zones: Never use the same cloth for counters and tables
Monthly Maintenance That Extends Table Life
Wood Table Care Calendar
- Weekly: Full disinfection protocol
- Monthly: Apply food-safe wood conditioner
- Quarterly: Inspect for water damage or cracks
- Annually: Consider professional refinishing if worn
Critical reminder: Maintain room temperature between 60-80°F and humidity at 35-45% to prevent wood damage.
Disinfection Quick Reference Guide
- Clear completely—no items left behind
- Wash with soap water—follow the grain on wood
- Rinse thoroughly—no slippery residue
- Apply correct disinfectant—match to your table material
- Wait full contact time—set a timer, don’t wipe early
- Air dry completely—no towel drying
Your kitchen table works harder than any surface in your home—it deserves professional-level care. By following this exact five-step protocol used in commercial kitchens, you transform it from a hidden germ factory into a truly food-safe zone. The process takes just minutes but prevents illnesses that could hospitalize your family. Remember: cleaning removes visible dirt, but only proper disinfection destroys the invisible threats lurking on your dining surface. Start implementing these steps today, and you’ll create a safer eating environment with every meal.

