
You pull out your KitchenAid stand mixer on a sweltering summer afternoon, craving creamy homemade ice cream—but that icy texture disaster from last time holds you back. What if you could consistently create gelato-parlor-quality scoops in just 30 minutes? The KitchenAid ice cream maker attachment transforms your mixer into a professional churning machine, but success hinges on precise temperature control and timing. Most home cooks fail because they skip the critical 15-hour bowl freeze or add mix-ins at the wrong moment.
Follow this exact process to avoid icy failures and achieve rich, velvety results every time. You’ll master the science behind custard bases, learn why stir speed is non-negotiable, and discover the exact window for adding cookie dough chunks. Stop wasting ingredients—these proven steps turn your KitchenAid into an ice cream powerhouse.
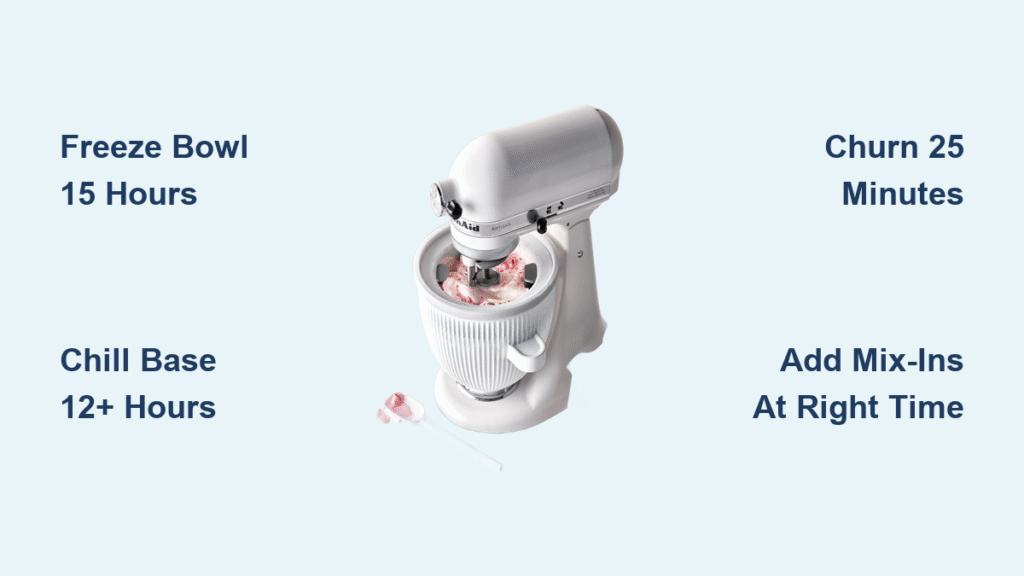
Freeze KitchenAid Bowl 15 Hours for Perfect Texture

Never skip this step—even two minutes at room temperature ruins results. Place your bowl flat against the back wall of your freezer, where temperatures stay coldest and most consistent. The liquid inside needs 14-16 hours to solidify completely; 15 hours is the ideal sweet spot. Test readiness by shaking it: If you hear sloshing, it’s not frozen enough.
Critical storage mistake: Storing the bowl upright displaces the cooling liquid. Always position it horizontally on a freezer shelf. If your freezer runs warm (common in frost-free models), extend freezing to 18 hours. Keep it permanently frozen for spontaneous cravings—spontaneity requires preparation!
Why Shortcuts Fail Every Time
Using the bowl after only 12 hours causes immediate problems:
– Warm batter won’t freeze properly, creating icy crystals
– Low freezer temps (<0°F) compensate for shorter freezes
– Side storage creates uneven cooling pockets
Pro Tip: Store the bowl in a labeled freezer bin with your paddle attachment. This prevents accidental removal and keeps tools ready.
Creamy Vanilla Custard Base Recipe for KitchenAid Maker
This French-style base creates silkier texture than Philadelphia-style (no-egg) recipes. Fat content is non-negotiable: Use heavy cream with 36% fat minimum—substituting half-and-half guarantees icy results. The egg yolks act as natural stabilizers, trapping air for that dreamy melt-in-your-mouth quality.
Ingredients yield 2 quarts (max capacity):
– 4 large egg yolks
– ½ cup granulated sugar (divided)
– 1½ cups whole milk
– 1½ cups heavy cream (36% fat)
– 2 tsp vanilla bean paste
Step-by-Step Custard Preparation
- Whisk yolks + ¼ cup sugar until pale yellow and forming ribbons (2-3 minutes)
- Heat milk, cream, remaining sugar, and vanilla to 165°F—steam rises but no bubbles form
- Temper eggs slowly: Drizzle ½ cup hot mixture into yolks while whisking vigorously
- Thicken custard: Return to low heat, stirring until it coats a spoon (175°F)
- Chill 12+ hours—skipping this causes grainy texture
Batter temperature alert: Your base must be refrigerator-cold (40°F or below) before churning. Warm batter won’t freeze, creating soup instead of ice cream. Never exceed 46 ounces total volume—overflow risks damaging your mixer.
Set Up & Churn Ice Cream in 30 Minutes with KitchenAid
This sequence prevents motor strain and texture failures:
1. Lock frozen bowl onto mixer base (it clicks audibly)
2. Insert paddle attachment—it floats freely; don’t force it
3. Start mixer on STIR speed (Speed 1)—higher speeds warm the bowl
4. Pour cold base slowly through the feed tube while running
Watch These Critical Churn Signs
- 20 minutes: Minimum time (under-churning = icy texture)
- 25-30 minutes: Perfect window for soft-serve consistency
- Stop immediately at 30 minutes (over-churning = dense, buttery texture)
Visual cues beat timers: When the paddle creates distinct ridges and volume doubles, it’s done. The mixture should mound when dropped from a spoon. Never walk away—your mixer sounds different when thickening occurs.
Speed & Volume Mistakes That Ruin Batches
- Using Speed 2+ generates heat, slowing freezing by 40%
- Overfilling past 46 oz causes leaks and uneven churning
- Warm batter adds 10+ minutes to churning time
Pro Tip: Place a towel under the mixer—it vibrates intensely during final minutes.
When to Add Chocolate Chips to KitchenAid Ice Cream Maker

Timing mix-ins wrong turns cookies into dust and fruit into mush. The paddle’s floating design lets you add ingredients mid-churn without stopping—but only at precise moments.
Mix-In Schedule for Perfect Distribution
- 12-15 minutes in: Add nuts, chocolate chunks, or candy bars (ice cream has structure to suspend them)
- Last 2 minutes: Gently fold in cookie crumbles or fresh berries (prevents crushing)
- After churning: Swirl in caramel or brownie pieces with a spatula (preserves air pockets)
Never dump mix-ins while running—they’ll spray out of the feed tube. Briefly pause the mixer, add ingredients, then restart. For swirl effects, layer mix-ins into your storage container instead of churning them in.
Worst Offenders to Avoid
- Liquid syrups added too early (create icy streaks)
- Warm cookie dough (melts and sinks)
- Frozen fruit (shatters the paddle)
Harden Ice Cream After KitchenAid Churning
Your ice cream exits at soft-serve consistency—proper hardening creates scoopable perfection. Transfer immediately to a shallow 9×5-inch loaf pan (deep containers freeze unevenly). Press plastic wrap directly onto the surface to block ice crystals.
Freezing Timeline for Best Results
- 0-2 hours: Too soft for scooping
- 2-3 hours: Ideal firmness (scoops cleanly)
- 4+ hours: Over-hardened (requires 5 minutes thawing)
Storage critical errors: Never leave ice cream in the freeze bowl—it becomes concrete and risks damaging the bowl’s seal. Maximum freezer life is 6 months, but flavor peaks at 2 weeks. For quick serving, store portions in individual ramekins.
Fix Icy KitchenAid Ice Cream in 3 Steps
Icy texture means one of three failures occurred:
1. Bowl wasn’t frozen 15+ hours → Next time, use a freezer thermometer to verify 0°F temps
2. Base was too warm → Chill custard 12+ hours, not 8
3. Churned under 20 minutes → Set timer for full 25 minutes
Urgent rescue for current batch:
– Scoop icy portions into a blender
– Add 1 tbsp heavy cream per cup
– Pulse until smooth, then refreeze 1 hour
Metal utensils cause permanent damage when scraping frozen ice cream. Use a plastic dough scraper—it glides without scratching the bowl’s coating. If ice cream sticks, let it sit 3 minutes at room temperature first.
Chocolate & Fruit Variations for KitchenAid Ice Cream Maker

Modify the vanilla base without compromising texture:
– Double Chocolate: Whisk ½ cup Dutch-process cocoa into dry ingredients before heating
– Strawberry Sorbet: Replace cream/milk with 3 cups pureed strawberries + ½ cup sugar
– Espresso Gelato: Steep ¼ cup coffee beans in warm cream for 20 minutes, then strain
Fat content rules:
– Heavy cream (36% fat): Luxuriously rich (ideal for chocolate)
– Whipping cream (30% fat): Lighter body (best for fruit sorbets)
– Never use skim milk—it lacks fat for smooth texture
For fruit swirls, cook berries with 2 tbsp sugar until jammy, then cool completely before layering into storage containers. Adding liquid fruit purees mid-churn creates icy pockets.
Clean & Store Your KitchenAid Ice Cream Attachment
Thermal shock cracks the bowl if washed while warm. Wait 30 minutes after churning before cleaning. Hand-wash only with warm water—dishwasher heat ruptures the cooling seal. Dry thoroughly with a microfiber towel to prevent ice buildup during storage.
Critical Maintenance Checklist
- Never store wet → Causes freezer burn on next use
- Keep paddle attached → Prevents misplacement
- Store upright → Avoids liquid displacement
- Check seal annually → Replace if cracks appear
This $70 attachment outperforms standalone machines by utilizing your mixer’s powerful motor. It works flawlessly with every KitchenAid stand mixer model—no adapters needed. For spontaneous cravings, keep the bowl frozen 24/7; you’ll be churning mint chip before the ice cream truck arrives.
Master these steps and you’ll never buy store-bought ice cream again. The secret isn’t fancy ingredients—it’s respecting the 15-hour freeze, chilling your base thoroughly, and churning precisely 25 minutes. Your KitchenAid transforms from weekday workhorse to dessert hero with one simple attachment. Now grab those egg yolks and make your first scoop—the perfect summer treat is 30 minutes away.

