

Your kitchen tools are only as good as your technique. Whether you’re struggling to julienne carrots evenly or wondering why your cast iron keeps rusting, this guide transforms everyday frustration into kitchen confidence. Learn the exact grip, angle, and maintenance routine professionals rely on—without culinary school tuition.
You’ll discover how a 15° knife angle beats brute force every time, why your Dutch oven knob might melt tonight’s dinner, and the five-second test that prevents sliced fingers. These aren’t just tips; they’re the non-negotiable standards that separate home cooks from kitchen masters. Stop replacing tools and start mastering them—your next meal depends on it.
Stop Cutting Yourself With Chef’s Knives
Rock-Chop Technique That Prevents Slips
Forget pressing down with force—proper knife work uses physics, not muscle. Grip your chef’s knife so your middle finger touches the bolster while your thumb and index finger pinch the blade just above the handle. This “pinch grip” gives surgical control. Keep your knuckles curled under in a claw shape to guide food, never flat palms.
When chopping onions or herbs, plant the tip firmly on your board and lift the heel only 1–2 cm. Let the knife’s curved belly rock through ingredients with gravity. For proteins like chicken breast, switch to a 10–15° slice-draw motion: one smooth forward glide with almost no downward pressure. This prevents shredding delicate meats.
Pro tip: Your blade length should match your forearm—from wrist to elbow. A too-long knife wobbles; too-short strains your wrist. Always slice toward a stable surface, never over your free hand.
Paring Knife Hacks for Delicate Work
Ditch the chef’s knife for small jobs—overreach causes 68% of kitchen cuts. Use a pencil grip on your paring knife for peeling apples or segmenting citrus. The 8–12° micro-bevel slices through soft strawberries without crushing them. For round produce like tomatoes, reverse your grip with the blade facing you. This lets you peel around curves safely while protecting knuckles.
Critical mistake: Never use a chef’s knife for peeling. The extra blade length increases leverage, turning minor slips into deep cuts. Reserve paring knives for anything smaller than your palm.
Mandoline Slicing Without Stitches
Safety Protocol That Actually Works
Mandoline injuries send 10,000+ people to ERs yearly—but they’re 100% preventable. Before touching food, set your thickness dial to 3 mm for fries or 0.5 mm for paper-thin potatoes. Always use the hand guard; even professionals lose fingertip pads without it. Position your food vertically on the guard, never horizontally.
Slide produce down the ramp with steady pressure—no forcing. Keep blade exposure under 1 mm per pass. After use, pop out the blade cartridge using the thumb-tab release and soak immediately in hot soapy water. Dried starch turns blades into rust traps.
Warning: If you feel resistance, stop immediately. Forcing causes slips. Switch to a chef’s knife for fibrous items like celery root.
Knife Storage That Prevents Drawer Accidents
Magnetic strips aren’t just chic—they’re safer than drawers. Mount yours 18–24 inches long, positioned 1 inch from your backsplash. This keeps blades accessible without knuckle scrapes when reaching. For drawer storage, use a custom tray with slots 0.5 inches wider than blade thickness. Never toss knives loose; one wrong grab means emergency stitches.
Pro move: Store knives blade-up in vertical slots. Horizontal storage dulls edges and risks cuts when retrieving. Always wash knives individually with blade facing away from you—never in a soapy pile.
Measure Like a Pastry Chef (No Guesswork)

Digital Scale Secrets for Perfect Results
Zero your mixing bowl, then hit tare between each ingredient. This avoids dish pileup and guarantees accuracy—critical since 1 cup of flour can weigh 120g (spooned) to 150g (scooped). Check calibration annually with a 500g weight; scales drift if moved frequently.
Game-changer: Convert every recipe to grams. Volume measurements cause failed cakes and dense breads. For sticky ingredients like honey, spray your bowl with non-stick oil first—nothing sticks, and cleanup vanishes.
Thermometer Placement That Prevents Dry Chicken
Insert probes into the thickest part of meat, staying 0.5 inches away from bones. For thin fish fillets, slide horizontally through the side. These temperatures are non-negotiable:
- Chicken: 165°F (74°C) at thickest point
- Beef medium-rare: Pull at 130°F (54°C), rests to 135°F (57°C)
- Fish: 145°F (63°C) instantly
Test it: Hold thermometer in ice water—should read 32°F (0°C). If not, recalibrate or replace. Never trust oven thermometers—they’re often 25°F off.
Stand Mixer Settings That Prevent Overworked Dough

Speed Mapping for Foolproof Results
Your mixer isn’t just “low” or “high”—speeds 1–10 each have precise purposes. Never exceed speed 2 for bread dough; high speeds overheat gluten in under 5 minutes. Follow this pro chart:
- Speeds 1–2: Folding ingredients, mixing cookie dough
- Speeds 3–4: Creaming butter/sugar for cakes
- Speeds 6–8: Whipping cream or egg whites
- Speed 2 only: Kneading pizza dough (8–10 minutes max)
Critical fix: If dough climbs the hook, stop immediately. Scrape down sides and add 1 tsp flour. Over-kneaded dough won’t rise properly.
Attachment Hacks You’re Not Using
Most home cooks own a stand mixer but misuse attachments. The flat beater is for cookies and batters—not bread. Switch to the dough hook for anything with 2+ cups flour. For pasta, roll through settings 1 to 8 dusting with semolina between passes.
Life-saver: When making meringue, chill the bowl and wire whip for 20 minutes first. You’ll get 50% more volume in half the time. Never use metal beaters—they scratch non-stick bowls.
Cast Iron Care That Builds Seasoning for Life
Seasoning Process That Actually Sticks
Factory coatings sabotage seasoning. Start by scrubbing new pans with hot water and steel wool until shiny metal shows. Dry thoroughly, then apply a whisper-thin layer of flaxseed oil—wipe until it looks dry. Bake upside-down at 450°F (230°C) for 1 hour. Cool in oven, then repeat 3–4 times.
Temperature zones matter:
– 250–300°F (120–150°C): Perfect for eggs (no sticking)
– 350–400°F (175–205°C): Sear steaks without smoke
– 450–500°F (230–260°C): Stir-fry territory
Cleaning Without Stripping Seasoning
Never soak cast iron—water penetration causes rust. Rinse while warm using a chain-mail scrubber for stuck bits. Dry on burner 2–3 minutes until water beads evaporate. While still warm, rub with ¼ tsp oil using a paper towel.
Myth busted: Light soap won’t hurt seasoning. But citrus cleaners will—avoid lemon-based degreasers. If rust appears, scrub with salt paste and re-season immediately.
Non-Stick Pan Safety That Prevents Toxic Fumes
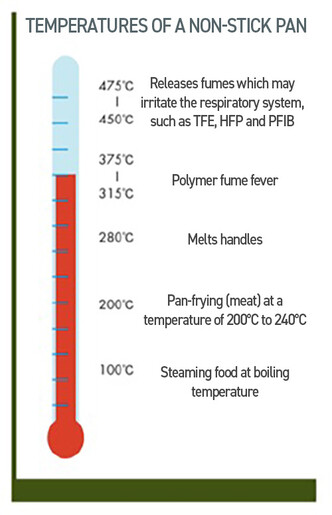
Temperature Limits That Save Your Health
Non-stick coatings release toxic fumes above 500°F (260°C)—reached in under 2 minutes on high heat. Preheat only on medium for maximum 2 minutes. Always use silicone, wood, or plastic utensils; metal scratches create permanent weak spots.
Replace now if: You see flaking, bubbling, or dark discoloration. Ingesting PTFE particles risks respiratory issues. With gentle care, quality pans last 3–5 years—not months.
Grating Without Blood Loss
Box Grater Face Functions Decoded
Your grater isn’t just for cheese—each side has a purpose:
– Coarse holes: Potatoes for hash browns (soaks up butter)
– Medium holes: Zucchini for fritters (perfect moisture release)
– Fine holes: Nutmeg or citrus zest (flavor bombs)
– Slicing side: Paper-thin cucumbers for salads
Pro hack: Spray grater with non-stick oil before use. Rinse immediately—dried cheese becomes cement within 10 minutes. Never use the fine side for hard cheese; it clogs instantly.
Y-Peeler Technique for Zero Waste
The 30° swivel blade contours around curves without wrist strain. Hold produce at waist height, peel downward in long strokes. Built-in julienne teeth create 1 mm strips for stir-fries—no extra knife work.
Critical: Stop when you hit pith on citrus. White membrane adds bitterness. For tomatoes, blanch first to slip skins cleanly.
2-Minute Maintenance That Prevents Tool Death
Post-Use Routine That Saves Hours
Rinse protein residue first—egg and dairy harden fast. Wash knives individually with blade facing away, dry immediately. Stand wooden spoons vertically to air-dry; never soak over 5 minutes.
Weekly fix: Apply food-grade mineral oil to wooden handles monthly. For stainless steel, use Bar Keepers Friend paste to remove heat tint—scrub with circular motions, rinse, dry.
Sharpening Schedule That Keeps Edges Razor-Sharp
Hone knives 15–20 times per side at 20° angle before each use—this realigns the edge. Sharpen quarterly using 1000-grit stone (sharpening) followed by 6000-grit (polishing). Test by slicing paper: clean cuts mean sharp; catching means it’s time to sharpen.
Pro check: Run your thumb perpendicular to the edge—not along it. If it grabs slightly, the burr is gone and it’s sharp.
Master these techniques and your tools will last decades, not seasons. A properly gripped knife at the right angle prevents 90% of kitchen cuts. Clean cast iron while warm and it won’t rust. Measure by weight, not volume, and your cakes will rise perfectly. Stop fighting your tools—start commanding them. Your next meal is counting on it.

