
Your new Toshiba rice cooker promises perfect rice with the press of a button, but those first attempts can feel overwhelming. Between the cryptic symbols on the control panel and the fear of crunchy centers or mushy disasters, many home cooks stick to stovetop methods despite owning this sophisticated appliance.
This guide transforms your Toshiba from intimidating gadget to kitchen MVP. You’ll master everything from basic white rice to advanced steaming techniques, discover model-specific tricks, and troubleshoot like a pro—all while avoiding common pitfalls that ruin dinner. Whether you own the RC-10NMF or RC-18NMF model, these steps work for any Toshiba rice cooker.
Unbox and Setup Your Cooker Properly
Remove All Packaging Safely
Tear away every piece of plastic film—yes, even the sneaky ones under the inner pot rim. Wash the non-stick pot, rice paddle, and measuring cup in warm, soapy water before first use. Wipe the main body with a barely damp cloth, steering clear of electrical connections. Never submerge the main unit in water—this damages the heating element.
Identify Key Components Fast
• Inner pot: Non-stick aluminum with water level markings
• Steam vent cap: Pops off for cleaning (don’t lose it!)
• Condensation collector: Small plastic cup clips to side
• Inner lid: Detachable for thorough cleaning
• Measuring cup: 180ml capacity—never substitute with regular cups
Position for Success
Place your cooker on a heat-resistant surface with 10cm clearance on all sides. Avoid cramped corners where steam can damage cabinets. The cord should reach the outlet without stretching across walkways. Critical tip: Ensure the unit sits perfectly level—uneven surfaces cause inconsistent cooking.
Measure Rice Like a Pro
Master the Measuring Cup
Use only the provided cup—it’s calibrated to the pot’s markings. One cup yields two cups cooked rice. For families of four, start with 2-3 cups dry rice. Never eyeball measurements—Toshiba’s sensors rely on precise ratios.
Rinse Rice Correctly
- Measure rice into separate bowl
- Add cold water, swirl gently 3 times
- Drain cloudy water
- Repeat until water runs mostly clear (2-3 rinses for white rice)
- Pro tip: For sushi rice, rinse 5-6 times until water is nearly clear
Water Level Cheat Sheet
• White rice: Fill to matching number line
• Brown rice: Add 20% more water than line indicates
• Jasmine/Basmati: Use 15% less water
• Sushi rice: Fill 5mm below indicated line
Program Perfect Rice Every Time
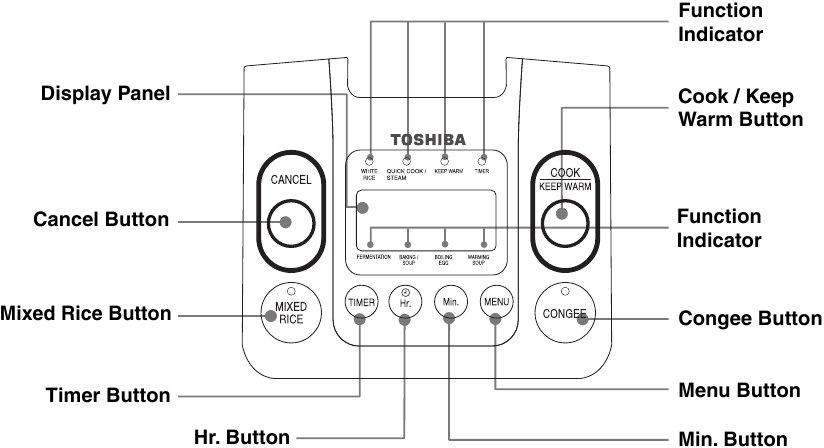
Navigate Control Panel Basics
Most Toshiba models share these functions:
– Menu: Cycles through programs (press repeatedly)
– Cook/Start: Begins selected program
– Keep Warm: Maintains temperature after cooking
– Timer: Sets delayed start (up to 24 hours)
– Cancel: Stops current operation
Choose Your Program Wisely
White Rice: 45-55 minutes total (includes steaming)
Quick Cook: 30-35 minutes—slightly firmer texture
Brown Rice: 70-90 minutes with automatic pre-soak
Sushi Rice: 50 minutes, produces firmer grains
Porridge: 60 minutes for creamy consistency
Set Delay Timer Safely
- Set current time using Clock button
- Add rice and water to pot
- Select program
- Press Timer, adjust finish time with +/- buttons
- Warning: Never add dairy, eggs, or meat when using timer
Step-by-Step White Rice Method
Load and Lock Process
- Add rinsed rice to inner pot
- Fill water to matching cup line (e.g., “2” for 2 cups)
- Insert pot—should sit flat without wobbling
- Close lid until it clicks/locks
- Ensure steam vent faces away from cabinets
Start Cooking Sequence
- Select White Rice program
- Press Cook or Start
- Display shows countdown or cooking animation
- Listen for completion chime
- Crucial: Let rice rest 10-15 minutes before opening
Fluff and Serve
Open lid away from face (steam release). Gently fluff rice with paddle from bottom up. Serve immediately or switch to Keep Warm for up to 12 hours. Never leave rice in cooker longer than 12 hours—bacterial growth becomes a risk.
Fix Common Rice Disasters

Rescue Mushy Rice Fast
• Remove inner pot immediately
• Spread rice on baking sheet
• Fan for 5 minutes to release moisture
• Prevention: Reduce water by 2 tablespoons next time
Fix Undercooked Centers
- Add 2-3 tablespoons water
- Close lid, press Cook for 5-10 minutes
- Check every 5 minutes
- Pro move: Use Quick Cook setting for faster fix
Prevent Burnt Bottom Layer
• Always check non-stick coating for scratches
• Ensure proper water ratios
• Clean heating element monthly
• Red flag: Persistent burning indicates damaged coating
Daily Cleaning Routine
Post-Cooking Cleanup
- Unplug and cool 20 minutes
- Remove inner pot—wash with soft sponge
- Wipe interior with damp cloth (no soap)
- Pop off inner lid, wash separately
- Empty condensation collector
Weekly Deep Clean
Remove steam vent cap—soak in warm, soapy water 10 minutes. Clean sensor area (small metal disc in pot center) with soft cloth. Check rubber gasket for trapped food. Never use steel wool—this damages non-stick surfaces.
Steam Complete Meals
Multi-Level Cooking Setup
- Add 1.5 cups water to inner pot
- Place steam tray over water
- Arrange vegetables/proteins in single layer
- Close lid, select Steam function
- Set 15-20 minutes for vegetables, 25-30 for proteins
Timing Tricks
Add ingredients to steam tray when rice has 15 minutes remaining. This synchronizes completion perfectly. Use foil packets for seasoned fish or marinated vegetables to prevent flavor transfer.
Troubleshoot Like a Technician

Decode Error Messages
E01/E02: Temperature sensor error—unplug 30 minutes, reseat pot
E03: Overheating—check ventilation, reduce rice quantity
E04: Lid sensor—ensure proper closure, clean locking mechanism
E05: Internal failure—contact customer service
Performance Problems Solved
Inconsistent results: Verify cooker sits level, check voltage supply
Extended cook times: Never open lid during cooking, ensure proper ratios
Keep-warm failures: Check if auto-keep-warm is disabled in settings
Safety Rules That Matter
Prevent Accidents
• Never operate without inner pot
• Keep 30cm from cabinet edges
• Use handles—surfaces stay hot 30+ minutes after cooking
• Unplug when cleaning or storing
Food Safety Essentials
• Cool rice within 1 hour for storage
• Refrigerate up to 4 days in airtight containers
• Freeze portions in freezer bags up to 1 month
• Danger zone: Discard rice left at room temperature 2+ hours
Warranty and Support Guide
Register within 30 days at Toshiba website using model number (found on bottom label). Standard warranty covers 1 year manufacturing defects. Save receipt and warranty card—required for service.
For issues beyond basic troubleshooting, contact Toshiba customer service with model number and purchase date. Replacement parts available online: inner pots, paddles, steam trays. Never attempt internal repairs—this voids your warranty.
Master these fundamentals and your Toshiba transforms from intimidating gadget to reliable dinner companion. Start with perfect white rice, then explore brown rice, steaming, and advanced programs. Within weeks, you’ll wonder how you ever managed without it. Remember: proper rice-to-water ratios, complete cleaning after each use, and understanding error codes are your keys to consistent results. Your perfect rice journey begins with a single press of the Cook button—now go make that flawless bowl of steaming grains you’ve been craving.

